Showing posts with label jersey. Show all posts

Friday, 20 August 2021

Building Eloisa and Adrienne

Three new makes for the price (blog post) of one. This skirt and two tops were made in the last few weeks, and bring my Whole 30 fabric usage to 7.5 metres. 

This skirt is one I've been meaning to make. I've had both the fabric and the pattern for at least a couple of years. The fabric was bought at Pitt Trading when they still had a physical store, and is a wool twill.

The skirt is fairly simple in design. It's a 1933 skirt from the McCall's Archive Collection. What makes it stand out are the overlapping triangular yoke pieces and lowered box pleats, both accentuated with topstitching. It also has a raised waistband which sits just above the natural waist. The wool twill has a good body to it, so it holds the shape of the pleats very well.

I raised the hem by about an inch to make it a bit  more modern and wearable. It's still very much a 1930's skirt but in a way that feels vintage without becoming costumey. The topstitching at the corners and top of the pleats isn't quite perfectly aligned, but the lines in a grey just slightly darker look great.

The first top is an adaptation of the Eloisa pattern from Named Clothing's new Building the Pattern book. The book's six basic patterns each have multiple variations to play around with. For this top I used the upper front, back and lower front 1 each extended approximately 10cm, the puff sleeve and the neckband. The top was still slightly too short so I added a hem band which I don't entirely like the look of, but if I wear it tucked in like with this skirt it won't be seen. The batwing shape of the top looks nice tucked into a waistband.


The fabric is a charcoal merino jersey from The Fabric Store. It's lightweight with tiny textural pindot perforations, but the pindots do not make it seethrough. This top was sewn up entirely with my overlocker with the exception of the channels for inserting the elastic at the cuffs. The Fabric Store's merino is always lovely to work with and this was no exception. It moved through the machine smoothly, and the curved front yoke seam presses into shape easily giving a nice curved line. 

The second top is the Friday Pattern Company Adrienne Blouse. The fabric is a leopard print rayon jersey from Spotlight. As with the first I sewed it up almost entirely using my overlocker. However unlike the merino this fabric was not the most cooperative. It is a very soft and almost slinky fabric which makes it lovely to wear but also very slippy to work with. It was not always easy to get it to move neatly through the machine as it would slip to the left away from the blades. I had to hold the fabric at an angle to compensate for its movement.

The pattern is a very quick and easy make, and probably would be quicker and easier with a slightly more structured fabric. The hem is a bit wonky because it wouldn't go neatly through the overlocker and didn't even out even with pressing so the twin stitched hem isn't quite straight to compensate. If I make it again I'll probably slightly shorten the front neckband so that it sits flatter against the body. But the top itself, with its elasticated cuffs and shoulders, is a beautiful shape.

Overall, I'm very happy with all three of these garments. They each have little imperfections but they've turned out really well.


Sunday, 15 March 2020

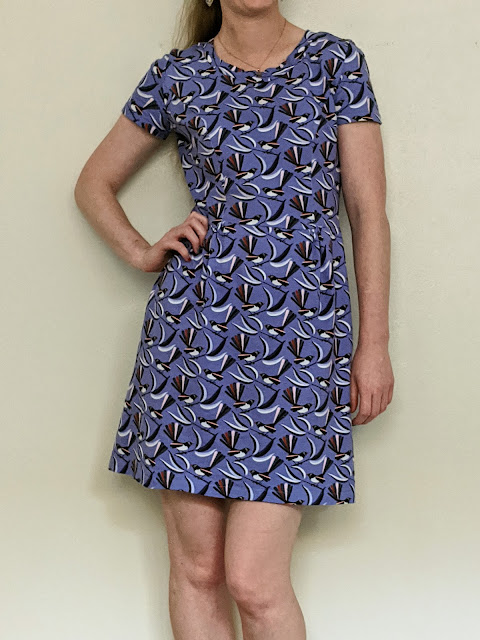
Wagtail Dress


It's been a while since I last blogged, but it's not because I haven't sewn. I made this dress back in August and have worn it a dozen or more times since. It was even photographed in December, just waiting for me to get around to writing about it on here.


The fabric is a Jocelyn Proust design from Spotlight, with a Willy Wagtail print. Jocelyn Proust makes great fabrics, mostly with Australian flora and fauna prints. The pattern is Vogue 9199. It's a Very Easy Vogue pattern, and I don't think I've made one before. I was looking for a simple knit dress pattern and this was what I could find. I almost dismissed it because the illustration on the front isn't great, but I was wanting a pattern to make a dress to take on holiday so had to go with what was available.


Because the print is directional it turned out I didn't have enough fabric to make the dress exactly as it is in the packet - the pieces were slightly too wide and the fabric slightly too narrow, and the print wouldn't work with some upside down birds. So I decided to cut the bodice half using the pattern and then use the leftover fabric to do a simple rectangle skirt. It wasn't enough to be able to do even gathers around the entire waistline, so I just did gathers at the four princess seams - two at the front and two at the back.


The fabric is lovely to sew with. It's a relatively thick jersey with moderate stretch that retains its shape well but isn't too hot to wear. It goes through the machine smoothly, and has kept its colour and stretch through multiple washes (the benefit of not writing a post until six months after finishing a make is I can review how it holds up in real life). 


 The pattern is a slightly looser fit than I had originally planned, but I do still like it. I think it works better with the rectangle skirt than it would with the full length princess seams as it gives it that slight bit more shape. But I really like the neckline and the sleeve shape and length. A good cap sleeve that is fitted but still allows movement is often hard to find in sewing patterns - too many are restrictively tight or far too long but these are just right.


Given I've worn this dress many times I'm obviously happy with the outcome. It's a comfortable, easy to wear dress, and the print is fantastic. I'm not sure if I'll make the pattern itself again, but might use it as the basis for making t-shirts, removing the princess seams. At the very least I will use the sleeve pieces in the future.


Thursday, 23 May 2019

Linen Legs


And a third Me Made May post! I made these trousers in the summer to be a lightweight pair to wear to work on hot days. But they are still getting wears little more than a week before winter because the temperature hasn't cooled down yet. They're soft and light and very easy to wear, work appropriate but not overly formal. The top was also made a few months ago, mostly to wear to work but also as a step above casual.


I'm pretty sure the fabric for the trousers is a linen/cotton blend. I bought it as a remnant from an op shop for $2 and there was no tag or detail, but it feels and looks like linen but without so much creasing. I did a burn test and it turned to grey ash, so it is either cotton or linen or a combination. Luckily because it isn't pure linen they don't crush too much, but they do show some creases by the end of the day.


The pattern is Simplicity 8243, a 1940s blouse and trouser pattern described as 'sportswear'. While this is my first time making the trousers I have used the pattern before, making the blouse as my Liberty Blouse. They are a vintage pattern but they don't look costumey. The line drawings on the pattern envelope make the trousers look very loose and wide-legged, but they are actually fairly fitted from the waist to the hips. I noticed the same thing when I made the blouse, the 1940s illustrations are more exaggerated than the final product. 


These are very simple trousers, wide, straight legged, with small pleats at the front. The pockets are stitched closely in to the side which holds them a bit too tight, unfortunately as with so many women's patterns they are also on the small side. The trousers have a centre back invisible zipper and a hook and bar at the waistband. The zipper is an invisible zipper, but I didn't have an invisible zipper foot so it isn't the best insertion, but at least being charcoal in colour it doesn't stand out too badly. Because the fabric is a linen blend all the seams are overlocked to prevent fraying.


The top is the Tonic Tee from SBCC Patterns, made in a floral lycra jersey I got last year from a Spoolettes fabric swap. I'ts a very soft yellow-cream with a touch of pink, with small floral and leaf print. I made the extra small, which was the second smallest size. I chose that size as it's just a little looser which works well for a top that can be worn for work. Because it's slightly looser it looks better when tucked into something with a fitted waist.


 I've been wearing this top and trousers since I made them but only photographed them this morning. Me Made May has been good for getting me to get around to post my backlog of makes, as I document what I'm wearing each day. Whether I keep this pace up after the end of the month is a different question!


Thursday, 2 May 2019

Drifting Wolf


Me Made May time! My pledge, as the last few years, is to wear me mades every day this month. And I also plan to get back on track with blogging by posting anything I wear that I haven't yet posted. To start with is my newest make, finished just yesterday.


Both the top and pants are from Papercut Patterns. I've made quite a few of their patterns and really like them. For me, I find there are very few adjustments I need to make, and the instructions tend to be fairly simple and clear.


The pants are the Peter and the Wolf pattern, which is now sadly out of print. I've had the pattern for a few years after picking it up for $10 at The Fabric Store. However, pants are daunting to make, and these pants have what looks like complicated piecing so I had put them to the side as too hard for now. But pants are the one clothing item where I still own a lot of store bought clothes, so I'm trying to make a concerted effort to replace them with my own creations.


The legs have two front and back pieces, angled pockets, front insets, back yoke, a waistband and even facings for the curved hems. This number of different parts is honestly huge for a pair of pants. I really shouldn't have been so daunted, because this pattern was amazingly straightforward.


The fabric is a lovely mid-weight mid-stretch cotton sateen with a moderate sheen from The Fabric Store. The pattern envelope version is made in a neutral grey with satin for the pockets, yoke and front insets so they stand out. As these are pants for work I didn't want to do something too out there, so opted to use the reverse side of the fabric. Rather than showing up as different colours, it just works to highlight the construction of the pants. Each seam is also topstitched, which also helps to show off the creative shape of the pattern.


These pants weren't hard to sew. I found the pattern stepped out the process for making very well, and the legs having centre and side pattern pieces suits the skinny fit. I didn't do any adjustments, but I'd think it wouldn't be too hard to make any changes needed to fix the fit. Hemming the pants was a bit harder, as the point at the front is difficult to make sharp. Because my thread was black and the fabric is black I wanted to be careful not to cut through the stitching line, so when I turned the facings inside I wasn't able to get the point as pointy they should be, but the shape is pretty close to what it's meant to be.


The top is adapted from the bodice of the Adrift Dress. I've made the dress before and found it a bit short, particularly in the bodice, so I lengthened it for this top. As I've made the dress before and it's a simple shape. The fabric is a bamboo jersey from Tessuti in a rich royal blue. It's beautifully soft, and was very easy to sew up.


I'm extremely happy with both these makes. I've already been wearing the top for a few months, and the pants are certain to be a favourite and a pattern to make again.


Monday, 4 February 2019

Rainbow Brite Inari Dress


My second make for 2019 is the Inari Tee Dress by Named Patterns. I'm a few years late on making the Inari compared to much of the sewing community, but bought the pattern when Named had a pattern sale mid last year. It was winter here when I bought it, but now that it's summer I decided it was time to make it.


The fabric, from The Fabric Store, is a beautiful velvety plush jersey. It's a Marc Jacobs fabric, rainbow stripes on a warm grey background. There's also a very fine silver stripe on either side of the grey stripe, but it doesn't show up as clearly in pictures. The fabric reminded me of 80s kids character Rainbow Brite, hence the name of the dress.


The fabric is wonderfully soft and sewed up quite easily, apart from the huge amounts of fluff. Especially when overlocking the seams. There aren't all that many seams to this dress but I still needed to clean my overlocker twice to get rid of all the fluff around the knives and needles. Even with the fluff, the fabric did not catch or slip on either my normal machine or my overlocker.


I did my best to pattern match at the side seams, but jerseys never quite cut out perfectly evenly so the stripes are a tiny bit off under the arms. The good thing with a knit fabric is that it's easy to slightly stretch one side so that it gets back in line with the other, so I made sure the bottom of each side seam matched and adjusted up the the underarm seam, so the more visible parts of the side seam have pretty much matched stripes and the parts that aren't seen unless I raise my arms are maybe a few millimetres off.


The Inari has a bit of an unusual shape - it's quite quite fitted at the neckline, sleeves and bust, almost tent-like through the waist and more fitted again at the hips and legs. The split side seams and shorter front hemline accentuate the more fitted bottom of the dress. This gives it a feel of being casual but not lazy, effortless rather than couldn't be bothered. I wasn't completely sure of the sleeves when I first finished the dress because the underarm is longer than the outer cap, but I'm starting to like it more now.


Because the jersey is effectively a velvet it is relatively warm. Even with the loose fit of the Inari, this summer of record-breaking temperatures has often been too hot for the dress. But on days where the temperature is in the mid-20s rather than the high-30s this dress is great.


Tuesday, 31 July 2018

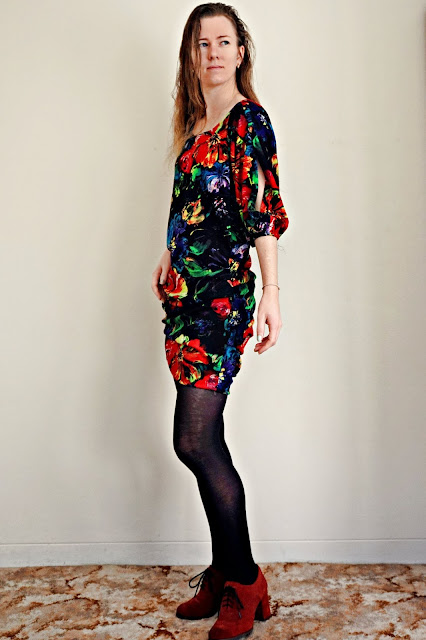
Floral Vampire Batwing Dress


I'm often a bit lazy with my sewing. I don't like changing my needle, so if I've put in a jersey needle I generally try and make a few things before changing the needle again. So when I made the side drape merino dress I went through my stash to look at other stretch fabrics I could sew up. One thing I pulled out was a heavy black and floral jersey. The pattern is another one from Drape Drape 2, the two-piece open batwing dress.


The fabric was from a Sydney Spoolettes fabric swap last year. I picked it up and put it down a few times, because I wasn't sure what I would do with it. It was a very large piece (1.5m by over 3m), a fairly thick jersey and quite a large print, so it needed a winter pattern that was big but wouldn't be overwhelming with the print.


Given I'd only just finished making something from Drape Drape 2, I'd already been looking through that book and it was fresh in my mind. It has two different batwing dress patterns, both of which I liked, but the other one looked like it needed a lighter weight jersey so I chose this one.


The pattern pieces for this dress are incredibly large and strangely shaped. Tracing them out was complicated, as there are multiple parts to join together, and it being a Japanese pattern there are many different patterns overlaid on each other on the page it can be hard to identify the correct lines. And the pieces couldn't even fit on a single piece of pattern paper, so there was lots of cutting odd bits off the side and attaching them on edges until I had what looked like a bat in flight.


Surprisingly, when I laid the pattern pieces out on the fabric, there was actually a fair bit of fabric left over. Yet the main piece, which makes up the front, sleeves, and upper back of the dress, was taller than me - not including the sleeves. The pattern pieces aren't only large, they have some strange angles which go in to making the gathered skirt, so it requires a lot of pins to cut out.


There are only a handful of steps to sew this pattern up and turn it into a mid-thigh length dress. The main thing to do is gather up the sides, which transforms a person-high piece of fabric into a skirt. The pleats on each side are sewn first, then the centre back seam, and the lower back piece is joined on. For the sleeves, the cuffs have pleats in them but were still a bit too loose and looked overwhelming with the large amount of fabric, so I added an extra pleat to make them slightly fitted at the cuffs.


I finished the dress a couple of weeks ago but haven't worn it yet. It's thick jersey, but the open sleeves mean it isn't really warm, and it sits somewhere between casual and dressy so I need to work out what it would suit. But I do like it and did enjoy making it.


Tuesday, 20 June 2017

Merino Jersey Dress


The pattern is from the burdastyle magazine of June last year. It is pattern 101 C, jersey mini dress. Being a northern hemisphere magazine the dress is meant to be a summer dress, but it's winter down here so my version is a cool weather version.


The fabric is a midweight merino from The Fabric Store. The fabric store has an amazing range of New Zealand merino, but I've been quite daunted about using merino because it's high quality and pretty expensive so I didn't want to ruin it. But the colours of this fabric were just too much to resist. The various blues are very vibrant and stood out from the rest in the store, so it came home with me.


In the end, the merino was extremely easy to sew with. It was very easy to cut and glided through my machine. There are only four pieces to it, two of the bodice/sleeves and two of the skirt/body. I lengthened both the sleeves and the skirt to make it a bit more cold weather appropriate. I also cut the front neckline just slightly more scooped so that I can identify the front from the back. I didn't want to make it too long because that might be too heavy and frumpy, but I think the length I chose works about right.


The dress is very comfortable to wear. It's a bit secret pyjamas, feeling much lazier and cosier than it looks. It's very easy to just throw on and wear at home, but a nice enough fabric and good enough cut that it's more than appropriate to wear out and about.


 I'm very happy with this dress. And I don't think I'll be so scared of using merino again, it really was a pleasure to use and it's such a nice fabric to wear.