Showing posts with label viyella. Show all posts

Sunday, 13 June 2021

Amber and the Swing Coat


 It's been a long time since my last post. So much so that I've gone from a quintessential summer item to very wintery makes with nothing in between.

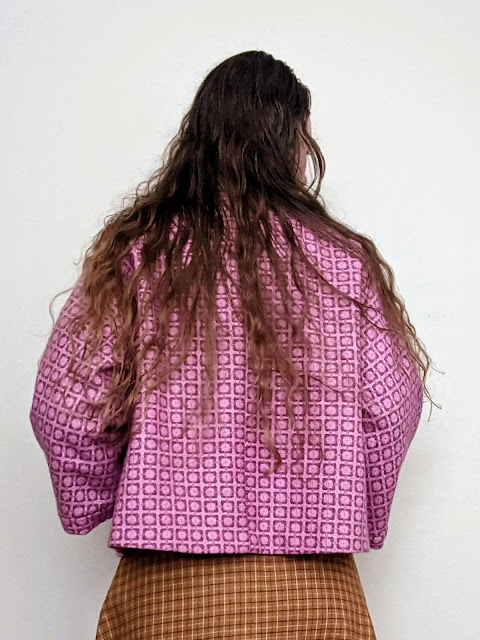
The jacket pattern is Simplicity 1319, which appears to now be out of print. It is a 1950s short swing coat with shawl collar. I made the longer length, although it still hits near the top of the hip. The fabric is a beautiful vintage wool I picked up at a Sydney Spoolettes fabric swap a few years back. It's very warm and has good structure and was relatively easy to work with. The lining is basic lightweight voile-weight cotton from my stash in pale baby pink. 

Overall, this pattern was reasonably good with only a few difficult elements. The way the shawl collar is constructed is designed to create pockets, with all the seams hidden inside. Both the lining and self fabric are folded over here, meaning there are four layers of fabric and the instructions for which pieces to fold which way were a bit confusing. I sewed one side what I thought was the right way but when I tried to turn it back the right way around it was twisted, so I had to unpick it, recheck and redo it to get it right. 

The biggest problem was with the length of the sleeves on the lining pieces. The instructions say the sleeve lining should be stitched to the seam allowance where the sleeve joins the cuff with the cuff then folded back in half and stitched down. But the sleeves of the lining piece are at least an inch too short to reach. Fortunately the cuffs are wide enough to fold in and stitch to the lining while still having part of the cuff visible, but it does mean the sleeves are a bit shorter. The pattern envelope shows the sleeves as being this slightly shorter length so I'm not sure if the problem was the illustration or the pattern pieces, but either way it didn't quite work how it was supposed to. 

The dress is the Named Patterns Amber Pinafore. The fabric is a viyella from The Sewing Basket in West Ryde, picked up on another Spoolettes outing. I've used viyella before and it's always been very soft, but this one is slightly stiffer and has a tendency to crease so requires a bit more ironing and effort to keep neat. I actually started making this dress a couple of years ago and never finished it, but pulled it out a few months back.

The waistline sits at just above the natural waist, with the deep v-necked bodice. The bodice pieces are all fully self-lined, but I left the skirt unlined as I didn't have enough of the fabric and didn't want to use a different fabric and possibly change the drape.

The back of the dress is racerback shape and does up with a buckle, but the fabric is prone to fraying so I only installed one eyelet. Only one is needed as it needs to be in the right place for the dress to sit properly and any more eyelets would just be cosmetic. Still, I would have liked to include a few more if the fabric was more stable and I was confident it wouldn't come apart.


The bodice being fully lined meant I was able to play around with how I wanted the check to sit, whether to have the centre front on the straight grain or on the bias. I decided the straight grain looked better, with the horizontal lines matching up more evenly. It also matches well to the skirt, which is approximately a half circle with the lines at the centre of the skirt matching the centre of the bodice and then curving with the bust seams.


I like the shape of the bodice pieces, but they do gape a bit at the sides. I initially thought I might have stitched them in the wrong way around (with the side edges in the centre front and vice versa), but when I tried changing them over the gaped more so I changed them back. I think if I trimmed the side edges to be shorter they would sit flatter, but it's a relatively minor issue and I decided it would take too much unstitching to be worth it to fix.


Overall I'm happy with both of these makes, despite a couple of small setbacks. I've worn the jacket several times already and found it a very good weight for transseasonal Sydney. The dress is something that can probably get wear through much of the year. 


Sunday, 4 August 2019

The Meridian


This is the Meridian Dress from Papercut Patterns. I've made quite a few patterns from Papercut and always find them well designed and clear to follow. The styles are relatively straightforward but often have nice design details that make them a little more interesting. The shape of this dress is pretty simple but the shaping the waist ties give to the bodice a lovely shape.


The fabric is a vintage Viyella I was given by a friend of my parents. Her aunt had a large fabric collection, and I was given this Viyella and a few pieces of raw Thai silk from the 1940s/50s. I have no ideas for the silk, but this Viyella obviously had to be a winter dress. Luckily it's the right time of year here to make a long sleeve wool dress. Being Viyella it's beautifully soft, light and warm.


This dress is the shorter length version of the Meridian Dress with long sleeves. I didn't make any adjustments in making it, and made a straight size XXS. The dress is pretty straightforward to sew. The front bodice pieces are a little confusing, and there was initially a slight gap when connecting the bodice and skirt pieces together. Because the bodice has a centre front seam as well as the ties it is a bit awkward joining it to the skirt. What I found worked was following the pattern and the stitching up the small gap the was left in the centre front. Given that the ties wrap across it also doesn't matter if the stitching is perfect because it will be hidden anyway when worn.


Viyella tends to fray so all the seams are overlocked, including inside the waist ties. The back is closed with a zipper and button. The button is a self cover button made with one of the leftover scraps. I bought an invisible zipper foot for my Janome machine so this invisible zipper is properly sewn in. I was even able to match the print up almost as close to perfect as possible. I had been pretty careful with the layout of the pattern on the fabric to try and make sure it would match on the back as that's the most visible seam, and the bodice back worked out really well. The bodie front is not evenly matched, but given the wrap ties it isn't really noticeable.


The dress sits at just above the natural waistline on me. I find Papercut's patterns are often slightly short in the waist. I'm 5'6" but longwaisted so with the skirt this pattern is still the correct length but I have found a few of their patterns in the past ended up a little shorter than I wanted. However being a narrow build, for this pattern the ties wrapping around at a low empire line probably works better than if they sat at my natural waist.


I made this dress back in June and photographed it in early July. It's been worn a few times in the last two months and has gotten many compliments. It's a very easy dress to wear - really the only thing slightly awkward with this dress is ironing the ties without leaving creases in the bodice. But overall it's a simple thing to throw on and a relatively easy sew for something that looks fairly elegant and much fancier than it is to make, which is generally my favourite type of pattern.


Thursday, 31 May 2018

Happy When It Rains Dress


This is the Happy When It Rains dress, inspired by Shirley Manson of Garbage. It also started raining here in Sydney after a dry spell as I was finishing making this, so the name seemed to fit. It even rained as I walked home this evening.


The fabric is a piece of Viyella a found at a local op shop for $2. Viyella a blend of merino wool and cotton that is soft, light and still fairly warm. It's no longer made so can only be found second hand. This means it's also often hard to find and not cheap, so finding some for so little I had to snap it up.


The piece was quite small - 1.3m by about 90cm - so I was limited in what I could make. I looked through my patterns and found this one. I've made this before and love the shift dress shape with the added detail of the bodice seam lines. It's a vintage pattern, which also seemed appropriate for the fabric. My copy is the original 1960s pattern, but it's been rereleased as Simplicity 3833.


The seam lines on the empire line bodice are definitely the highlight of the dress, but also require patience to do. Connecting the bodice to the skirt can't be done all in one go - it requires at least three steps. I sewed each side seam and bust dart, then sewed the curved front from seam line to seam line. It was a bit difficult to sew without it catching, and easier to start from the side and then sew to the centre, so that seam was also sewn in two stages.


The rest of the dress was very straightforward to put together, but I did get to use my new overlocker to finish off the seams. A few weeks ago Aldi had craft and sewing supplies as their special buys, including a Janome overlocker for $199. I've been daunted by overlockers, but it was actualy very easy to use. It did help that the machine was already threaded with small spools so I haven't had to work that out yet, but the actual sewing went pretty well.


The hem and facings are all finished by hand. Because the fabric is mottled rather than a flat colour, trying to match thread was going to be tricky. But by finishing by hand I didn't have to worry about that and was able to give the dress a clean finish.


I really like the shape of this dress. The empire line bodice is closely fitted, but the rest of the dress skims out from there making it very easy to wear.  There's also a long sleeved version which I would have made if there was enough fabric, so I guess that will have to be what I do next time.