Showing posts with label named patterns. Show all posts

Sunday, 13 June 2021

Amber and the Swing Coat


 It's been a long time since my last post. So much so that I've gone from a quintessential summer item to very wintery makes with nothing in between.

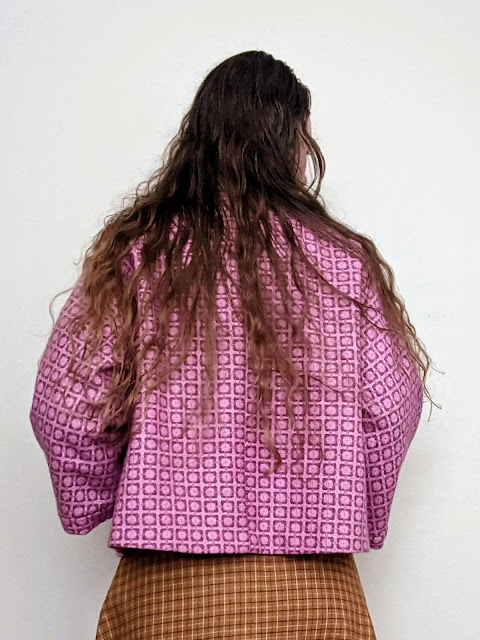
The jacket pattern is Simplicity 1319, which appears to now be out of print. It is a 1950s short swing coat with shawl collar. I made the longer length, although it still hits near the top of the hip. The fabric is a beautiful vintage wool I picked up at a Sydney Spoolettes fabric swap a few years back. It's very warm and has good structure and was relatively easy to work with. The lining is basic lightweight voile-weight cotton from my stash in pale baby pink. 

Overall, this pattern was reasonably good with only a few difficult elements. The way the shawl collar is constructed is designed to create pockets, with all the seams hidden inside. Both the lining and self fabric are folded over here, meaning there are four layers of fabric and the instructions for which pieces to fold which way were a bit confusing. I sewed one side what I thought was the right way but when I tried to turn it back the right way around it was twisted, so I had to unpick it, recheck and redo it to get it right. 

The biggest problem was with the length of the sleeves on the lining pieces. The instructions say the sleeve lining should be stitched to the seam allowance where the sleeve joins the cuff with the cuff then folded back in half and stitched down. But the sleeves of the lining piece are at least an inch too short to reach. Fortunately the cuffs are wide enough to fold in and stitch to the lining while still having part of the cuff visible, but it does mean the sleeves are a bit shorter. The pattern envelope shows the sleeves as being this slightly shorter length so I'm not sure if the problem was the illustration or the pattern pieces, but either way it didn't quite work how it was supposed to. 

The dress is the Named Patterns Amber Pinafore. The fabric is a viyella from The Sewing Basket in West Ryde, picked up on another Spoolettes outing. I've used viyella before and it's always been very soft, but this one is slightly stiffer and has a tendency to crease so requires a bit more ironing and effort to keep neat. I actually started making this dress a couple of years ago and never finished it, but pulled it out a few months back.

The waistline sits at just above the natural waist, with the deep v-necked bodice. The bodice pieces are all fully self-lined, but I left the skirt unlined as I didn't have enough of the fabric and didn't want to use a different fabric and possibly change the drape.

The back of the dress is racerback shape and does up with a buckle, but the fabric is prone to fraying so I only installed one eyelet. Only one is needed as it needs to be in the right place for the dress to sit properly and any more eyelets would just be cosmetic. Still, I would have liked to include a few more if the fabric was more stable and I was confident it wouldn't come apart.


The bodice being fully lined meant I was able to play around with how I wanted the check to sit, whether to have the centre front on the straight grain or on the bias. I decided the straight grain looked better, with the horizontal lines matching up more evenly. It also matches well to the skirt, which is approximately a half circle with the lines at the centre of the skirt matching the centre of the bodice and then curving with the bust seams.


I like the shape of the bodice pieces, but they do gape a bit at the sides. I initially thought I might have stitched them in the wrong way around (with the side edges in the centre front and vice versa), but when I tried changing them over the gaped more so I changed them back. I think if I trimmed the side edges to be shorter they would sit flatter, but it's a relatively minor issue and I decided it would take too much unstitching to be worth it to fix.


Overall I'm happy with both of these makes, despite a couple of small setbacks. I've worn the jacket several times already and found it a very good weight for transseasonal Sydney. The dress is something that can probably get wear through much of the year. 


Monday, 3 August 2020

Ruska Jumper Dress


Another new make that's been in my wardrobe getting worn for more than a month. It has already been getting a reasonable amount of wear, and is comfortable for working from home while still being both relaxed and presentable for video meetings. 


This is the Ruska Knot Dress from Named Patterns' book, Breaking the Pattern. It's a great pattern book, with lots of options for each pattern and some potential for mixing and matching across patterns. My version is the straight knot dress but with the longer sleeves. 


The dress has a double front. The under dress is fitted and cut in one piece, while the knot overlay is cut in two pieces, stitched together down the front until it reaches the ties. It's connected in together along the seams, which means taking care to ensure no layers slip out of place, especially when connecting the sleeves and neckband. 


The fabric is a jumper knit from My Hung Fabrics. It's a lovely baby pink and charcoal mix - it definitely looks more pink in reality than in the photographs. It's quite soft and stretchy, but the ribbed fabric holds its shape well enough to work for the pattern. It's reversible, so there's no worry about the "wrong" side showing on the knot section. 


Unfortunately the fabric was absolutely terrible to work with. It falls apart and frays very easily, which means it had to be overlocked. But at the same time all the bits of fluff coming off got caught in the overlocker, almost clogging it. A couple of times on the longer seams I had to use tweezers to remove pieces of  thread caught behind the bottom blade. Once I finished sewing the dress I completely opened both the sewing machine and overlocker up in order to give them a thorough cleanout.


This dress is very comfy and cosy while still looking put together, very much a secret pyjamas pattern. Especially made out of this knit, it really does feel like a giant fancy looking jumper. And a giant fancy looking jumper is always great to wear.


Monday, 4 February 2019

Rainbow Brite Inari Dress


My second make for 2019 is the Inari Tee Dress by Named Patterns. I'm a few years late on making the Inari compared to much of the sewing community, but bought the pattern when Named had a pattern sale mid last year. It was winter here when I bought it, but now that it's summer I decided it was time to make it.


The fabric, from The Fabric Store, is a beautiful velvety plush jersey. It's a Marc Jacobs fabric, rainbow stripes on a warm grey background. There's also a very fine silver stripe on either side of the grey stripe, but it doesn't show up as clearly in pictures. The fabric reminded me of 80s kids character Rainbow Brite, hence the name of the dress.


The fabric is wonderfully soft and sewed up quite easily, apart from the huge amounts of fluff. Especially when overlocking the seams. There aren't all that many seams to this dress but I still needed to clean my overlocker twice to get rid of all the fluff around the knives and needles. Even with the fluff, the fabric did not catch or slip on either my normal machine or my overlocker.


I did my best to pattern match at the side seams, but jerseys never quite cut out perfectly evenly so the stripes are a tiny bit off under the arms. The good thing with a knit fabric is that it's easy to slightly stretch one side so that it gets back in line with the other, so I made sure the bottom of each side seam matched and adjusted up the the underarm seam, so the more visible parts of the side seam have pretty much matched stripes and the parts that aren't seen unless I raise my arms are maybe a few millimetres off.


The Inari has a bit of an unusual shape - it's quite quite fitted at the neckline, sleeves and bust, almost tent-like through the waist and more fitted again at the hips and legs. The split side seams and shorter front hemline accentuate the more fitted bottom of the dress. This gives it a feel of being casual but not lazy, effortless rather than couldn't be bothered. I wasn't completely sure of the sleeves when I first finished the dress because the underarm is longer than the outer cap, but I'm starting to like it more now.


Because the jersey is effectively a velvet it is relatively warm. Even with the loose fit of the Inari, this summer of record-breaking temperatures has often been too hot for the dress. But on days where the temperature is in the mid-20s rather than the high-30s this dress is great.


Monday, 6 February 2017

Summer Sleepwear


It is hot.
This summer in Sydney (and a lot of Australia) has been ridiculous. We've had a record-equalling nine days over 35C - that's 95F for Americans - so far this summer and there's still almost a month left to go. It's too hot to do much sewing, or to wear too much. So light sleepwear is a must.


These two items are some of the few things I've made over the summer. Most of my old sleepwear is very much old and starting to fall apart. I also didn't have a summer robe for lazing at home during the holidays or on weekends when I don't feel like getting dressed just yet. So here are my Asaka Kimono and loose drape tank top nightie.


First up is the Asaka Kimono from Named Clothing. Named are a Finnish indie pattern brand who I know a lot of sewists have tried, but this was my first make. I actually bought the pattern during their pre-Christmas sale in 2015 (I bought 2 other patterns then too) but I only recently got around to making it.


The pattern is pretty straightforward without too many pieces. It does require a lot of fabric - and it isn't one where you can just lay the pieces like a jigsaw to save room. But none of the pieces are strange shapes, nor are there any awkward joins that need to be made. This pattern would be suitable for even fairly beginner sewists.


Because the fabric frays and isn't the greatest quality (although the print was too perfect a match for the pattern not to buy) I again did French seams. Of course I couldn't do French seams for the sleeves due to the vent, so instead I sewed those with a wider seam allowance and then rolled that under and topstitched it down.

I do think the tie belt is possibly a bit too long, which is my only complaint. Mine almost reaches the floor when untied, and that's after I managed to burn holes in one end and had to cut it shorter. Turns out the cheap $2 a metre fabric I bought at Spotlight is not friends with the iron, so this gown is just going to have to remain creased.


The nightie is the No. 13 Loose Drape Tank Top from Drape Drape. This pattern I have changed when I made it. The first and obvious change is in the fabric I used. As with most in the book, the pattern is designed for a knit fabric. However I'd bought metres of this black and white Deco-esque rose satin a few years back planning to make sleepwear. Seeing as I already had the fabric, I decided I might as well use it as I'd planned to.


The second change I made was to the pattern itself. The original in the book is much more draped at the side, down to the waist in the pictures in the book. I didn't want it to be that deep, so when I traced the pattern out I overlapped the two pattern pieces to narrow and raise it. The sides are still deep, but not so much that the nightie is about to fall off.


I didn't make any other modifications to this pattern, and like my Punto Drape Dress the pattern was incredibly easy to follow. It is made all in one piece, cut out on the fold and sewn up at the back, so it is very quick. It definitely taes twice as long to trace and cut the pattern out as it does to make it. It's a great pattern, and works in a woven just as well as it would in a knt. Again, recommended for sewists of all skill levels.


We've had a bit of a cool change come through this evening and tomorrow is going to be wet and a cool(!) 25 degrees, but the weekend is hotting up again, possibly to 40 (104F) on Sunday. So these lightweight sleepwear and lounging gown are going to come in handy for a few more weeks yet.