Showing posts with label top. Show all posts

Thursday, 2 May 2019

Drifting Wolf


Me Made May time! My pledge, as the last few years, is to wear me mades every day this month. And I also plan to get back on track with blogging by posting anything I wear that I haven't yet posted. To start with is my newest make, finished just yesterday.


Both the top and pants are from Papercut Patterns. I've made quite a few of their patterns and really like them. For me, I find there are very few adjustments I need to make, and the instructions tend to be fairly simple and clear.


The pants are the Peter and the Wolf pattern, which is now sadly out of print. I've had the pattern for a few years after picking it up for $10 at The Fabric Store. However, pants are daunting to make, and these pants have what looks like complicated piecing so I had put them to the side as too hard for now. But pants are the one clothing item where I still own a lot of store bought clothes, so I'm trying to make a concerted effort to replace them with my own creations.


The legs have two front and back pieces, angled pockets, front insets, back yoke, a waistband and even facings for the curved hems. This number of different parts is honestly huge for a pair of pants. I really shouldn't have been so daunted, because this pattern was amazingly straightforward.


The fabric is a lovely mid-weight mid-stretch cotton sateen with a moderate sheen from The Fabric Store. The pattern envelope version is made in a neutral grey with satin for the pockets, yoke and front insets so they stand out. As these are pants for work I didn't want to do something too out there, so opted to use the reverse side of the fabric. Rather than showing up as different colours, it just works to highlight the construction of the pants. Each seam is also topstitched, which also helps to show off the creative shape of the pattern.


These pants weren't hard to sew. I found the pattern stepped out the process for making very well, and the legs having centre and side pattern pieces suits the skinny fit. I didn't do any adjustments, but I'd think it wouldn't be too hard to make any changes needed to fix the fit. Hemming the pants was a bit harder, as the point at the front is difficult to make sharp. Because my thread was black and the fabric is black I wanted to be careful not to cut through the stitching line, so when I turned the facings inside I wasn't able to get the point as pointy they should be, but the shape is pretty close to what it's meant to be.


The top is adapted from the bodice of the Adrift Dress. I've made the dress before and found it a bit short, particularly in the bodice, so I lengthened it for this top. As I've made the dress before and it's a simple shape. The fabric is a bamboo jersey from Tessuti in a rich royal blue. It's beautifully soft, and was very easy to sew up.


I'm extremely happy with both these makes. I've already been wearing the top for a few months, and the pants are certain to be a favourite and a pattern to make again.


Saturday, 30 June 2018

Side Drape Merino Dress


Only 18 months ago I'd barely used merino and was daunted by the prospect; now I've sewn it a bunch of times and it's my favourite stretch fabric to use. It's soft and moves smoothly through the machine, and I've never had problems with it getting caught or skipping stitches. This dress and top are both in lovely merino from The Fabric Store.


The dress pattern is the one-piece side drape tank from Drape Drape 2. The pattern, as with many in the Drape Drape books, is a strange shape. This one is also very wide, and even though my piece of fabric was the size it called for it wasn't quite wide enough, so I had to fold it in slightly. This means the side drape is about an inch less than it should be, luckily not enough to make a noticeable difference to how the dress drapes.


Sewing the dress probably took less time than tracing and cutting out the pattern. The dress itself is all one piece, plus three strips to finish the neckline and armholes. It's sewn up very quickly, one shoulder seam, one full side seam, one half side seam, a hem and the finishings. The ease of sewing it matches its ease in wearing. The dress isn't fancy by any means, but it looks a step above casual. It sits in that secret pyjamas spot of being very easy and comfy but looking like you've put in more effort.


The skivvy was made back in February to take on holiday and was definitely useful in southern Patagonia. I didn'tuse a pattern for it,just traced out from some previous long sleeved tops I'd made. I thought about buying one because there are a few nice indie ones, especially from Papercut and Named Patterns, but I was making this fairly last minute and didn't feel I had the time to get either a paper pattern or print out and put together a PDF. It largely worked without a pattern, although the neck band is slightly tighter than ideal, but I can still get it over my head which is the main thing.


 The skivvyis actually black and charcoal stripe, but they're narrow stripes so it doesn't really show up in the photos. Both the dress and skivvy are very comfortable and versatile to wear, together or separately. The dress can probably get worn through most of the year given that it's sleeveless. The merino is warm when worn with a long sleeve top and tights, but it's also breathable so could be worn on its own.


Tuesday, 18 July 2017

Cosy Wool Poncho Jumper


This is a very cosy lazy top. It's from the December 2016 issue of Burdastyle magazine and is described as an oversized pullover. The pattern is somewhere between a poncho and a jumper or even a snuggie, but with an elasticated waist.

the fanric is a $12 a metre bright cream hacci knit (I believe that's what it's called, it looks like a knitted jumper) from My Hung in Hurstville and is suprisingly warm for its weight. It's 70% wool and 30% poly, and is warm but soft to the touch and not itchy like wool can sometimes be. It drapes well, but still has a bit of body.


This pattern uses a lot of fabric. There are only three pieces - two front and one back - but each piece is wide, with a very long funnel neck. The pieces are too wide to be able to lay side by side on folded fabric, so I had to buy 2 metres of fabric to fit the pieces on. Unfortunately that means there is a reasonable amount of fabric wastage, with so big but awkwardly shaped scraps.


In the magazine there were two different versions of this pattern: this short elastic waist version, and a longer tunic-style version which has a curved high-low hem. I decided to cut out the longer version out, figuring I could always shorten it if it didn't lookright long. While it was very cosy longer, it didn't look right in this fabric, especially with the large neck.  So I folded the top flat along the centre front seam and cut the hem level.

The pattern sews together very easily. It is pretty straightforward, with the centre, shoulder and side seams all just straight lines. The neck is folded under and then stitched which I  initially tried to do with a machine zigzag stitch, but it got caught into the bobbin thread. So instead it is hand stitched in place which took longer, but isn't visible. For the waistband I decided to sew the elastic in directly to the waistband rather than inserting it into the already sewn hem. It requires a bit more care, but ends up cleaner and neater. I made the sleeve openings about 15cm wide, so the top rises slightly if I lift my arms up, but the volume of the top means it largely stays in place.


This top is wonderfully comfortable, and is definitely going to get a lot of wear for many years. It's simple and a lazy wear but still looks put together, and although light, it's also warm. I think it's going to be a great addition to my winter wardrobe.


Wednesday, 29 March 2017

Faded Mosaic Top and Classic Grey Skirt


Two new makes today, a top and skirt to wear to work. Both are simple makes in classic styles, making them very wearable.


The top is the Betty Blouse which was in Simply Sewing magazine last July. I rarely buy sewing magazines, but I'd been looking for a non-button up short sleeved blouse pattern with no closures or complications. This pattern was pretty much exactly what I wanted. It's a simple woven blouse with just a front and back piece and pintucks.


The fabric is a viscose from Tessuti called Running Out Of Blue. The print is mosaic style and changes from peacock blue through to rust about every two feet. I hadn't realised the print changed colour when I picked the bolt up - I'd just liked the peacock blue - but when it was being rolled out to be cut I saw the rust colour emerge. This meant I had to decide how I was going to use the shifting colours in the blouse, basically which colour I wanted at the neckline and which at the hem. After holding it up against myself each way I decided the blue at the neckline was the way to go.


The fabric is beautiful with a lovely hand, but being a lightweight viscose it was a bit slippery to pin and cut out. Fortunately the print gave me handy lines to cut along to even out the hem and shoulders! The print was also very helpful for making sure my pintucks were nice and even - I could fold in the middle of the squares and stitch along the second outline and know that each pintuck would be exactly the same.


The skirt is an adjusted version of the straight skirt pattern in the Blouse Skirt and Pants Style Book. The fabric is a lightweight grey wool check from The Fabric Store, lined with some grey stretch woven cotton I'd bought for another project but found was the wrong weight. The zipper was stitched in by hand to try and keep it looking as neat as possible.


I used my French curve to slightly widen out from the waist to a more A-line shape. It was mostly an easy make, except that the two different fabrics do handle differently. I had measured them the same, but when I went to sew it up the shell was wider at the hem than the lining. To fix this I stitched in the side seams on the shell, It was still a little too wide when I sewed the hem, so I had to slightly fold it at the seams, but hopefully it isn't visible!


Because it's such a straightforward pattern and I'd used it once before I didn't look at the instructions, and so forgot that the pattern doesn't include seam or hem allowance. It didn't matter for the seam allowance given I'd already widened the skirt, but it did mean the hem was shorter than I initially planned. I had some fabric left and was going to put a flounce on for extra length, so I measured a curve, cut it out, and then realised I'd measured the outside rather than inside length of the curve, so the flounce was too narrow. So I folded the hems of the lining and shell in towards each other as narrowly as I could and stitched close to the edge. The length is actually fine, it's just not quite what I'd planned, but I'll get used to it.


Saturday, 13 August 2016

Magical Merino


Both of these makes have been finished for a while, and have had multiple wears. Both the top and cardigan are made with New Zealand merino jersey from The Fabric Store.  I'm finally getting them posted before winter disappears completely. The cardigan might get all-seasons wear, but the long sleeve top is definitely a cooler weather item.


First, the cardigan, although this was sewn second. It's actually an edited version of the Gather Blouse from Japanese pattern book She has a mannish style. I've made the blouse before, so when I was looking for a pattern to base a loose and drapey cardigan on, it seemed like a good choice. To make it more of a cardigan I narrowed the lower back piece so it isn't quite so gathered, and lengthened and tapered the sleeves to be full length. I went through my buttons to find some to use for the closure, but ended up deciding the shape of the cardi works better without a closure.


The one other thing I did for the cardigan was cover all the seams in bias binding. Given it's a loose cardigan and I'd decided against adding buttons, I wanted to make sure the insides looked nice because the could be seen. I'm largely happy with how they turned out, other than the collar not laying flat. The sienna satin binding stands out a bit more than I'd realised it would., and also is a little bulkier where the seams joined than I wanted, but that's only a minor quibble.


So on to the top. It's also merino, in a very pale shade of pink which unfortunately doesn't quite show up in the pictures. Unlike the cardigan, this top is self drafted. I used my bust and waist measurements to then draw up the front and back pieces. I did put the shoulder seam a bit too wide and ideally would have pulled it in about 1.5cm. However I decided it wasn't too far off that it was worth redoing, so I'll just put up with sleeves that sit a smidgen off my shoulder.


The collar and cuffs were designed to be slightly ruffled, and I'm pretty happy with how they turned out. I used the left over merino from the body of the top and cut curved pieces. The cuffs were easy, because they aren't too large, but I only just had enough room to cut a piece for the collar. Initially it didn't look like it was going to show any sort of ruffle, but finishing the raw edge with a rolled hem stretched it out just enough that it self ruffled. It's not over the top, just enough to give it a bit of interest and difference from a plain top.


 Also, the photos for once are with a nice background! That's thanks to a couple of the Sydney Spoolettes wanting to get some photos done, so we met in Hyde Park on Thursday lunchtime to take pictures for each other (thanks Susan for taking mine!). Makes a nice change from the retaining wall above our pool!


Lastly, sewing with merino was surprisingly easy. I'd been daunted by the prospect, partly because the fabric was very soft and stretchy jersey, partly because it wasn't cheap. But it went through my machine wonderfully, and I never had any problems with dropped stitches. It was a little tricky covering the back seam of the cardigan with bias binding, but that was due to the extra bulk from the gathering, not due to the fabric itself. So in the future, I won't be scared to sew with merino. Instead, I'll relish the opportunity because it is so nice to work with and to wear.


Thursday, 14 January 2016

Hot Day Work Outfit


First post for 2016! It's taken two weeks, so it's a two-for one post this time. I did get some sewing done over the Christmas-New Year's break but hadn't gotten around to taking any photos until before work this morning. It's lucky I took these photos first thing this morning, because after reaching 40° around lunchtime Sydney had some big thunderstormsthrough the afternoon, and I got soaked to the bone crossing the road from the train station to the bus stop on my way home.


As with my silk Kate Top, this outfit is specifically things I made that I can wear to work. Both of these patterns are from Japanese pattern books. The top, which I'll call the tie shell, is pattern I from les couleurs francaises. The skirt is the first variation of the straight skirt pattern in the blouse, skirt and pants style book. Neither are English translations of the books, although there are a few diagrams and illustrations. Still, it's best to have some reasonable sewing knowledge before tackling a pattern you can't read.


The top is made with a poly crepe from fabrics by Gertie, bought at Spotlight. Unfortunately, given that it was a remnant-sized piece I was pretty limited in what I could do. I chose the tie shell because it didn't use too much fabric. I had to compromise slightly. though. Japanese patterns don't have seam allowances included, but my fabric was not quite wide enough to add seam allowances for the back piece. It still fits and the back looks fine, but there should be a little extra length in the front upper bodice. But you do what you can with the fabric you have.


Other than that little issue the top was a very easy make. I did French seams, the narrowest folded hem possible to keep as much length as possible, and finished the neckline and armholes in off-white satin bias binding. As the shoulder straps are fairly narrow, the binding overlaps itself. I decided to sew the neckline first, and then only sew the armhole binding up to the neckline stitching, rather than having overlapping stitch lines. That way it has a cleaner, even line, and looks more professional.

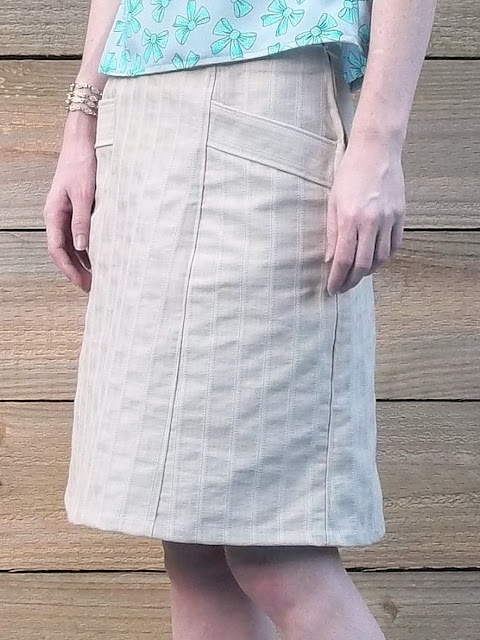
The skirt is made with a heavy cotton from Tessuti Fabrics. I bought it at the same time as the silk for my Kate Top. I wanted something light in colour that was simple but not completely plain. This cotton is textured but not printed, so it fight the bill well. As it has a fair amount of body it needed to be a skirt with a more solid shape, and this six gored A-line skirt seemed just right.

This pattern was trickier to use than the top. The pattern book has a handful of basic patterns and then gives options for how to vary it to make other styles. This was a relatively easy variation, except that I decided to make some extra changes. The diagonal pieces on the side fronts of the original pattern are fake pockets, but I decided I wanted real ones. Measuring out the extra pattern pieces I needed was okay, although I did manage to sew a pocket bag on inside out. Putting the zipper in was a bit more of a problem. Because the fabric is a little heavier, once you put together the lower skirt front, the pocket bag, and the pocket top, it starts to get pretty thick. My machine wasn't too happy about that, and so the stitch line is a bit wonky and the zipper is unaligned by about 5mm at the top. I thought about redoing the zipper, but decided it's not obvious so I couldn't be bothered.


So apart from getting rained on coming home, I'm happy with both top and skirt. The top is light and breathable, and the skirt's shape and neutral tone will make it a really flexible item. Plus, pockets! It's been a while since I've used a Japanese pattern and they're always a bit daunting, but I've always had good results with them. Both books have a number of other great patterns, so I've no doubt I'll make a few more of them in the future.


Sunday, 20 December 2015

Silk Tessuti Kate Top aka Grown-Up Clothing Item #1


So I got offered a new job a couple of weeks back! I'd been looking for work for a while, in the meantime doing short-term projects, but nothing with any permanence or certainty. But I had an interview in mid-November and managed to be successful, so yay me! Anyway, all this has to do with sewing because this is a job in an office, where I'd previously been at a university/working from home. Although it's not a corporate or particularly formal office, I do still need to dress a bit differently to how I have been.


Tessuti released their Kate Top pattern in early November, at the same time as I made it through to the first round of the recruitment process for the job. It was a beautiful pattern, plus they had an Instagram competition for making it, so I was already tempted. When I got offered an interview I started really seriously thinking about buying the pattern. If I was successful, I'd need some more grown-up clothes, and a classic shell top is very versatile and grown-up.


The interview went well, and the offices are about a five minute walk from Tessuti's Surry Hills store, so I rewarded myself with a trip over there. Looking around for something that would be good for this pattern I spied this gorgeous silk. It's called Beautiful Spill and is wonderfully soft and vibrant and I just couldn't pass it up. I knew I had to get it and make the Kate Top with it.


Because the print is very bright I decided to make view A, with the lower neckline so that the colour wouldn't be completely overwhelming. I made size XXS, which fits very well. The top is designed to be a bit loose, and the drapey silk works really well with that bit of extra room from the bust to the waist. Being a slight build I probably could have left the bust darts off because they don't add any shaping for me, so in the future I might not include them. 


I was a little daunted about sewing with the silk. I have sewn with silk before, but only a few times, and with taffeta and dupion, not with something delicate and light like this. However it wasn't that bad in the end. I used a new size 8 machine needle, a lot more pins than normal, and went slowly, and I didn't have any issues. I also did French seams as the safest way to treat a delicate fabric, so that the raw edges would be hidden away. The only real problem I had with construction was sewing the bust darts on the wrong side of the fabric and having to redo them. There is a front and back to the fabric, but the colours are still very bright and you have to pay attention to notice the difference, which I obviously didn't do at first when doing the darts!


There were a few new techniques in making this. The side splits were something I'd never done before, and looking at the pattern pieces I had no idea how they can together. But the instructions given were really clear and easy to follow. I did stitch them down slightly differently to the instructions, doing each of the four side split sections individually, rather than doing them all in one with the hem. Although the silk did turn out to be easy to sew with, I thought it would be best to concentrate and get each edge done properly by themselves rather than run the risk of the whole thing going wrong. It might have been fine without my precautions, but better to be safe than sorry.


The other new-to-me techniques were using tearaway vilene and making self bias binding. The vilene on the neckline and armholes works to stabilise it, which is especially helpful on a light fabric like this silk. With it, I was able to hang the top as I went along, making it easier to pin things together and see if it was all coming together right. The bias binding was trickier. This silk doesn't really seem to crease - great for wearing the top, but not so good when trying to press a fold on the self bias. In the end I had to accept I wasn't going to get it pressed much at all, and just had to use a lot of pins and pay extra attention to make sure it was attached correctly. It isn't perfect, but for a first attempt and with a fabric that isn't really designed to be used as bias, I think it turned out pretty well.


So this is the first item for my (slightly) more grown-up work appropriate wardrobe. And I love it. I'm really happy I decided to use the silk and didn't avoid it because it's a scary fabric. The colours and the drape are both perfect for the pattern. And I think wearing this to an office I can pass as a real and responsible adult!