Showing posts with label summer. Show all posts

Sunday, 26 September 2021

The Australian Wildflowers Dress

Although I do own a lot of original and reproduction vintage patterns and sew with them regularly, I do always try and pull them out especially in September for Sew Vintage September. Especially with Covid lockdown again it is nice to be able to see everyone's makes on Instagram and feel connected to others joining in the vintage sewing for the month.


Both the pattern and fabric have been in my stash for several years, although I hadn't really thought about them together. The fabric is such an amazing print but also very large, so it needed something that would do it justice. A full dress was always going to be the best option, but what sort of dress was the question, particularly how to make sure the skirt showed off the print. I had been thinking a circle skirt as it wouldn't hide anything in gathers, but the directional print would have meant some flowers ended up sideways or even upside down. In the end looking through my patterns and fabrics with both Sew Vintage September and the Whole 30 Fabric Challenge in mind led me to pull both fabric and pattern out together for the first time.

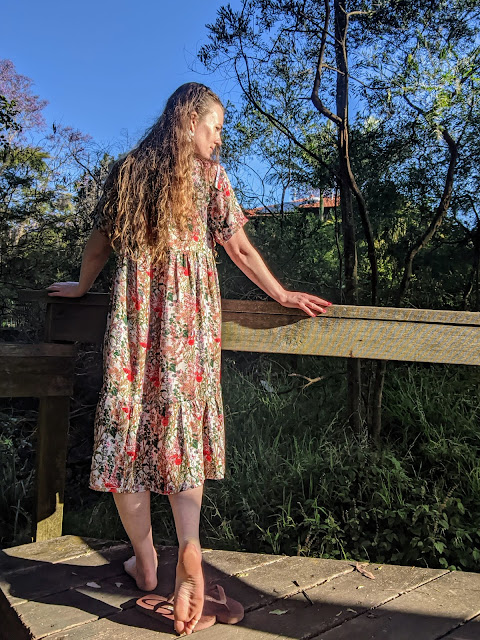
This absolutely beautiful fabric is one I picked up at a Sydney Spoolettes fabric swap a few years ago. The fabric design is called Australian Wildflowers and is covered in botanical drawings of different wildflowers, complete with common and scientific names as well as the states and territories they grow in.  There are flannel flowers, spider flowers, swamp and Sydney golden wattle, Cooktown, lemon and blue lady orchids, kangaroo paw, brown boronia, Sturt's desert pea and waratahs among others. The colours are wonderfully vibrant, and although a few arent' quite accurate to the flowers they depict they are all equally lovely drawings.


The pattern is Simplicity 4982 from 1955 and is an original, not a reproduction. It is a vintage size 12, measurements bust 30, waist 25 and hip 33. As an original pattern, there is a lot less ease than in modern patterns. The bodice is fitted and sits snug at the waist with maybe half an inch of ease. It could possibly do with an extra 1cm, but at the same time the closer fit probably helps to keep the bulk of the skirt from weighing the bodice down too much - the dress will pretty much stay in place without the straps because it simply can't sit lower down the waist.

Being an original 1950s pattern the shape of the upper bodice is very much designed to be worn with 1950s undergarments. The top edge of the upper bodice sat flat and correctly, but there was a lot of empty space between the top and the seam with the lower bodice. To remove some of the fullness I made the lower curve shallower and cut the sides of the piece straight rather than angled out to the lower edge. This kept the line of the top edge the same but reduced the height and width of the pattern piece so it was better sized.

The skirt is very wide and full. There are three 1.5m wide panels for a total width of 4.5m, while the bodice is only 66cm. This meant reducing down approximately 7cm of skirt for every 1cm of bodice. I gathered the skirt by hand in three sections, one for each skirt panel. It took approximately an hour to do the gathering and pin it in place, and then 15 minutes to carefully machine stitch it together. I had considered basting it together but ended up deciding the pins would be better at keeping the skirt from being pulled out of alignment while sewing. Because of the weight of the skirt I wanted to make sure the connection to the bodice was very sturdy, so I did a second line of stitching to make the connection more secure.

The bodice of the dress is lined, using a lightweight white lining. I sewed the straps in at the same time as attaching the bodice lining. To make sure I was still able to adjust the length each strap is two pieces: on attached in the front and one attached in the back. The zipper was installed before the lining was attached, and the lining was then machine stitched along the seam allowances joining the bodice pieces to keep the bodice and shell aligned, and hand stitched to the inside of the zipper tape and just inside the skirt seam. As with hand gathering the skirt this was a time consuming process but the finished product looks so much better for the effort.

The final step was to sew up the straps I had left open. As I mentioned there is minimal ease, so the dress sits close to the right spot when strapless. The original pattern actually has a strapless option where the bodice is boned, but I wanted this to be a bit more wearable so I included the straps. I pinned the two sides together at the shoulder before machine sewing at the top then trimming the excess and hand stitching closed. I probably pulled the straps up a couple of millimetres higher than needed, but it is to minor of an issue to be worth unstitching to adjust. 

Despite how big the dress is it only used 2.85m of fabric. The skirt is three panels 1.5m wide by 75cm long, with 30cm for the bodice and straps and another 30cm to line the bodice. The pattern actually suggests the skirt also be lined, but given the weight of this fabric I decided that was unnecessary. I haven't posted every make here on my blog - I may do a roundup post of the ones later - but this brings me to 15.15 metres or 16.5 yards of fabric from my stash used as part of the Whole 30 Fabric Challenge. Just over halfway through, a bit under 15 metres now to go.

I love how this dress turned out. The waist seam is snug so I can't slouch in the dress but the fit is close to perfect. It's feminine and fun and the weight of the fabric makes it very wearable. Although for now it can only be worn at home, this dress is brightening my lockdown days.


Monday, 1 February 2021

The Forest Mint Swimmers

It's summer, so it's time for new swimmers!

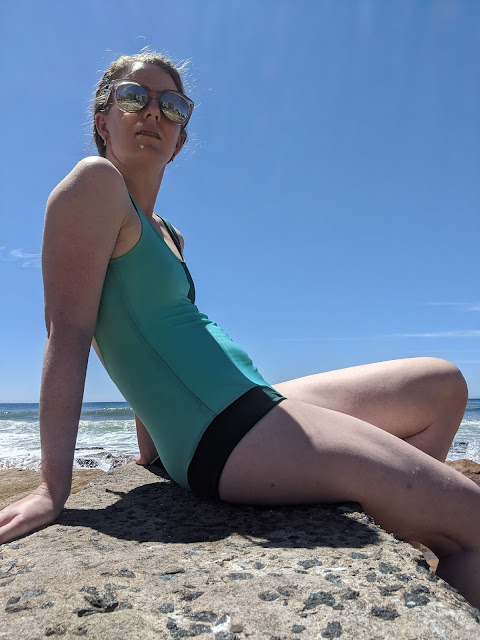
The pattern is a Cynthia Rowley for Simplicity, S8928. I had been looking for a nice one-piece that was simple and practical. I almost flicked past this pattern when looking in the catalogue because it is paired with a poorly styled and underwhelming-looking caftan, but then I noticed the interesting colour blocking. 


The lycras are both from My Hung in Hurstville. The forest green was a remnant piece which made it an easy first pick for half the suit. I then spent probably half an hour carefully looking through all My Hung's lycras to find just the right complementary colour including rich rose pinks and different purples and blues before settling on this slightly shimmery mint. It does have a higher sheen, but because it is in the same family of greens-with-just-a-hint-of-blue the shine is not distracting. I had considered using a third lycra for the leg bands - I have some bits and pieces in my stash - but in the end I felt adding a major contrast would take away from how well the two greens complement each other. 

This time I didn't make a straight size unlike for most patterns. I'm both long-waisted and have particularly small shoulders, so I needed it as small as possible at the top but it needed to reach all the way to and fit properly on my hips. I started from a 4 at the shoulders through to the high waist, then gradually lengthened and widened to reach an 8 at the crotch, while the leg band pieces I cut out in size 6. The result is suitably snug but with enough length to reach and cover properly.


I followed the instructions closely, except for the lining. The pattern as written is self lined, but I thought two layers of centre seams would look and feel far too bulky, so instead the main front and back pieces are lined with swimsuit lining. To make sure I cut them out the right size, I first sewed the two front and two back pieces together so I could use them to trace the lining fabric. This made sure everything lined up correctly and I didn't end up with straps starting or ending in the wrong place. The leg bands I did as the pattern suggested and self lined with lycra, which gave the swimsuit a neater finish both inside and out.

The instructions were straightforward and mostly easy to follow, apart from adding the elastic to the leg bands and sewing the crotch seam. The main fabric and lining pieces are sewn separately before being sewn together at the legs. The elastic is then stitched to the leg lining so it is encased in the garment. To join the crotch seam it is pulled up through the neck between the lining and main fabric and sewn in a circle. It was a bit confusing and I needed to reread the steps a few times, but the actual process was very easy in the end. Because the lining and outer are made as separate pieces I did some additional stitching at the top of the leg bands on the inside to keep them together and stop one sliding out of place.

I sewed this up almost entirely with my overlocker, which worked incredibly well. It made sure all the edges were neat, and the lining was far less likely to slip out of place than doing a zigzag stitch on a normal machine which avoided any unevennes with the fit. The elastic is stitched in with a zigzag stitch, using matching threads for each side and paying attention to make sure I started and finished the stitching at the centre seam. 

While this summer has been wetter meaning there have been fewer days to wear it, I did get to try it out last week on a 38 degree day. It held up well in the water, and the lycra didn't feel too hot to wear. Hopefully there will be some more sunny days and it can get some more use before the end of the season!


Sunday, 15 November 2020

The Wild Meadow Gown


This dress is the Friday Pattern Company's Wilder Gown, which seems to be the current most popular pattern. I can see why it's so popular - it's fairly easy to make and easily adjustable and adaptable. It's loose fitting, but doesn't feel oversized, has a 70s influence but doesn't feel costumey. It has a bit of a secret pyjamas feel but is still very much wearable in public.

The fabric is a viscose rayon satin from My Hung Fabrics in Hurstville. I bought the fabric specifically for the pattern. I really liked the all over floral print, particularly the fact it has the feel of an overgrown meadow. The print is directional with the flowers all growing along the grainline, but because of the overgrown feel it isn't overly noticeable, which was lucky given I accidentally cut the bodice front pieces out upside down. The fabric is wonderfully soft with a subtle shine and an excellent drape, but it does fray a lot. Each seam is overlocked to protect the fabric from falling apart.

The pattern is easy to follow, with only a small number of pieces. The skirt is two tiers of gathered rectangles, two for the first tier and three for the second. Folded in half, my fabric was slightly narrower than the pattern piece, so for the first tier I just used the width of the fabric. The second tier is three pieces, two slightly narrower and one the correct width. 

I chose to make the gown with short sleeves and also shorten the length slightly so it wouldn't look quite so much like a nightie. The length of the full dress would have sat at a slightly awkward length, almost a maxi dress but not quite, so I made the second tier shorter by cutting it off at the lengthen/shorten line. 

Construction is generally very straightforward but I did have some issues with gathering the skirt tiers. The first line of gathering stitches I put in were too close to the edge of the fabric, which given the fabric's habit for fraying meant I wasn't able to gather the whole way along. I removed those stitches and did new gathering lower than the seam line which gathered in quite well. It did mean I had to remove that line of stitching from the finished garment, but it also avoided any more frustrations. 

The one new element to me was the gathered neckline. The pattern pieces have an extended neck almost like a turtleneck which is folded over and stitched with two lines of stitching about an inch apart, with the neck tie piece threaded through the channel between the stitching lines. This then gathers the dress when worn, pulled as loosely or tightly as desired.


I think this dress will get a lot of wear in these warmer months. Because of the print and the length I was slightly worried the dress might be a bit overwhelming, but I'm really happy with how it turned out. The only negative is that the fabric is slightly warmer than I expected it to be. The large amount of fabric gathered at the high neckline definitely contributes to that, so tying it more loosely might be one option. Overall, though, it's a lovely, dreamy, floaty dress that's both an enjoyable make and an enjoyable wear.


Sunday, 15 March 2020

Wagtail Dress


It's been a while since I last blogged, but it's not because I haven't sewn. I made this dress back in August and have worn it a dozen or more times since. It was even photographed in December, just waiting for me to get around to writing about it on here.


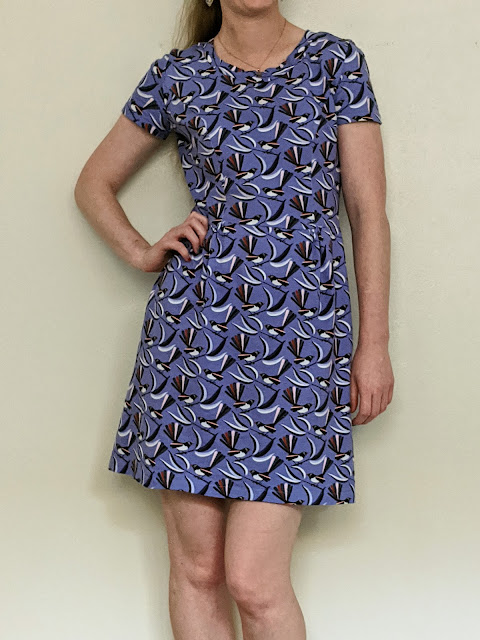
The fabric is a Jocelyn Proust design from Spotlight, with a Willy Wagtail print. Jocelyn Proust makes great fabrics, mostly with Australian flora and fauna prints. The pattern is Vogue 9199. It's a Very Easy Vogue pattern, and I don't think I've made one before. I was looking for a simple knit dress pattern and this was what I could find. I almost dismissed it because the illustration on the front isn't great, but I was wanting a pattern to make a dress to take on holiday so had to go with what was available.


Because the print is directional it turned out I didn't have enough fabric to make the dress exactly as it is in the packet - the pieces were slightly too wide and the fabric slightly too narrow, and the print wouldn't work with some upside down birds. So I decided to cut the bodice half using the pattern and then use the leftover fabric to do a simple rectangle skirt. It wasn't enough to be able to do even gathers around the entire waistline, so I just did gathers at the four princess seams - two at the front and two at the back.


The fabric is lovely to sew with. It's a relatively thick jersey with moderate stretch that retains its shape well but isn't too hot to wear. It goes through the machine smoothly, and has kept its colour and stretch through multiple washes (the benefit of not writing a post until six months after finishing a make is I can review how it holds up in real life). 


 The pattern is a slightly looser fit than I had originally planned, but I do still like it. I think it works better with the rectangle skirt than it would with the full length princess seams as it gives it that slight bit more shape. But I really like the neckline and the sleeve shape and length. A good cap sleeve that is fitted but still allows movement is often hard to find in sewing patterns - too many are restrictively tight or far too long but these are just right.


Given I've worn this dress many times I'm obviously happy with the outcome. It's a comfortable, easy to wear dress, and the print is fantastic. I'm not sure if I'll make the pattern itself again, but might use it as the basis for making t-shirts, removing the princess seams. At the very least I will use the sleeve pieces in the future.


Thursday, 19 December 2019

Temperatures Climbing Dress


What do you do when it's going to be 40 degrees celsius (104 fahrenheit) and you still need to go to work? You make a light, loose dress the night before in preparation.


It's already been a hot summer here, and we're barely two weeks in. When the forecast for Thursday was for a 40 degree day I had a look through my wardrobe but there was nothing that was cool enough and ok to wear to work. So I decided I'd grab some cotton from my stash and make something.

Initially I was thinking of making a more typical sundress and even selected a pattern, but then realised its large number of pieces, zipper and fitted shape would be more complicated and be hard to get done in one night. So I decided a loose shape would be best, something with minimal shaping and only a few pieces.


I didn't use a pattern for this dress, instead drawing a quick sketch of the image in my head on my phone's note taking app. I decided to make the front with three pieces with diagonal seams to give a hint of shape. Although I didn't use a pattern the trapeze shape and lines are similar to a few other patterns, such as the Collins Top from In The Folds or the Sway Dress from Papercut Patterns.


The fabric is a Liberty of London tana lawn, Howells Ladders in orange/yellow from The Fabric Store. Tana lawn is beautifully soft and light, which makes it perfect for the heat. And the ladder print goes well with the "climbing" name for the post.


Because I didn't use a pattern the dress isn't quite perfect. The neckline is a little deeper than planned, the shoulders a little wider, the length a centimetre or two short. It's probably more of a beach coverup than workwear, but on extreme heat days comfort is the key.


It has been a long time since my last update, but I do have a few makes from this year that are ready for photographing and posting. Now that this very busy year is almost over, hopefully I'll have time to catch up a bit.


Tuesday, 25 June 2019

Chelsea Pattern Tester Dress


Just in time for winter and rain - here's a dress for the middle of summer.
Back in February I got the opportunity to be a pattern tester for the new Chelsea Dress from Amy Nicole Studios. I've previously tested her Patti Pocket Skirt and incorporated that pattern into a dress as well. I really enjoyed that pattern, so when I got the email with the first picture of the Chelsea Dress asking for testers I thought it would be fun to try.


As this was a tester version, this was made exactly to the pattern as it was at the time. I made size 0. There were a couple of small changes to the final pattern, but nothing significant and nothing that has any bearing on my experience sewing it up. There are options on Amy Nicole's blog to do a full bust adjustment or raise the deep v neckline, but I did neither. There's also an option to make this a maxi dress, but I made the short version. So my review is just on the basic pattern, but there are options for changing it if you need to.


The bodice is very closely fitted and designed to have no ease. It is fully lined and understitched, with elastic along the plunge neck to keep it in place and stop any gaping. Sewing the elastic in is very straightforward, but understitching is a bit fiddly as the pieces are pretty small. The width of the straps and the fact they are angled to be closer together at the back also helps the dress remain secure. As I said the pattern doesn't really have ease, so the waistband is meant to be snug. The zipper and hook and eye fit very close to the body, so it's important to check the sizing is right.


I didn't have any problems with making the dress, but I did make one dumb error - I forgot to check the printer settings and it printed far too large. The skirt was easy enough to adjust - just cut thesides and length off a bit - but the bodice pieces are not easily adjusted. So, I printed out the half dozen or so sheets again before I cut into my fabric.


The bodice and hem fabric is a linen-like remnant I picked up at a Sydney Spoolettes fabric swap a few years back. I had wanted to make a short sleeve blouse or shell top out of it, but the piece was long and diagonally cut which made fitting pattern pieces tricky. I tried a few times over the years, but couldn't find something that fitted well on the piece. When I got the tester pattern for the Chelsea Dress and saw Amy Nicole's colour blocking suggestions I got this piece out again to see if I could jigsaw the bodice and hem into place and excitingly it fit!


The skirt and pockets are a basic cotton poplin. It's just slightly stiff, so it stands out with a bit of fullness. The dark blue matching the spots on the bodice and hem band was semi-accidental - I already owned both fabrics, so when the bodice pieces fit on the spots this blue was the obvious choice for skirt. The skirt is very simple, just a very basic shape gathered at the waistband with good sized pockets in the side seams. Because I'd printed the skirt pieces out too large I couldn't use the marked notches to guide where to place the pockets, so that was a combination of measuring and guessing. But they are a usable size, which is always a great bonus.


I haven't worn this dress properly yet so can't report on how it goes with a full days' wear. But it's a lovely style and the colour blocking options make it very versatile. It is a slim-fitting design on the bodice so isn't going to suit everyone, but it is an easy sew. But if you like the look of the pattern I definitely recommend it.