Showing posts with label self-designed. Show all posts

Sunday, 28 May 2017

Messy Artist and Geographer Skirts

Two new skirts for today's post, one work and one casual, so this post is a bit longer than normal but that makes up for the recent infrequent posting.
Both of these were made without a pattern, and both fabrics are from Spotlight.


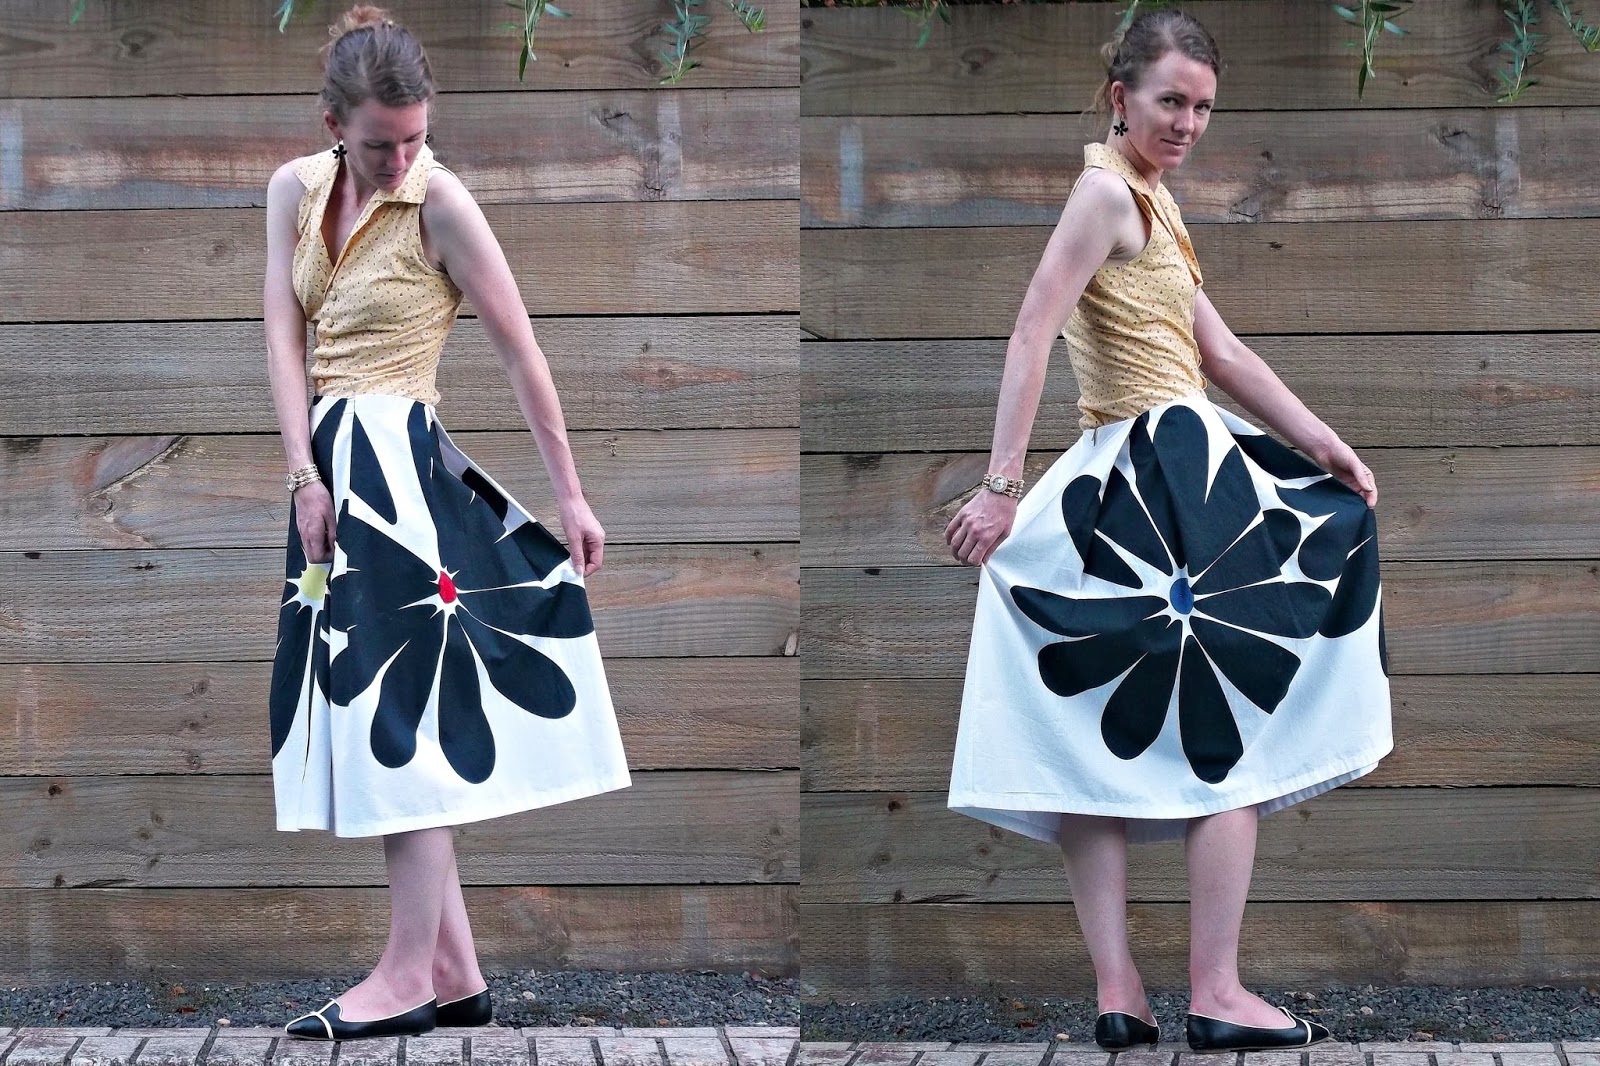
While I didn't use a pattern for the Messy Artist skirt, I did do a quick google about how to draft a knit skirt. I found a useful how-to on Maria Denmark's website with instructions on how to measure. It's quite straightforward: you use your waist and hip measurements minus four centimetres, then divided by four, and the distance between the two.


The skirt is just two identical pieces, one front, one back. On the fold, you use the waist minus four then divided by four measurement, then measure down the distance to work out where to widen for the hips. I used my french curve to angle out from the waist to the hip. This is a bit trickier, because the curve of each person's side is different, But with a bit of attention and awareness of your shape it's relatively straightforward to measure. After that it's just measuring the desired length for the skirt.


I had been going to put elastic into the waistband, but given the fabric is a scuba knit a separate waistband wasn't necessary. I'd planned to use a wide elastic, so had added 10cm to fit it in. When I'd sewn up the sides I tried the skirt on it fit well enough that I decided not to add elastic. I also liked that the extra fabric allowed me to make the skirt either a normal waisted or high waisted skirt, so decided not to cut it back.


The entire skirt was about 20 minutes of work. It took longer to decide on the right placement of the print for the front and the back, working out which bit of paint and which colour I wanted where. It's all sewn with a zigzag stitch for stretch. I made the skirt slightly A-lined, so it's a snug fit to the hip but then hangs down a bit looser to just above the knee.


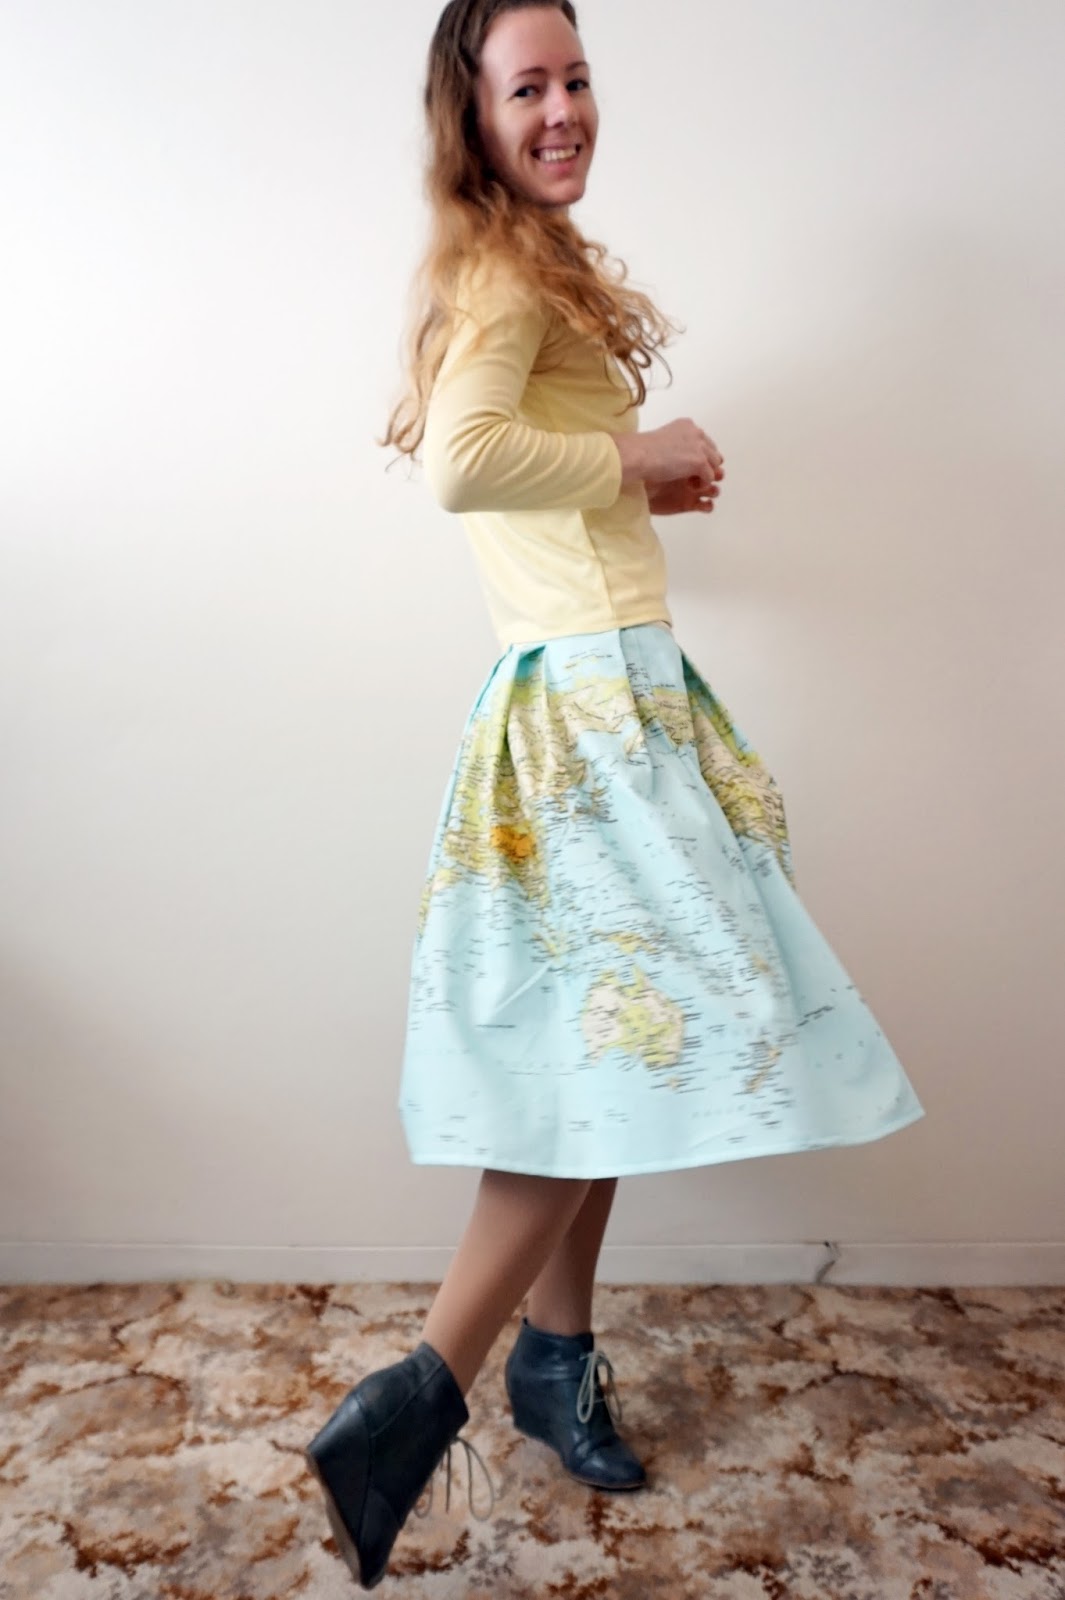
The fabric for the second skirt is one I've had for a couple of years. When I saw this fabric I loved it immediately. I am a geographer, so I felt like I had to buy it. It was always going to be a skirt, but it took a while for me to get around to it. I bought two panels of the fabric because I wasn't sure what would work best. The width of the panel was wide enough to fit around my waist, but adding darts would have meant losing some of the map. With the two panels I could have one front and one back, with the option to gather or pleat the waist.


In the end I decided to make the skirt pleated. The fabric is a cotton duck, so it has quite a bit of body and I felt it would be too full if I gathered it, and the waistband would be too bulky. I also put pockets in the side seams, although I initially sewed them inside out.


Even though I used two panel pieces for this skirt, for some reason I decided to put the zipper in the centre back instead of the side seam. This meant inserting it into the middle of the back panel, Given cotton duck tends to fray quite a bit this was a daunting - and honestly stupid - challenge. I folded the skirt to find and mark the centre back and used fusible interfacing to try and stabilise the fabric. I then marked the length of the zipper and stitched around the sides and bottom of the line. Next I cut along my marked line, with diagonal cuts at the bottom to the corners of my stitch line, folded the fabric back to the stitching, and pinned my zipper in.


Unfortunately when I stitched it in it didn't quite work. I hadn't folded enough fabric over, so my machine didn't catch it to stitch down properly. And at the bottom it didn't catch the triangular piece of fabric at all. So I pulled the zipout, did a new wider line of stitching, and tried again. Fortunately, this time it was successful.


After putting in the zip, I needed to work out the pleats. I pinned the side seams to my mannequin and started arranging the pleats. I didn't do any measuring, I just eyeballed where to fold. I tried to make the folds opposite on the back to the front so that in theory all of the world is visible around the skirt. I pleated and pinned until the skirt fit the dummy, then stitched the pleats down.


The skirt is finished off with a bias binding waist and a narrow hem. The hem is just double folded narrowly to not lose any of the print. I used 12mm bias binding for the waist. I stitched the binding on the inside of the skirt, folded it over to the front, and stitched it down.


 I'm really happy with how both skirts turned out, and have already worn each of them. They also both received a lot of compliments when I wore them, and questions about where I bought them - especially the geographer skirt. It was great to be able to tell people that these are made by me.


Thursday, 12 January 2017

The Whites and The Blues


A belated post of some 2016 makes. I still have a few others that have been made but not photographed, or need just a little bit of fixing or finishing. With these two makes, one has already been in my wardrobe for 11 months, the other was made two weeks before the end of the year. So I guess that evens out to...still be a ridiculously long time between making and posting.


Both of these makes were quick pattern-free makes. Both pieces of fabric were remnants, so I only had what was there to work with. And with both fabrics I knew exactly what they'd be as soon as I bought them. Even so, both fabrics spent a while in my stash before I made them up into these garments.


The first make is a simple jersey top. The fabric was from Spotlight, bought in the second half of 2015. The print is white silhouettes of foxes, although they bear almost as much resemblance to cacti as they do to foxes. But I liked that the fabric is fun while still be quite simple in the navy and white colours. It was also a softer jersey than many of Spotlight's can be.


The top was a very simple make. It is raglan sleeved, and the front and back are identical, just rectangles with the top corners cut off on an angle. With the sleeves the neckline is not quite rectangular, angling out slightly towards the shoulders. It's sewn together with a three stitch zigzag about 6mm wide in white thread. The fit is close but not tight, so it's casual but still neat.


The skirt is a piece of wonderfully soft remnant rayon with navy palm leaves on a cream background was bought at My Hung fabrics. It was 1.5 metres wide and 1.1 metres long. This made it just the perfect size piece for  a maxi skirt. With skirts I tend not to bother with patterns, and for this one I didn't even bother with any measurement. I just pinned pleats every few centimetres to bring it down to my waist size, sewed my pleats about 8cm long, then stitched up the back seam, added a zipper, and folded over and stitched a waistband and hem. All done in not much more than an hour.


Both of these pieces also remind me of some of the things I really love about sewing. Designing my own ideas, or seeing a fabric and having an image in my head of what it should be and then creating that is such a great experience. Using fabrics in prints and colours I choose that are good quality and have a better feel than the cheap disposable things for sale in most shops means I enjoy wearing what I make. And my wardrobe has much more colour and variety when I make things myself.


Saturday, 24 September 2016

Tessuti Cut Out Lace LBD


First post in a month! And this dress almost didn't even make it.
This dress was made as an entry for Tessuti's cut out lace competition. Even though I'd bought the fabric a day or two after the competition was announced (perks/dangers of working a less than ten minute walk from Tessuti's Surry Hills store) there were quite a few things that almost got in the way of the dress being made.


The first thing that delayed this dress was a holiday, and some holiday sewing of shorts and cargo pants to wear while bushwalking in Western Australian national parks. Because of this, I didn't have time to start on my competition entry until I got back from holiday a week and a half into September. But the bigger problem was that I just couldn't seem to get my make to look how I wanted it to look.


I'd decided as soon as I saw the lace in store that I wanted to do as little as possible to it, and just let the fabric speak for itself. I decided to buy a single panel so I wouldn't be tempted to do anything too fussy. I also wanted to use the half flower piece at the centre top of the panel as my neckline, so I thought a simple fitted sheath dress would be the go, and started pinning and draping on my mannequin.


It didn't quite go according to plan. First, I needed to do the centre pack seam and insert the zipper. I had been going to use an open ended zip, but when I got the black open ended zipper I had out, it wasn't long enough. Given this was last weekend and entries closed yesterday, I decided I didn't have time to go searching for a long enough open ended zip and instead searched through for other options. 


Initially I went for a normal black zip about 45 centimetres long. I pinned it in, folding the fabric in further as it got down to the waist. I stitched the zipper in, and then for the lower half of the seam eased the seam back out from the waist to the hip and then straight down to the bottom. I then folded in some double pointed darts to fit the bust and waist, putting in two long darts and four short darts - two near the centre front, two close to the sides. I made sure they fit my mannequin, sewed them up, trimmed out the neckline, stitched the shoulders together, and cut out some of the lace for armholes.


Then I tried it on and it looked terrible.
The darts sat too low, leaving a weird billowy gaping at the bust, and the zipper at the back didn't sit flat either. The neckline was the only thing I was fairly happy with. Even the lace at the armholes was droopy at the back. That was going to be an easy fix, it would just need the extra pieces cut out once everything else was done, but the rest required going right back to the start. 


The first change I made was to rip the zipper out and redo it. I decided that I'd just put the zip in straight, rather than playing around trying to get it to fit in to the waist. I also decided to change over to an invisible zip, although I'm not entirely sure why as it's a shorter zipper. So I unpicked all my darts from the front, put small shoulder pleats in at the back to make sure the neckline was even, and draped it back over my mannequin.


My thought then was maybe I could make the dress so it was fitted at the front but hung loose at the back. So I did a first run of pinning the front in again, and tried it on. Unsurprisingly, it didn't really work. I had pinned the front darts in higher so it was better fitted, but there wasn't enough fabric for it to give the loose effect I wanted at the back. And honestly, I'm not sure this idea could have worked, because trying to keep one half loose while the other half is tight is just too complicated. I'd contemplated using ribbon ties from the underarm to the back, but I really don't think it would have sat evenly at all.


I hadn't sewn anything for that second arrangement, so there wasn't any more unpicking to do, but by this stage it was Thursday night and I was a bit at a loss of what to do. My next thought was to make separates, with a cropped top and high waisted skirt. The lace at the bodice would be long enough to work as a cropped top, but I decided against this idea because I really don't think I'd wear the top. And given the neckline was the first decision I'd made when I saw the fabric and was the one element I was happy with, I didn't want to lose that on a garment I wouldn't wear. So I discarded that idea.
Then I finally worked out what to do.


It's an obvious realisation, but if your mannequin doesn't have the exact same measurements as you then pinning and draping a fitted dress completely on the mannequin isn't going to end up fitting properly. The answer, of course, was to pin the dress directly onto myself. So I put it on and folded in two darts for the front and two for the back and pinned them in place. I stitched them down, leaving them open at the bottom so they have a soft pleated effect. And after all of that messing around, mid-morning yesterday I finally had the dress I'd pictured in my head.
Then it was just a case of taking some pictures and sending them in as my entry. 


And so that's the saga of my lace LBD. With persistence, sometimes you can manage to pull of the image in your head. Now I just need a reason to wear it!


Tuesday, 15 March 2016

Polkadotted Twirling Dress


I can't think of a better name for this. It's a dress, it's covered in polkadots, and it's impossible to put it on and not start twirling, so polkadotted twirling dress it shall be.
This dress is made of 5.5 metres of vintage nylon chiffon-like fabric. I don't know the date that it's from, but it's probably from the 1950s looking at the print and the type of fabric. It's semi-sheer, has finished selvedges and is very vibrant in colour, but not the most breathable fabric.


The dress is self-drafted for a number of reasons. I wanted to use as much of the fabric as I could (only two very small offcuts didn't make it into the final product), and the finished selvedge meant I'd need a pattern that had straight edged skirt pieces. In addition, the width of the fabric wouldn't work for every pattern, so I decided I should just come up with something myself. It still took me about four years to both come up with how to use this fabric and have the courage to cut in to it. I haven't seen vintage nylon fabric any other time, and I doubt I'd be able to find much again, let alone something as glorious as this print, so I didn't want to wreck it.


In the end the width and amount of the fabric meant a very full maxi dress was the only choice. Because the fabric frays like crazy - not exactly a surprise for a nylon chiffon - I wanted to use the selvedges where I could. For all the other seams, I decided to cover them in bias binding. The larger polkadots were a obvious choice to have at the bottom of the skirt. The fabric was fairly wide, so works for an empire line to floor maxi skirt. I cut off about 50cm to be the bodice, and used the rest of it for the skirt.


Now I'm pretty small, and have a very narrow ribcage, so reducing the five metres I had for the skirt in so that it fitted me was fun. I briefly thought about gathering it, but that wasn't going to work with this fairly delicate fabric, so lots of pleats was the only other option. I've honestly forgotten how many pleats were involved, but from memory it was a bit over 60. In fact when I'd done the pleats it was still slightly too wide, so at each side I pleated the pleats in a further inch each. There's a lot of thread ends I still haven't brought myself to do something about!

The bodice is incredibly simple but effective. It is two strips of the fabric, slightly overlapped at the front, and folded over the shoulders to meet at the centre back. They're overlapped at the sides and hand stitched together to form simple sleeves. The effect gives it a simple V front and back, with hints of 1930s and 1970s styles. Given how big the skirt is I wanted the top to be as simple as possible. The bias binding just gives it that little bit of a finished look.


I decided to use blue bias binding rather than red to match the polkadots. I wanted a satin bias binding but couldn't find one in the darker shade of blue. Still I decided I preferred the sheen to the colour matching, so went for the royal blue shade. As it's only visible as a finishing for the bodice and is meant to be noticeable I felt the different colour was fine. Fortunately I already had a red zipper in my giant stash of zips.


When I started sewing I was using a size 9 needle, but the stitches were a bit loose. I had a look at my machine's instruction manual ,and it actually suggested using a blue-tipped needle to sew very sheer fabrics. I was a bit unsure, but it worked fantastically well. Because the fabric is delicate I of course was careful putting it through the machine, but didn't have any problems with it catching or tearing which I'd been scared would happen.


I have to be honest that I'm not completely sure when I'd wear this dress. It's very light, but it's so big that it's far too easy to step on. I think it's something that Florence Welch would love to wear, but it's not necessarily practical for most peoples' day-to-day lives. And as someone who's pretty good at tripping over and getting myster bruises. I don't know that a dress with five metres of skirt to tread on is something I should really be trusted with.

But the fabric was too beautiful to resist. And the twirly factor of this dress is so much fun, too. I think half my photos had to be discarded because they were fuzzy, but I just had to play with its movement. So I will find reasons to wear it, and just make sure to bundle it up in my arms when I walk so I don't tread on it or tear it.


Thursday, 4 February 2016

Flower Power Midi


Floral prints seem to be in at the moment. At least I've seen a lot on sewing blogs, in fabric stores, and in the windows of clothes shops. But I haven't seen so many giantly oversized florals like this 1950s-feel midi skirt. So I guess this skirt is both on-trend and individual.


The fabric is an old doona (quilt/duvet) cover I picked up at an op shop a few years back. Op shops can be great places for fabrics, and very cheap too. When I picked it up I didn't realise it was double sided - this skirt is only one quarter of the fabric. As soon as I saw the doona cover in the op shop I thought the giant flowers would look great as a skirt, but when I realised there were a total of twelve flowers, I thought I should come up with something that used more, if not all of it. But I didn't have any ideas, and so I put it away, buried in my overflowing fabric drawers.


From memory there was no label on the doona cover when I bought it, but the print seems to me to be a bit Skandinavian. Whether it is Ikea fabric or just trying to look like Ikea and Marimekko prints, it has that sort of style. Each flower has a different coloured centre: yellow for the centre front flower, red for the left, blue for the right.


 The skirt itself isn't really that exciting. It's self-designed, and without any measuring at all. I simply sewed up the back seam leaving room for inserting the zipper, and then went to work pinning it on my dressmaker's dummy Ilse-Jane. I eyeball measured to try and keep things even, although the side pleats are narrower than the front and back pleats. But the large-scale print means that these slight differences don't really matter - the flowers still stand out anyway. I hand-stitched the waistband down so that I only stitched through the insides of the pleats, allowing the pleats to stand out and so that there was no visible stitching line through the tops of the petals.


I have to admit that generally, the midi length isn't really my favourite. I think it can look a bit odd, either like a child playing dress ups in their mum's clothes, or  a kid wearing clothes they've outgrown. But with this print I really had no choice. There was no other way to show off those giant flowers. I do like how the length looks, I really do think it suits the print, but the length still isn't something I normally wear, so it is going to take some getting used to.

Although I'd had this fabric for ages and had known exactly what I'd wanted to make when I saw it, it took somewhere around 4-5 years to get around to making it. I do still have three quarters of it left (anyone want it?), but I have been thinking about the need to sew my stash, rather than just buying more fabric. And especially making something like this, which was not only something I'd already completely decided on but was also extremely quick to make.


Friday, 6 November 2015

Cropped Nani Iro Top


There are a few fabric brands that are lovely but pricier, which daunt me a little from buying them. I buy some of my fabric and quite a few patterns and zippers from op shops, so expensive fabric is a bit scary. Nani Iro is one of those brands that have daunted me, because the fabrics are so nice and I don't want to screw it up. But when Tessuti Fabrics got some new Nani Iro in earlier in the year I just could resist buying a little bit. The fabric is the blue Sazanami Pocho, Tessuti still have the pink.


I didn't have much money to spend, so I only bought half a metre. I'm quite little, and I didn't want to make anything complicated anyway, just a simple top. Originally I'd been thinking of doing something sleeveless, a shell or tank top. But I wasn't really certain what I wanted to do, and it was winter, anyway, not really the time of year to be making light and airy tops. So I put my little piece of Nani Iro away in my stash for a later date when I had a better idea of what to do, and when the weather was right to wear it.


I was still thinking every so often about exactly what to make, taking in influences from what I saw on other blogs, Instagram, and even in shop catalogues. I decided that the top would be unstructured, and that to complement that I'd make it just slightly cropped. I'd also seen a bunch of tops with pompom trims on them and really liked the idea, so went to see if I could find a trim that would match some of the spots. Spotlight had this red pompom trim that seemed a perfect match.


I thought the pompom trim would look better on sleeves than on a sleeveless tank. I still didn't want to have multiple pieces to the pattern, so I simply started cutting two matching rectangles but added an extra inch of width at the top for all-in-one sleeves. Easy and lazy. For the neckline I just did trial and error, cutting the curves of both front and back pieces down. The back was right first time, but I lowered the front neckline slightly from where I first cut it. I did think about making it a deep scoop, but in the end decided I liked how it sat just below my collar bones.

After that, it was very fast to put together. Given it's just two pieces there wasn't much sewing at all. I used red threat to match both the red spots and the pompom trim. Normally I avoid visible stitching, but I thought it would complement this fabric and this top well.


This was an extremely fast make - about an hour, compared to the huge time and effort on my last make, the DuBarry dress. The attention to detail required for a long make is really rewarding when you get it done, but short and fast makes like this top are great because you have something to show off so soon after you started.