Showing posts with label vogue. Show all posts

Sunday, 24 February 2019

The Geometry Dress


Last night was Sydney Frocktails 2019, where the sewing ladies of Sydney (and beyond) get together in our fancy handmade makes to have some drinks, some fun and feel each others' clothes without it being weird. This dress, the Geometry Dress - named for both the construction and the print - was started last weekend and finished at 4pm yesterday. In total there's probably around 20 hours of work in this dress.


The fabric is one I bought from Tessuti somewhere around 5 years ago, I think. It's a cotton sateen with a very high sheen. In fact, quite a few people at frocktails were surprised when I told them it was a cotton, thinking it was a satin or even an African wax print. It's surprisingly lightweight despite the look, and is wonderfully soft and smooth with a small amount of stretch.


I decided I wanted to use a fabric I already had for my frocktails dress, given I have a very large stash. I've had this fabric for a while and always thought it would make a great cocktail dress of some sort. Having two panels of the print, I figured I'd use one for the skirt and one for the bodice, but didn't have any ideas of how I'd actually do it. I looked through all the patterns I own but nothing grabbed me, so went to Spotlight to look through the pattern books. I still had no idea at all of what shape or style I wanted so came away empty handed. Then I saw a sundress pattern that was too casual but had a nice minimal bodice which inspired me to find something with some form of cut outs. So I went to Lincraft in my lunch hour a week and a half ago with a half-formed thought, searching for the pattern to complete the thought.


The pattern is a Vogue designer pattern by Rebecca Vallance, number V1545. I changed the pattern to a plain pleated skirt to show off the fabric print. I really should not have chosen to make something so difficult a week out from the event, but I never pay attention to the difficulty rating on patterns. My thoughts were simply the pieced bodice could work with the almost patchwork nature of the print, but without really considering how exactly that would work out.


Working out the pattern placement took about four hours to get right. The print is a panel, and I had two panels so figured I'd use one for the skirt and one for the bodice, using the different designs in the panel for the different pieces of the bodice. The print on the fabric isn't actually symmetrical, so I couldn't just fold it in half and cut the pieces together. Instead, I cut one of each bodice piece out with the fabric print side up, then laid it print side down on the fabric matching the lines as well as possible and cut out the opposite side. It was a laborious process, but the final result made it worthwhile.


The pattern is relatively difficult, but the biggest issue was how time-consuming it was. Obviously the four hours of pattern placement was the biggest single amount of time. The blue and red triangles and stripe on the edge of the panels were an obvious choice for the front overlay and the waistband. Then I kept changing my mind about whether to have the geometric shapes for the front or the back. In the end the back and side back pieces fitted better on the floral, and the finished diamond shape on the back is better than I could have planned. I also tried to get the skirt to pattern match, which worked pretty well at the top with the invisible zipper, but got slightly out of alignment near the hem. But the teal stripes match up, so the bit of unevenness in between doesn't really matter.


The bodice is fully lined and all seams bar the armscyes are understitched. I do love how understitching keeps the lining from peeking out, but it does significantly increase the amount of time it takes to sew. The lining, which is just a heavy cotton, gives the bodice much more structure than the cotton sateen alone, but the different weights of the fabric definitely benefited from the understitching.


All the finishings are done by hand, apart from the hem. But hand stitching a neckline, waist, and 15 inch metal zipper takes a long time. And zipper tape for a heavy metal zipper is not good on needles or fingers - my left pointer finger has a callus and also a bit of a hole where the needle pushed back into the skin when it didn't want to go through the tape and fabric. The waistband, in comparison, was a very easy sew. Although the hem ended up being sewn by machine, I luckily had a forest green that perfectly matched the narrow stripe between the teal and mint stripes so the stitch line is only visible when looked at closely.


As well as changing the skirt from the original pattern I reduced the front opening of the dress. In the original pattern the front is open all the way down to the waistband, but that's really not practical to wear, so I hand stitched in the back to keep them together. I also added a quick stitch where the overlay crossed the front bodice pieces to keep them from gaping apart. These were quick minor edits, but meant I could be comfortable and confident wearing the dress knowing it was going to stay where it was meant to.


One of the best things about frocktails is seeing the great variety of styles people wear. Getting to make something that's just fun to dress up, rather than making practical clothes for work or everyday wear. Seeing women in velvet, sequins, brocades, circle skirts with petticoats and all sorts of colours and prints was great, and a great reminder that sewing is not only a practical skill, it can reflect each person's individuality. And it's a wonderful community to be part of. Ready to do it all again in September!


Tuesday, 28 November 2017

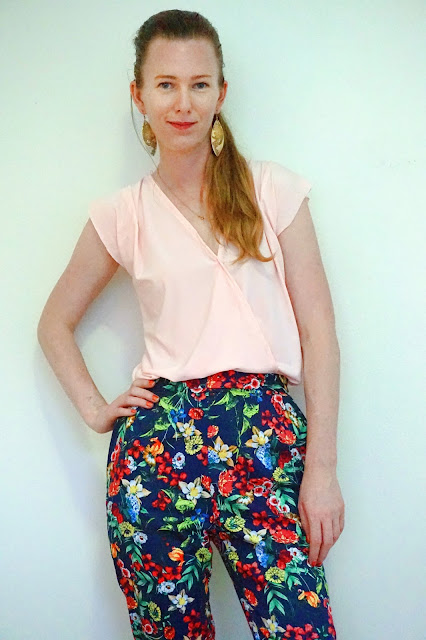
The Spring Garden Pants


I've been meaning to learn how to sew pants. I have tried a few times, but it's always daunting and I'm never as happy with how they turn out as with my other makes. But I wanted some new pants to wear to work, so I decided it was time for my next attempt at them. I own a few pants patterns and am planning to work my way up through them by difficulty level. Fitted side zip pants seemd like the easiest place to start.


The pattern is Vintage Vogue V9189, a high waisted pattern with two shorts lengths and two pants lengths originally from 1960. The amazing floral fabric is a cotton sateen with a bit of stretch from My Hung in Hurstville. I've seen a few floral pants around lately, and given it is almost summer here I thought bright floral would be the best choice. Plus, being a plain slim-fitting pattern these pants can handle a print better than a more traditional trouser.


One of the really good things about this pattern is that it comes with three different lengths: short, medium and long. Given one of the problems I've had making pants before was where the curve of the hip sat on the pattern compared to where it is on my body, it was good to know when I opened the pattern up that I'd be able to use the different lengths to make those adjustments before cutting out if I needed to. In the end I made the medium without any adjustments, but for others who are taller or shorter, or who have different leg and waist lengths, this pattern effectively does those adjustments for you.


These are definitely the best fitting pants I've made, but that was partly by accident. I'd almost finished sewing them up - except for the waistband and hemming - so tried them on. With other pants I've made they have often been a bit loose at the crotch and inner thighs, and these were as well. Given the slim fit of the pattern it really stood out, so I decided I would sew the seam in closer. I had intended to evenly take in 1cm and see how it looked, but when sewing the crotch curve the pants back pulled a bit and I ended up sewing it in 2cm. I noticed because the seam was not straight just after I'd sewn across the centre of the crotch so I stopped stitching.


I was going to immediately grab my seam ripper and unpick it all, but thought I'd first try them on to check if I'd at least dealt with the loose thigh issue. When I put them on not only did the leg fit better but the crotch on the side I'd taken in was also fixed, which was great. Of course, that meant I somehow had to recreate my accidental fix on the other side. Because I'd started sewing from the thigh for my accidentally correct adjustment, I decided to do the same for the other leg. I also marked where I'd become uneven between the front and back, and very carefully sewed it, using my fingers to adjust the back until I reached where I'd initially stopped. 


There are slanted side pockets which are angled very close to the side seam making them slightly hidden. The pockets are understitched to try and stop them from turning out, but for some reason the righthand pocket facing doesn't always stay down. The side zipper was nice and easy to put in, just like a skirt's. The waistband also went in well - I have had patterns in the past where the waistband piece was too short or too long, but this one was just right.


As a finishing touch, the button is from my tin of vintage buttons I inherited from my grandma. I like that it's vintage, so fits with the era and style of the pants, the colour matches perfectly, and it's nice to have that connection to my grandma, who sewed a lot herself.


 I am really proud of how these pants turned out. The fabric and the fit are just right, and they are just fun to wear. They've improved my confidence in making pants, and I plan keep working my way through the other patterns I own increasing the difficulty, including doing fly finishes. In the meantime, I'll be wearing these as much as I can.


Thursday, 23 February 2017

Vintage Vogue for Frocktails


So the Sydney Spoolettes finally got around to holding a frocktails event last Saturday. Melbourne, Brisbane and Canberra sewists have been much better organised than us Sydney sewists and have each held a few big events before, but it had only been talked about in Sydney. But thanks to the excellent organisational skills of Caz from Useful Box, Sydney has joined the party.


Frocktails is where you wear something you've made, book out a nice venue and get together with a bunch of other sewists to have some drinks, chat, and feel each others' fabric. It's a lot of fun, as you get to see all the different styles people wear, see patterns you've heard about made up into a finished product and talk about fabrics and sewing techniques without boring people out of their minds.


It's also a good excuse to make a pattern that isn't an every day style. Or, in my case, finally finish one off. This dress is by far the longest make from when I bought the pattern and fabric to when I tied off the last thread. In fact, I'd be surprised if there were many people who had a finished make that had taken as long as this one did!


This pattern is the out-of-print Vintage Vogue V2787, originally from 1948. It's an absolutely stunning pattern, with curved and gathered bodice seams, gathered shoulders and a curved and half gathered front skirt piece. I bought the pattern and fabric from Tessuti back in 2005 when they still had a store on York St in Sydney. The fabric is a silk twill called falling leaves or falling ivy (it's been over a decade, I'm not certain of its name) and is wonderfully soft with a great hand. I got the pattern home, pinned it and cut it out, and then realised I'd had a bit of a delusion of talent and definitely didn't have the sewing experience to make something as complex as this. So I put it back in its Tessuti bag and put it away for a decade.


I pulled it back out two years ago during the sewphotohop daily photo challenge on Instagram. One of the prompts was 'secret corner of shame', and an unfinished ten year old pattern was an obvious choice. I got a few comments telling me to have a go at sewing it up, so I took it out of its bag. I hand gathered along the seams, hand basting before stitching it together. The fabric has about 4% elastane giving it a slight stretch, but it sews together completely smoothly.


The dress has a side zip and button back. The button I used is from a box of vintage buttons I inherited from my grandma. I did all the seams by machine, but decided that the zipper, hem and sleeve caps needed to be sewn by hand. However I didn't finish the dress off then, I pinned the zipper in and moved on to other projects that were quicker and that I had a reason to sew.


Fast forward another year and a half to the start of this year, and I was starting to think about what I should wear to frocktails. I looked through what other fabrics and patterns I had but nothing grabbed me, so I thought I might pull this one out again and finally finish it off. But there were a few other things I wanted to do first (see my last few posts) so I didn't actually sit down to start finishing it off until about a week before the event. And not only did I have a long week at work, I was close to out of the bone coloured thread I was using. Nothing like a deadline.


The hand sewing was straightforward, just tedious. I decided to hand sew the last elements so that the hem, side and sleeve caps would look smooth with no stitch lines. That meant it took time and close attention to make the stitches as invisible as possible. I finally tied off the ends of the hem threat at 6:05pm on Saturday, barely half an hour before leaving to head into the city for frocktails. I gave the dress a quick press - missing a crease on the front of the skirt - got ready, and headed off to see all the Sydney Spoolettes.


Sadly I didn't get many photos at frocktails as I only had my phone and the venue was relatively dim, but it was a fantastic night. There were 70 women all in amazing outfits they'd made, great drinks and lots of food. It's taken a long time, but it was great to finally get so much of Sydney's sewing community together into the one room. Here's hoping we'll have more frocktails events in the future!