Showing posts with label skirt. Show all posts

Friday, 20 August 2021

Building Eloisa and Adrienne

Three new makes for the price (blog post) of one. This skirt and two tops were made in the last few weeks, and bring my Whole 30 fabric usage to 7.5 metres. 

This skirt is one I've been meaning to make. I've had both the fabric and the pattern for at least a couple of years. The fabric was bought at Pitt Trading when they still had a physical store, and is a wool twill.

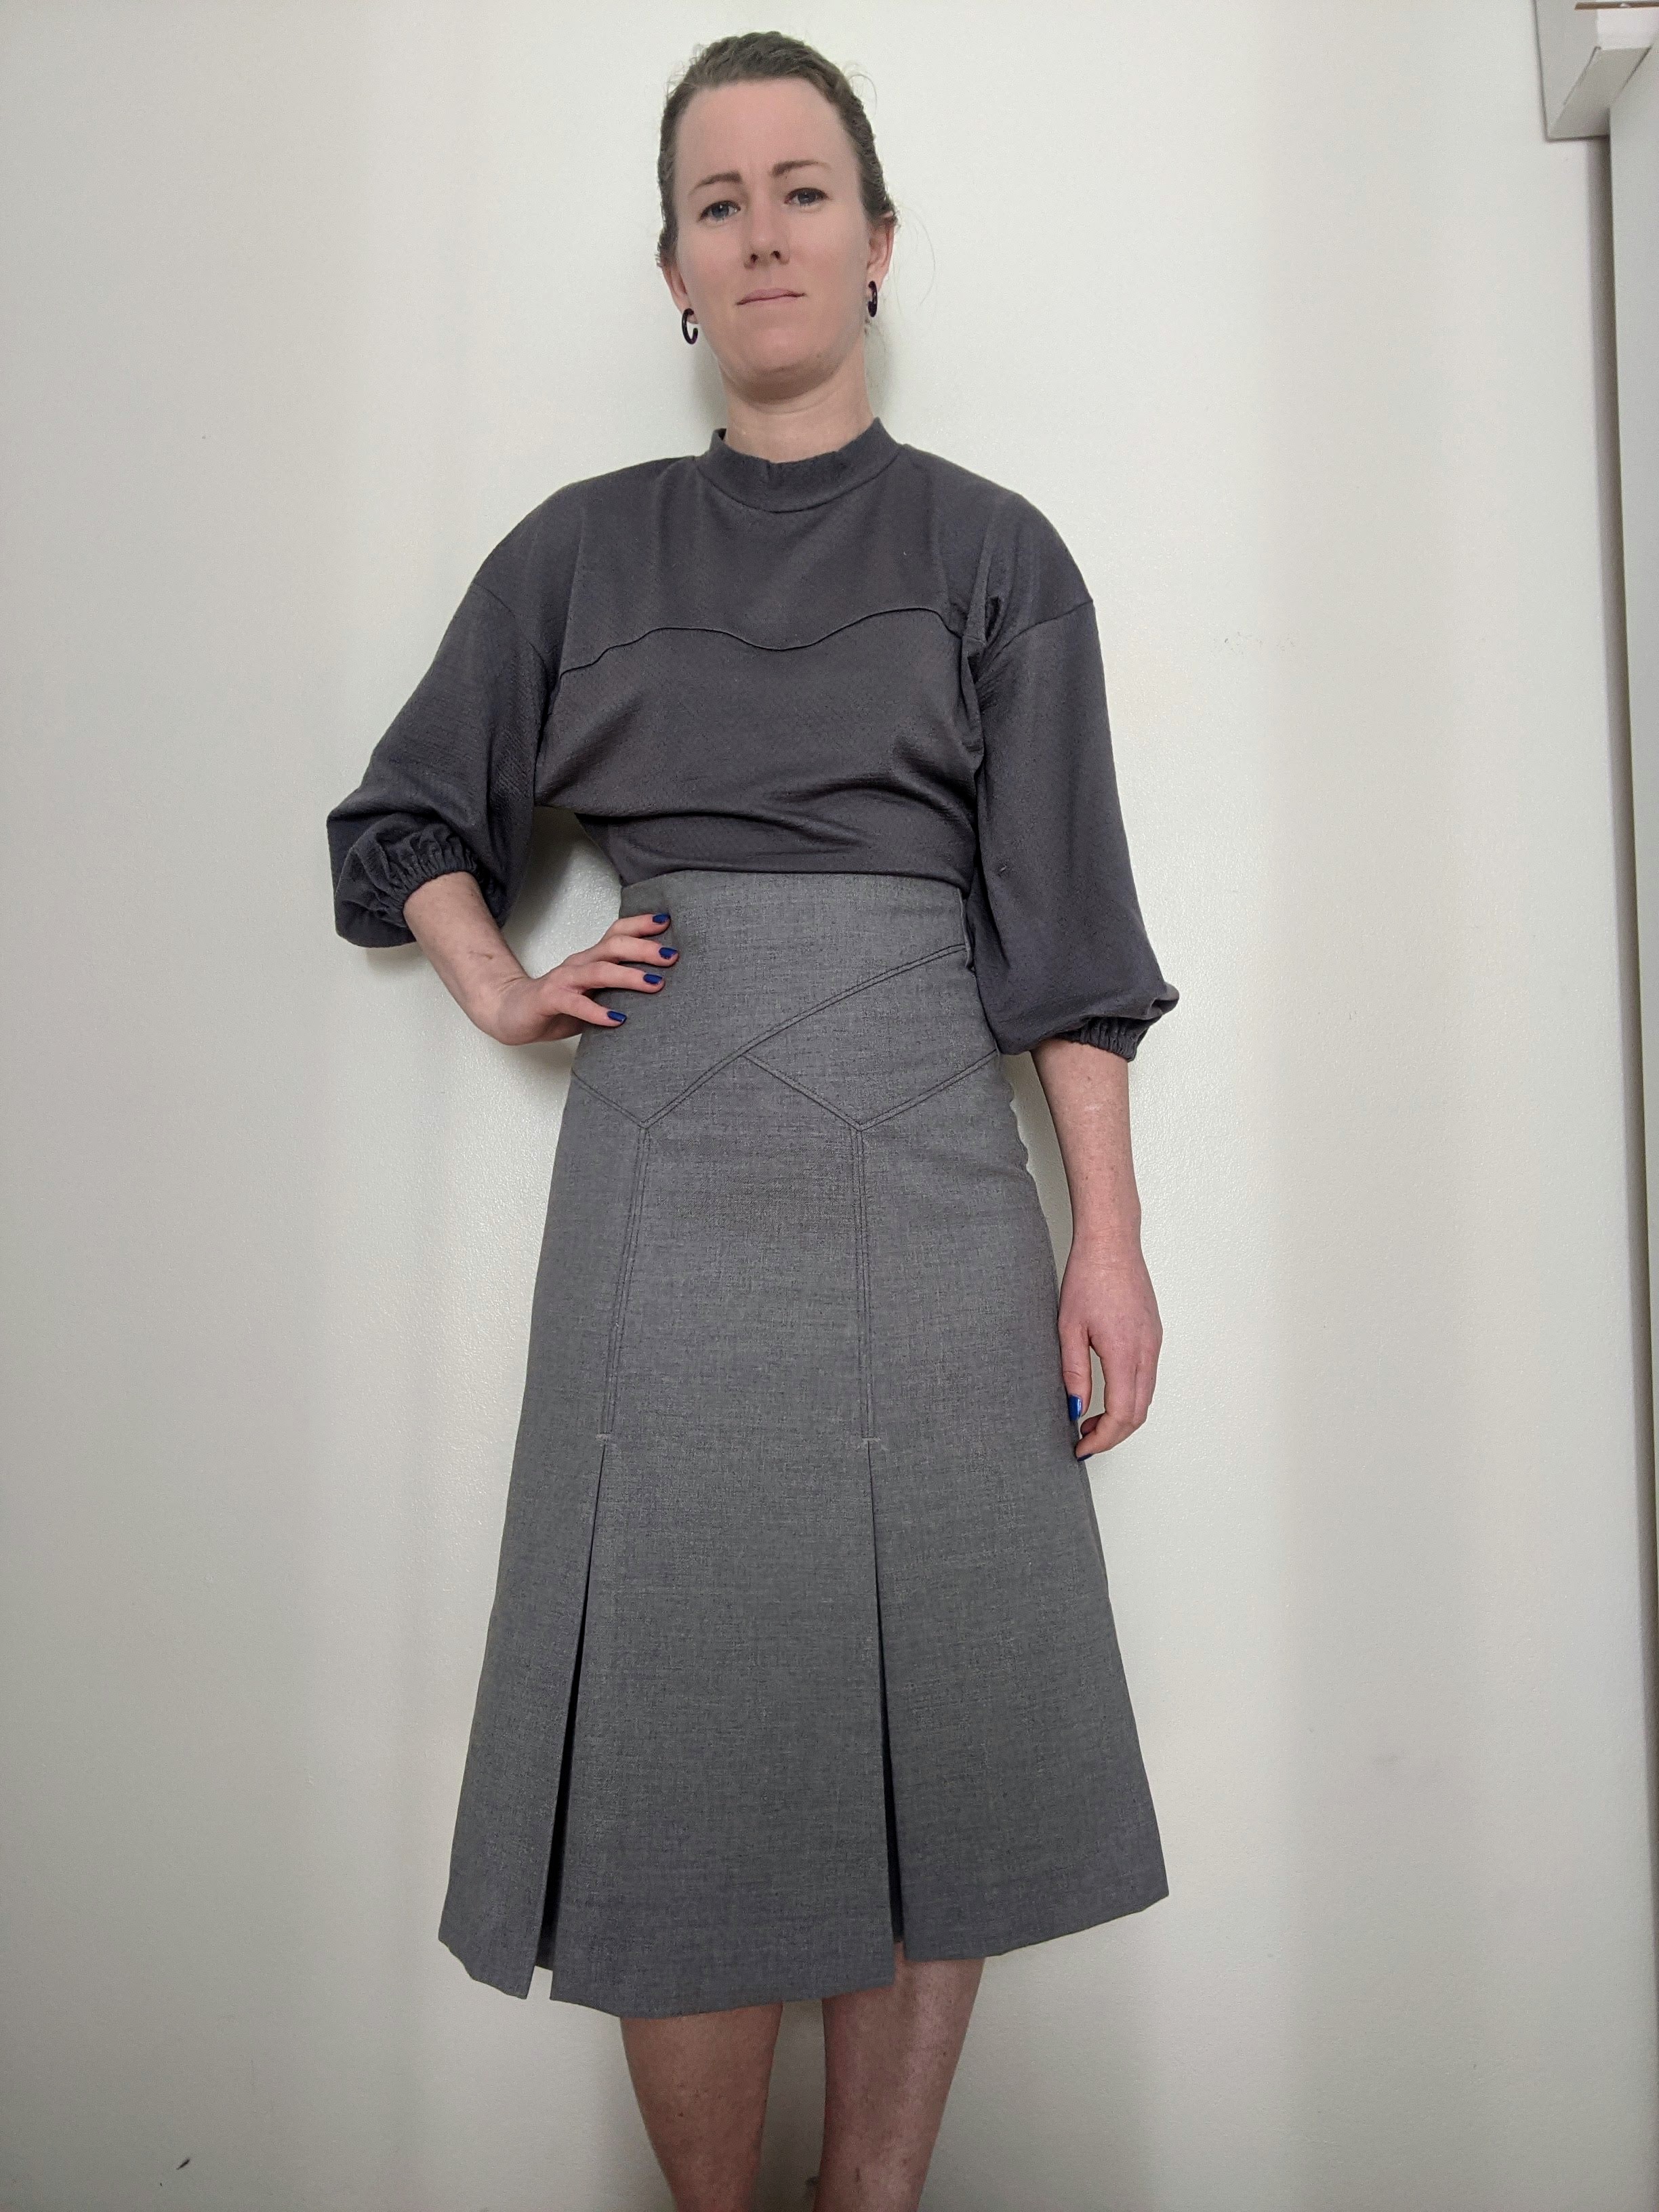
The skirt is fairly simple in design. It's a 1933 skirt from the McCall's Archive Collection. What makes it stand out are the overlapping triangular yoke pieces and lowered box pleats, both accentuated with topstitching. It also has a raised waistband which sits just above the natural waist. The wool twill has a good body to it, so it holds the shape of the pleats very well.

I raised the hem by about an inch to make it a bit  more modern and wearable. It's still very much a 1930's skirt but in a way that feels vintage without becoming costumey. The topstitching at the corners and top of the pleats isn't quite perfectly aligned, but the lines in a grey just slightly darker look great.

The first top is an adaptation of the Eloisa pattern from Named Clothing's new Building the Pattern book. The book's six basic patterns each have multiple variations to play around with. For this top I used the upper front, back and lower front 1 each extended approximately 10cm, the puff sleeve and the neckband. The top was still slightly too short so I added a hem band which I don't entirely like the look of, but if I wear it tucked in like with this skirt it won't be seen. The batwing shape of the top looks nice tucked into a waistband.


The fabric is a charcoal merino jersey from The Fabric Store. It's lightweight with tiny textural pindot perforations, but the pindots do not make it seethrough. This top was sewn up entirely with my overlocker with the exception of the channels for inserting the elastic at the cuffs. The Fabric Store's merino is always lovely to work with and this was no exception. It moved through the machine smoothly, and the curved front yoke seam presses into shape easily giving a nice curved line. 

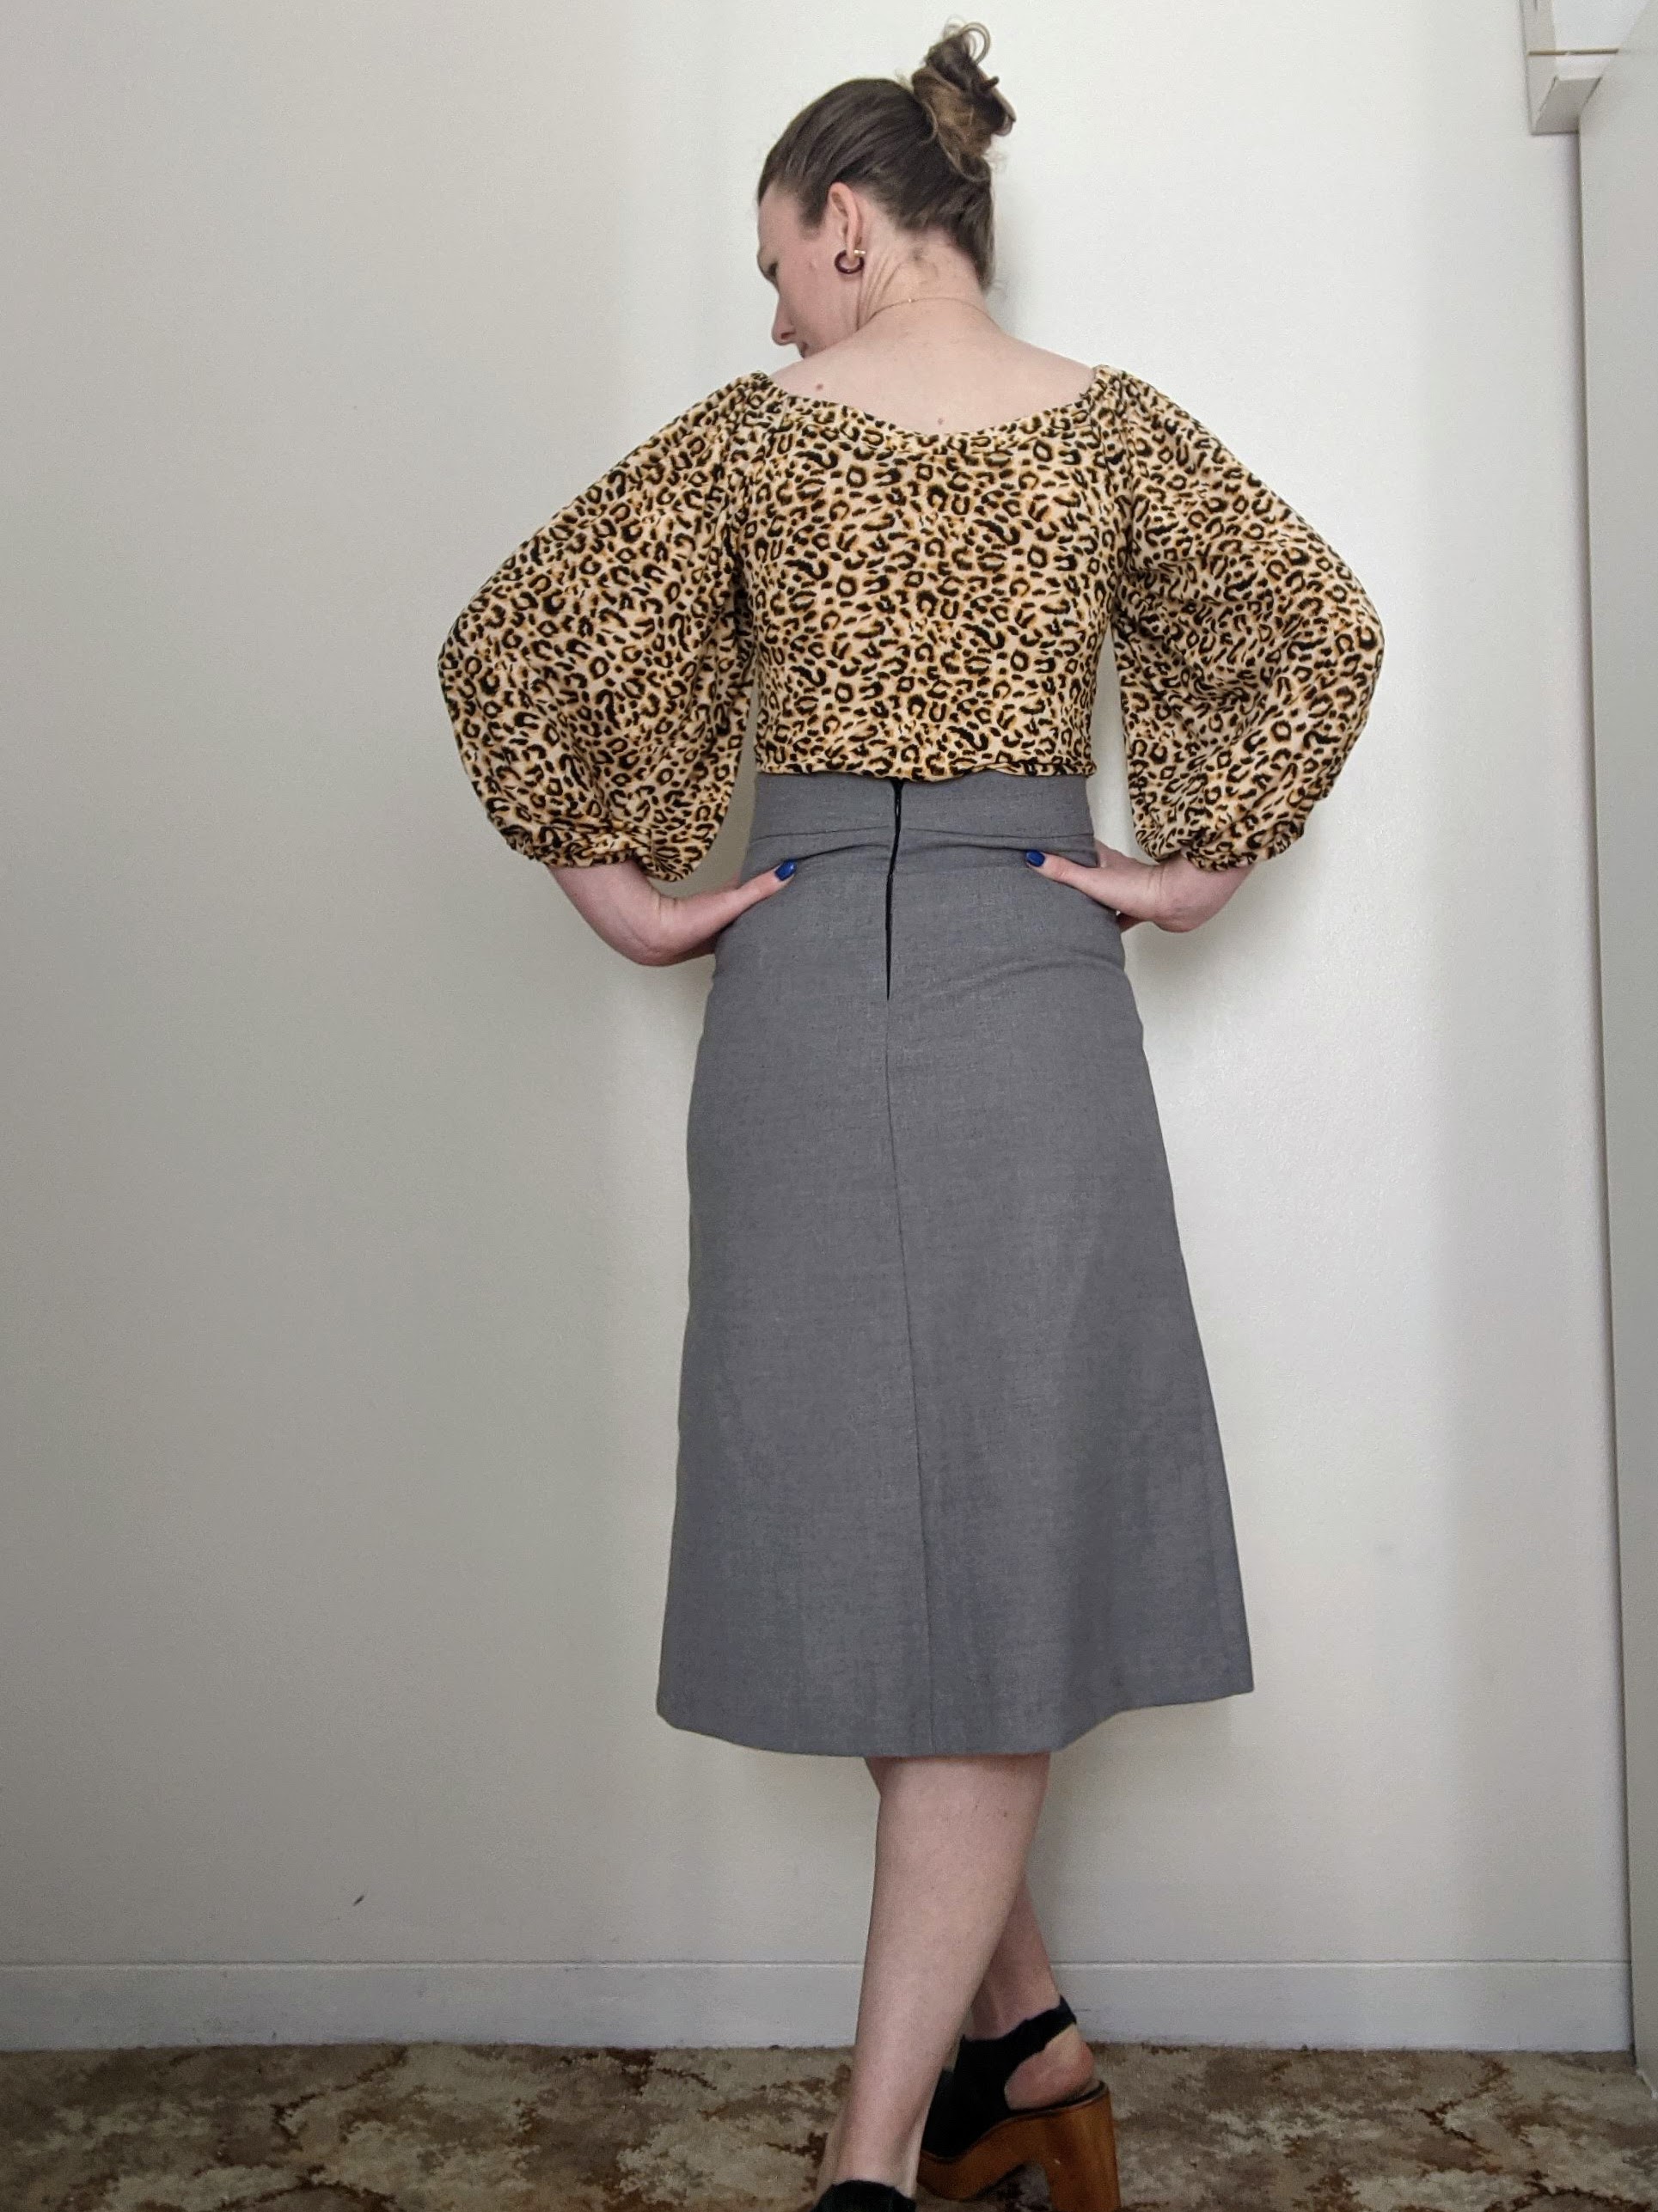
The second top is the Friday Pattern Company Adrienne Blouse. The fabric is a leopard print rayon jersey from Spotlight. As with the first I sewed it up almost entirely using my overlocker. However unlike the merino this fabric was not the most cooperative. It is a very soft and almost slinky fabric which makes it lovely to wear but also very slippy to work with. It was not always easy to get it to move neatly through the machine as it would slip to the left away from the blades. I had to hold the fabric at an angle to compensate for its movement.

The pattern is a very quick and easy make, and probably would be quicker and easier with a slightly more structured fabric. The hem is a bit wonky because it wouldn't go neatly through the overlocker and didn't even out even with pressing so the twin stitched hem isn't quite straight to compensate. If I make it again I'll probably slightly shorten the front neckband so that it sits flatter against the body. But the top itself, with its elasticated cuffs and shoulders, is a beautiful shape.

Overall, I'm very happy with all three of these garments. They each have little imperfections but they've turned out really well.


Tuesday, 21 July 2020

unseasonal skirts


I've done quite a bit of sewing during COVID working from home, but have been slow to post things here. I aim to add a few of my makes before the end of the month, starting with these two skirts which were both made about three months ago.
First up is the Dolores Skirt from Le Maison Victor magazine in May Gibbs Flannel Flowers fabric in midweight cotton from Nerida Hansen. The May Gibbs print is lovely, and such iconic Australiana. This is the midnight shade - the fabric also comes in pink, summer blue and lemon, but I felt those paler shades did not show the print as clearly. This deep blue allows the flowers and bush babies to stand out.


This skirt is a very simple style and straightforward make, just a gathered button up skirt with a waistband and pockets. The gathering is uneven and almost pleated at parts, but because it's relatively full I felt the imperfections don't really show up enough to be worth redoing. The attention is drawn to the print, rather than the size of the gathers.


The buttons are dark wood from Spotlight. I considered white buttons to fit with the print but in the end the wood buttons suited the fabric better, by matching both the tone and feel of the print. 
I really like the length of this skirt. I have a few skirts in this below the knee length, all with moderate fullness. They're relaxed and easy to wear and dress up and down.


This second skirt is from Burda magazine, issue 12/2016, pattern 105. The pattern is a very basic fitted skirt shape, but with the curved zip closure. The pattern actually suggests also having a hidden side zipper, but it isn't necessary so I omitted it. The zipper is a double slide zipper, with slides at top and bottom. I've had it in my stash for a while after picking it up for 50c at an op shop a few years back. When I bought it I didn't have a pattern to use it for, but it really seemed like it would suit a skirt. The zipper is slightly shorter than the pattern asked for so doesn't quite reach the hem, but it didn't affect the making of the skirt.


Construction was mostly straightforward. Inserting the zipper along the curved seams was a bit fiddly, but mostly just required careful pinning in place and sewing slowly to ensure it remained even. It was slightly bumpy when I finished sewing it but that was easily fixed by pressing the stitching. The harder part was attaching the facing behind the top of the zipper curve. The extra bulk meant that the front of the skirt sits about half a centimetre above the back to accommodate the seam allowance even after it was trimmed back. If I'd thought beforehand I might have made the right front (the lower curve) finish half a centimetre lower to help the waist align properly, but it's a minor imperfection.


The fabric is a Liberty of London cotton twill bought from the fabric store, although I can't remember the name of the print and it doesn't seem to be available on their website anymore. The weight is perfect for the pattern, because it has body and holds shape but was still able to handle curved seams. I liked the print as well - it's colourful but still pretty simple and versatile and works well with a lot of things.


Wednesday, 15 May 2019

The Embroidery Skirt


This is my second Me Made May post, but this skirt is not a new one. This was made last year in October. I even took photos of it, but didn't check any of them until after finishing when I discovered none of them were full sized or properly framed. For some reason it has taken me until now to get around to photographing it again even though I've worn it frequently.


The fabric is from The Fabric Store and is a gorgeous embroidered linen cotton. It was such an eyecatching fabric that I picked it up. I knew the fabric needed the be a skirt to take advantage of the print without the garment being overwhelming, and I didn't want to make anything complicated to take attention away from the embroidery. I thought a simple skirt, that was gathered or pleated in some way, would be the right way to use the fabric.


I bought a one metre piece, and the fabric was about 1.5 metres wide. Because my idea for the skirt was something fairly simple, the only decision I needed to make was which way to cut it. The embroidery is in staggered rows down the length of the bolt. My original thought was to cut lengthwise in between the rows because I was nervous about cutting through the flowers, but when I held the fabric against me to check how it looked it just didn't seem quite right.  When I turned it the other way, it looked great.


I had been very nervous that cutting through the embroidery would cause it to fray and fall apart. But using my overlocker to finish the edges of the fabric on all sides helped to stabilise the print. I decided to pleat rather than gather to minimise the bulk around the waist, and to allow the embroidery to feature as clearly as possible.


I inserted the zipper first and then used pins and my dressmaker dummy to pleat until the skirt fit. The skirt has a circumference of almost 2 metres but my waist is only 60cm, so there was a lot of pleating to do. The pleats had to be overlaid on each other to get it down to the right size. There was a fair bit of trial and error in the size of the pleats and how far to overlap them until I got it right. To hold it all in place I hand basted, machine stitched two rows of stitching, and then covered the waist with blanket-width bias binding.


Because there's a lot of fabric the skirt is quite heavy to wear. But it is fitted well so doesn't slip down. The pleating also gives the skirt a slightly full shape which swishes and moves when I walk. This skirt should have made it onto the blog ages ago, and has already had many wears. Hopefully it will have wears for many years to come!


Tuesday, 14 November 2017

The Patti Pocket Skirt


This is the Patti Pocket Skirt from Amy Nicole Studios. A month or so back I was lucky enough to get offered to pattern test a new skirt. And not just any skirt pattern, but one with pockets, which are too few and far between in women's patterns.


The fabric is from My Hung in Hurstville. It's a polyester rayon blend which I've been tempted by for a few years, but never previously had a pattern appropriate for the fabric. The pleats in this pattern needed a fabric that could hold both structure and softness. I couldn't find anything in my stash that seemed quite right, so went looking. Wandering through My Hung this fabric finally stood out as suited to a specific patter.


I made the size 0, view A, the above the knee length. The pattern is designed for petite sizes of 5'4" and shorter. I am 5'6", but long-waisted, so my legs are closer to a slightly more petite height. As such I did not make any changes to the pattern in my construction, apart from using French seams to prevent fraying. I also don't have an invisible zipper foot so had to do a standard zipper insertion. I even followed Amy's instructions to use very few or no pins which was honestly pretty daunting, but actually turned out well.


I started sewing this up a bit later than planned, so I used the second tester version of the pattern and the third tester version of the instrutions. The version I sewed up is I think identical to the final version for this length, and I used the final version of the instructions.


The skirt has six panels as well as pockets. The panels allow for blocking and print mixing. I did consider finding a fabric that would allow proper blocking, but in the end I liked this fabric too much. There is some very subtle blocking as I cut the side pieces on the alternate stripes - the blue and gold match all the way around, but the purple and peach alternate.


Overall I was very happy with this pattern. It was quite straightforward to make, with instructions both clearly written and with clear diagrams. The pockets on this skirt are slightly looser than the body of the skirt, which at first meant I thought I had cut the pieces unevenly. But the instructions do say this is intended, and it does mean there is room to properly use the pockets. The only small thing to note about it is that you need to take care when pressing the pleats and pockets to avoid uneven creases.


I really like this pattern. The pockets are a good size, the pleats are lovely and the length is great. The sizing worked perfectly on me, but for anyone taller or with longer legs it would probably be necessary to lengthen the shorter version A length. I am thinking about making the version B midi length, or possibly just a different version of this short length. It's a lovely skirt, and I definitely recommend it.


Saturday, 16 September 2017

The Pais-Liberty Skirt

I've been a bit slack on posting for a while, and very slack on my Vintage Pledge for this year but with this post I'm starting to rectify that with this colourful paisley print skirt.

This skirt is a very simple and classic A-line. The pattern is Simplicity 8363 from 1969. I made version 1, without the pockets or suspenders. It's a teen sized pattern which are sized a bit differently (they generally have a wider waist and narrower bust) but I didn't have to make any adjustments. Given the skirt is A-line, it simply needed to fit my waist and the shape would be fine on the hips.

This was a very straightforward sew. I've made this skirt before, version 4 in a fabric almost identical to the envelope. This time it's the plainest version of the skirt possible. I've done French seams again, so everything is neat and tidy inside. The waist facing was hand sewn for neatness, but the hem is machine done. I don't tend to like visible stitching, but the fabric is so busy that the stitching doesn't stand out.


The fabric is from The Fabric Store. It's Liberty Darlington Twill. I haven't sewn with Liberty much because it is pricey and I don't want to mess it up, but it is so lovely to sew. It cuts easily and evenly and glides through the machine, and the colours are so wonderfully vibrant. The fabric also simply feels great, unlike some others, especially cheap polyester. I have a few more pieces of Liberty in my stash, so maybe I will be motivated to pull them out and use them.


The jumper I'm wearing with this skirt is another new make, which should be up very soon too. And I have a few more things finished, partly made or ready to go, so hopefully this blog will become a bit more active - at least for a while.


Sunday, 28 May 2017

Messy Artist and Geographer Skirts

Two new skirts for today's post, one work and one casual, so this post is a bit longer than normal but that makes up for the recent infrequent posting.
Both of these were made without a pattern, and both fabrics are from Spotlight.


While I didn't use a pattern for the Messy Artist skirt, I did do a quick google about how to draft a knit skirt. I found a useful how-to on Maria Denmark's website with instructions on how to measure. It's quite straightforward: you use your waist and hip measurements minus four centimetres, then divided by four, and the distance between the two.


The skirt is just two identical pieces, one front, one back. On the fold, you use the waist minus four then divided by four measurement, then measure down the distance to work out where to widen for the hips. I used my french curve to angle out from the waist to the hip. This is a bit trickier, because the curve of each person's side is different, But with a bit of attention and awareness of your shape it's relatively straightforward to measure. After that it's just measuring the desired length for the skirt.


I had been going to put elastic into the waistband, but given the fabric is a scuba knit a separate waistband wasn't necessary. I'd planned to use a wide elastic, so had added 10cm to fit it in. When I'd sewn up the sides I tried the skirt on it fit well enough that I decided not to add elastic. I also liked that the extra fabric allowed me to make the skirt either a normal waisted or high waisted skirt, so decided not to cut it back.


The entire skirt was about 20 minutes of work. It took longer to decide on the right placement of the print for the front and the back, working out which bit of paint and which colour I wanted where. It's all sewn with a zigzag stitch for stretch. I made the skirt slightly A-lined, so it's a snug fit to the hip but then hangs down a bit looser to just above the knee.


The fabric for the second skirt is one I've had for a couple of years. When I saw this fabric I loved it immediately. I am a geographer, so I felt like I had to buy it. It was always going to be a skirt, but it took a while for me to get around to it. I bought two panels of the fabric because I wasn't sure what would work best. The width of the panel was wide enough to fit around my waist, but adding darts would have meant losing some of the map. With the two panels I could have one front and one back, with the option to gather or pleat the waist.


In the end I decided to make the skirt pleated. The fabric is a cotton duck, so it has quite a bit of body and I felt it would be too full if I gathered it, and the waistband would be too bulky. I also put pockets in the side seams, although I initially sewed them inside out.


Even though I used two panel pieces for this skirt, for some reason I decided to put the zipper in the centre back instead of the side seam. This meant inserting it into the middle of the back panel, Given cotton duck tends to fray quite a bit this was a daunting - and honestly stupid - challenge. I folded the skirt to find and mark the centre back and used fusible interfacing to try and stabilise the fabric. I then marked the length of the zipper and stitched around the sides and bottom of the line. Next I cut along my marked line, with diagonal cuts at the bottom to the corners of my stitch line, folded the fabric back to the stitching, and pinned my zipper in.


Unfortunately when I stitched it in it didn't quite work. I hadn't folded enough fabric over, so my machine didn't catch it to stitch down properly. And at the bottom it didn't catch the triangular piece of fabric at all. So I pulled the zipout, did a new wider line of stitching, and tried again. Fortunately, this time it was successful.


After putting in the zip, I needed to work out the pleats. I pinned the side seams to my mannequin and started arranging the pleats. I didn't do any measuring, I just eyeballed where to fold. I tried to make the folds opposite on the back to the front so that in theory all of the world is visible around the skirt. I pleated and pinned until the skirt fit the dummy, then stitched the pleats down.


The skirt is finished off with a bias binding waist and a narrow hem. The hem is just double folded narrowly to not lose any of the print. I used 12mm bias binding for the waist. I stitched the binding on the inside of the skirt, folded it over to the front, and stitched it down.


 I'm really happy with how both skirts turned out, and have already worn each of them. They also both received a lot of compliments when I wore them, and questions about where I bought them - especially the geographer skirt. It was great to be able to tell people that these are made by me.


Wednesday, 29 March 2017

Faded Mosaic Top and Classic Grey Skirt


Two new makes today, a top and skirt to wear to work. Both are simple makes in classic styles, making them very wearable.


The top is the Betty Blouse which was in Simply Sewing magazine last July. I rarely buy sewing magazines, but I'd been looking for a non-button up short sleeved blouse pattern with no closures or complications. This pattern was pretty much exactly what I wanted. It's a simple woven blouse with just a front and back piece and pintucks.


The fabric is a viscose from Tessuti called Running Out Of Blue. The print is mosaic style and changes from peacock blue through to rust about every two feet. I hadn't realised the print changed colour when I picked the bolt up - I'd just liked the peacock blue - but when it was being rolled out to be cut I saw the rust colour emerge. This meant I had to decide how I was going to use the shifting colours in the blouse, basically which colour I wanted at the neckline and which at the hem. After holding it up against myself each way I decided the blue at the neckline was the way to go.


The fabric is beautiful with a lovely hand, but being a lightweight viscose it was a bit slippery to pin and cut out. Fortunately the print gave me handy lines to cut along to even out the hem and shoulders! The print was also very helpful for making sure my pintucks were nice and even - I could fold in the middle of the squares and stitch along the second outline and know that each pintuck would be exactly the same.


The skirt is an adjusted version of the straight skirt pattern in the Blouse Skirt and Pants Style Book. The fabric is a lightweight grey wool check from The Fabric Store, lined with some grey stretch woven cotton I'd bought for another project but found was the wrong weight. The zipper was stitched in by hand to try and keep it looking as neat as possible.


I used my French curve to slightly widen out from the waist to a more A-line shape. It was mostly an easy make, except that the two different fabrics do handle differently. I had measured them the same, but when I went to sew it up the shell was wider at the hem than the lining. To fix this I stitched in the side seams on the shell, It was still a little too wide when I sewed the hem, so I had to slightly fold it at the seams, but hopefully it isn't visible!


Because it's such a straightforward pattern and I'd used it once before I didn't look at the instructions, and so forgot that the pattern doesn't include seam or hem allowance. It didn't matter for the seam allowance given I'd already widened the skirt, but it did mean the hem was shorter than I initially planned. I had some fabric left and was going to put a flounce on for extra length, so I measured a curve, cut it out, and then realised I'd measured the outside rather than inside length of the curve, so the flounce was too narrow. So I folded the hems of the lining and shell in towards each other as narrowly as I could and stitched close to the edge. The length is actually fine, it's just not quite what I'd planned, but I'll get used to it.