Tuesday, 15 March 2016

Polkadotted Twirling Dress


I can't think of a better name for this. It's a dress, it's covered in polkadots, and it's impossible to put it on and not start twirling, so polkadotted twirling dress it shall be.
This dress is made of 5.5 metres of vintage nylon chiffon-like fabric. I don't know the date that it's from, but it's probably from the 1950s looking at the print and the type of fabric. It's semi-sheer, has finished selvedges and is very vibrant in colour, but not the most breathable fabric.


The dress is self-drafted for a number of reasons. I wanted to use as much of the fabric as I could (only two very small offcuts didn't make it into the final product), and the finished selvedge meant I'd need a pattern that had straight edged skirt pieces. In addition, the width of the fabric wouldn't work for every pattern, so I decided I should just come up with something myself. It still took me about four years to both come up with how to use this fabric and have the courage to cut in to it. I haven't seen vintage nylon fabric any other time, and I doubt I'd be able to find much again, let alone something as glorious as this print, so I didn't want to wreck it.


In the end the width and amount of the fabric meant a very full maxi dress was the only choice. Because the fabric frays like crazy - not exactly a surprise for a nylon chiffon - I wanted to use the selvedges where I could. For all the other seams, I decided to cover them in bias binding. The larger polkadots were a obvious choice to have at the bottom of the skirt. The fabric was fairly wide, so works for an empire line to floor maxi skirt. I cut off about 50cm to be the bodice, and used the rest of it for the skirt.


Now I'm pretty small, and have a very narrow ribcage, so reducing the five metres I had for the skirt in so that it fitted me was fun. I briefly thought about gathering it, but that wasn't going to work with this fairly delicate fabric, so lots of pleats was the only other option. I've honestly forgotten how many pleats were involved, but from memory it was a bit over 60. In fact when I'd done the pleats it was still slightly too wide, so at each side I pleated the pleats in a further inch each. There's a lot of thread ends I still haven't brought myself to do something about!

The bodice is incredibly simple but effective. It is two strips of the fabric, slightly overlapped at the front, and folded over the shoulders to meet at the centre back. They're overlapped at the sides and hand stitched together to form simple sleeves. The effect gives it a simple V front and back, with hints of 1930s and 1970s styles. Given how big the skirt is I wanted the top to be as simple as possible. The bias binding just gives it that little bit of a finished look.


I decided to use blue bias binding rather than red to match the polkadots. I wanted a satin bias binding but couldn't find one in the darker shade of blue. Still I decided I preferred the sheen to the colour matching, so went for the royal blue shade. As it's only visible as a finishing for the bodice and is meant to be noticeable I felt the different colour was fine. Fortunately I already had a red zipper in my giant stash of zips.


When I started sewing I was using a size 9 needle, but the stitches were a bit loose. I had a look at my machine's instruction manual ,and it actually suggested using a blue-tipped needle to sew very sheer fabrics. I was a bit unsure, but it worked fantastically well. Because the fabric is delicate I of course was careful putting it through the machine, but didn't have any problems with it catching or tearing which I'd been scared would happen.


I have to be honest that I'm not completely sure when I'd wear this dress. It's very light, but it's so big that it's far too easy to step on. I think it's something that Florence Welch would love to wear, but it's not necessarily practical for most peoples' day-to-day lives. And as someone who's pretty good at tripping over and getting myster bruises. I don't know that a dress with five metres of skirt to tread on is something I should really be trusted with.

But the fabric was too beautiful to resist. And the twirly factor of this dress is so much fun, too. I think half my photos had to be discarded because they were fuzzy, but I just had to play with its movement. So I will find reasons to wear it, and just make sure to bundle it up in my arms when I walk so I don't tread on it or tear it.


Wednesday, 24 February 2016

Tula and Henry Retro Blouse


These very girly fabrics were just made for this 1940s blouse. Such old fashioned girly fabrics, such an old fashioned girly blouse. Both in a good way. The main fabric is Tula Pink, from her Parisville collection, and is called Topiary. The pink peplum and collar fabric is a Henry Glass, and is called Miss Modd.


I've actually had both fabrics for almost five years but couldn't find what I wanted to make with them. I'd thought of using them together, but was a bit in two minds about it, and didn't have any patterns that really felt like they were right for either fabric. But when Spotlight had a pattern sale a few months ago I managed to snap up a few reproduction vintage patterns, including this one. Although the original pattern doesn't call for two contrasting fabrics, when I was going through my stash to find something to make the blouse with, it was clear that yes, the fabrics do work together, and this was the pattern that would make that happen.

This blouse is another addition to my work-appropriate clothing needs. The pattern is Simplicity 1590, which is labelled as a "Misses' 1940s Retro Blouse". There are two variations, this high necked option or a scoop neckline. Because I wanted to use the contrasting fabric I decided to make the high necked version so I could make a contrast collar. But I did leave off the waist ties and neck bow, deciding they were probably a bit much on an already very girly blouse.


I'd forgotten how high the necklines tend to be on 1940s patterns! I've made a few in the past and generally lowered the neck a bit at the front so it didn't feel tight, but I forgot to do that with this pattern. So because it is slightly uncomfortable done up, I decided to leave the top button undone. Also the way the collar is made it won't sit properly if I have the top button done up even though I'm sure I followed the pattern correctly, so I'll just leave it undone when I wear it. It kind of makes it a bit more modern and less costumey, too, to wear it not done up to the top.

When it came time to choose buttons for this blouse, I wasn't really sure where to start. There's a lot of colour in the two fabrics, so trying to find something that matched was a clear possibility. But then I had to work out what colour to match. I decided not to try and match one of the secondary colours in the main fabric's flower circles because I thought adding anything extra to the two already dominant colours might be a bit much. Pink buttons was my next thought, so that they'd join the collar and peplum as a contrast. But when I went through my tin of vintage buttons I inherited from my grandma I found these green ones. The colour isn't a perfect match but works tonally, and there were the exact number of them that I needed. I did do the buttonholes in pink thread to keep the contrasting going.


 I'm mostly happy with this blouse. I've alreay mentioned the very high neckline which I can't button all the way up and have it comfortable and have the collar sit right. I also should have slimmed in the front bodice from the waist to the underarms. I don't do it for every pattern, but the way 1940s patterns emphasise the shoulders means they can be a little baggy on me around the bust. I could always go the whole way down the 1940s path and add shoulder pads to give the blouse a lift, but I think it's fine without it. Pattern placement for the main fabric was another issue I was conscious of, and I don't know that I got the best result, but I did manage to avoid anything inappropriate. But weirdly the thing I'm least happy with is the back seam for the peplum. It tickles me whenever it moves, which is going to take some getting used to.


But still, it's a lovely pattern, and gloriously girly fabrics. And it's nice to have used some fabrics that have been in my stash long enough they could be starting school this year! This is also my first vintage pledge make for 2016. I'm aiming for at least eight, so we'll see how I go.


Saturday, 13 February 2016

Midsummer Day's Dress


This is the Midsummer Night's Dream Dress by Papercut Patterns. Papercut are a great New Zealand independent pattern company who make some really elegant but easily wearable patterns.


I've so far only made a few Papercut Patterns but I've really enjoyed them. The packaging is lovely, and the instructions are clear and well-written. This dress was fairly quick to make in terms of the actual sewing. It's quick to make because although there are a few pieces - three skirt, three bodice, ties and binding - it's very straightforward to put together. All the stitching involved is straight stitching. Attaching the self bias needs a little more attention and effort to make sure it's folded and placed correctly, but it is easy enough. My fabric didn't entirely press down sharply so I had to use more pins to hold it in place, which makes sewing a little slower, but made sure that it was all even and correct.


I did find that the bodice was initially a little loose around the arms and potentially would slide down and expose bra sides. I'd already added the binding andstra ps and didn't really didn't want to undo all of that just to trim the bodice in, so I decided to put a few quick tucks/bust darts in at the sides. There are two on each side, and the print of the fabric makes them imperceptible. They're just enough to pull the dress in around the arms without affecting how the shape of the bodice or how the dress sits.


This dress was also my first rolled hem. As with all sewing machines, mine has a few different feet, some of which I've never really used. After hanging the dress for a couple of days to let the hem settle, I luckily only had to trim off a little unevenness. I then tried it on to decide how much I wanted to hem it by, and was pretty happy with where it sat. So I decided to have a go with my rolled hem foot. I also thought a rolled hem would be a good choice for the flow of this dress, as a minimal hem would have no effect on the dress' shape and movement. The fabric did try and slip out of the coiling part of the rolling foot, but it turned out almost perfectly even, which I was pleasantly surprised by.


The fabric is a rayon crepe from Spotlight. Given that the skirt is pretty much a semicircle, the print couldn't be anything directional. The dress also has a soft flow to it, so the fabric also couldn't be anything heavy. Originally I was looking at some all over floral prints, but when I saw this one I thought it would be perfect. The colourful jagged waves already have the look of movement, so it was well-suited to a dress with flow. It's also lightweight without being completely flyaway, soft but not see-through.


This one has taken a lot longer to get to here than it should have. I got the pattern in June, the fabric in September, and made the dress over the Christmas-New Year's break, and finally got around to wearing and photographing it yesterday. When I bought the pattern and fabric it was of course still cold, but the summer's been long and hot, and this dress is perfect for that sort of weather. Better late than never.


I love this pattern because not only was it easy to follow and the final dress beautifully elegant, it's also a wrap dress so it's relaxed and comfy. And isn't that one of the best things about sewing? You don't need to choose between comfort and look - with the right fabric and pattern, you get to have both.


Thursday, 4 February 2016

Flower Power Midi


Floral prints seem to be in at the moment. At least I've seen a lot on sewing blogs, in fabric stores, and in the windows of clothes shops. But I haven't seen so many giantly oversized florals like this 1950s-feel midi skirt. So I guess this skirt is both on-trend and individual.


The fabric is an old doona (quilt/duvet) cover I picked up at an op shop a few years back. Op shops can be great places for fabrics, and very cheap too. When I picked it up I didn't realise it was double sided - this skirt is only one quarter of the fabric. As soon as I saw the doona cover in the op shop I thought the giant flowers would look great as a skirt, but when I realised there were a total of twelve flowers, I thought I should come up with something that used more, if not all of it. But I didn't have any ideas, and so I put it away, buried in my overflowing fabric drawers.


From memory there was no label on the doona cover when I bought it, but the print seems to me to be a bit Skandinavian. Whether it is Ikea fabric or just trying to look like Ikea and Marimekko prints, it has that sort of style. Each flower has a different coloured centre: yellow for the centre front flower, red for the left, blue for the right.


 The skirt itself isn't really that exciting. It's self-designed, and without any measuring at all. I simply sewed up the back seam leaving room for inserting the zipper, and then went to work pinning it on my dressmaker's dummy Ilse-Jane. I eyeball measured to try and keep things even, although the side pleats are narrower than the front and back pleats. But the large-scale print means that these slight differences don't really matter - the flowers still stand out anyway. I hand-stitched the waistband down so that I only stitched through the insides of the pleats, allowing the pleats to stand out and so that there was no visible stitching line through the tops of the petals.


I have to admit that generally, the midi length isn't really my favourite. I think it can look a bit odd, either like a child playing dress ups in their mum's clothes, or  a kid wearing clothes they've outgrown. But with this print I really had no choice. There was no other way to show off those giant flowers. I do like how the length looks, I really do think it suits the print, but the length still isn't something I normally wear, so it is going to take some getting used to.

Although I'd had this fabric for ages and had known exactly what I'd wanted to make when I saw it, it took somewhere around 4-5 years to get around to making it. I do still have three quarters of it left (anyone want it?), but I have been thinking about the need to sew my stash, rather than just buying more fabric. And especially making something like this, which was not only something I'd already completely decided on but was also extremely quick to make.


Monday, 25 January 2016

Tropical Splash Swimsuit


Yay I made a new swimsuit! This is the Splash Swimsuit by Lily Sage & Co. It comes in both one piece and bikini. She released it last Northern Summer, so I'd been waiting for it to warm up before putting it on my sewing list. Then I needed to make a few work-appropriate clothes (more to come soon), but I finally got around to starting it last weekend.


I bought these fabrics at My Hung in Hurstville which has a huge range of lycras. When I went looking for fabric, this wasn't really what I had in mind. The pattern has the option to do the straps and waist and side bands in a contrast fabric which I'd decided to do, but I'd been thinking of using a fabric that was, well, at least a bit more restrained than this one. I was thinking block colour contrasts and colourful but muted main fabric, but once I saw this fish+flowers+waves+seaweed+gold foil nothing else looked interesting. And with the contrast accent again I did try and look for something that would tone it down, but nothing looked like a good match. So instead I went the whole hog and got some fluoro orange to match the fluoro orange fish. Very grown up.


Making the suit itself was pretty good. The instructions are well written, although I did need to reread how to do the straps a few times just to reassure myself that I was doing the right thing. But it was easy to follow. Sewing lycra, swimsuit lining, and swimwear elastic isn't easy - they do all have stretch, but different amounts which can make it awkward to keep things in place. There's a fair amount of basting in this pattern, which is helpful in address those issues, though.

I made a straight size 6, the smallest size. I'm long waisted, and so one piece swimsuits are often a problem for me as if they're long enough they're far too wide, but if they're fitted enough they're often too short. I'd seen a few others made up and lots of comments that the bottoms are quite high waisted. Because the pattern sat high I decided to not make any adjustments, but if I make the one piece again I will lengthen the bodice a little, maybe half an inch. As it is at the moment, the bodice pulls the bottoms up just a little bit over the waistline. It's not something that's a problem, but it is something that I'd fix in a future version.


I finished it off this past Saturday, finally getting the straps sewn. I won't post any pictures that give you a close view of them because, well my stitching is pretty woeful. I used a three point zigzag like the instructions say, and the stitching is fine. The straps themselves, however, are not so good. Trying to fold the lycra over the swimwear elastic, keep it even, keep it straight, and feed it through the machine takes either a lot more practice, or an extra five hands, or probably both. Either way, mine certainly don't look anywhere near professional. But they are functional, and they're tied up behind my back where I can't see them, so I think I can put up with them.


I made one change to the pattern, adding contrast bands on the legs. The pattern says to put in swimwear elastic and fold over the main fabric of the bottoms and stitch it in. But I tried the suit on and it was definitely already fitted enough and didn't need any elastic to keep it snugly in place. Also I was still a bit frustrated from sewing the straps and didn't want to use any more elastic unless it was necessary. Instead, I decided to cut a couple of extra pieces of fluoro orange lycra to act as contrast bands. Given every other edge has the contrast orange, I thought the legs needed the same. So I cut out the extra pieces, stitched the ends together to make one piece, stitched them right sides facing to the bottoms, then folded them over to the inside and finished off with a three point zigzag.


Although I finished the suit on Saturday I wasn't sure when I'd get to photograph it. Although Sydney's had a very tropical summer this year - constant temperatures up in the mid-high 30s followed by big thunderstorms - by the time I get home the storms are in full blast. And then this weekend was a bit grey and not really the right weather. Luckily not only is today a public holiday but it's also been fairly warm and sunny, so I took the opportunity to get the photos done.


I'm also very lucky that we have a pool so I can get the pictures in the suit's natural environment. With bonus fake rock waterfall and ferns for a 'tropical' feel. I even gave it a quick test swim (our pool's looking a bit dirty because of all the storms) and it did fantastically, no loosening or slipping out of place.


Overall, I am very happy with this suit, even if the straps are badly done. They're on, and they work, which is the important thing. And I love the slightly garish tropical fabric! I have a fair bit of it left - who knows, I might even make the bikini version and give myself a matching set.


Thursday, 14 January 2016

Hot Day Work Outfit


First post for 2016! It's taken two weeks, so it's a two-for one post this time. I did get some sewing done over the Christmas-New Year's break but hadn't gotten around to taking any photos until before work this morning. It's lucky I took these photos first thing this morning, because after reaching 40° around lunchtime Sydney had some big thunderstormsthrough the afternoon, and I got soaked to the bone crossing the road from the train station to the bus stop on my way home.


As with my silk Kate Top, this outfit is specifically things I made that I can wear to work. Both of these patterns are from Japanese pattern books. The top, which I'll call the tie shell, is pattern I from les couleurs francaises. The skirt is the first variation of the straight skirt pattern in the blouse, skirt and pants style book. Neither are English translations of the books, although there are a few diagrams and illustrations. Still, it's best to have some reasonable sewing knowledge before tackling a pattern you can't read.


The top is made with a poly crepe from fabrics by Gertie, bought at Spotlight. Unfortunately, given that it was a remnant-sized piece I was pretty limited in what I could do. I chose the tie shell because it didn't use too much fabric. I had to compromise slightly. though. Japanese patterns don't have seam allowances included, but my fabric was not quite wide enough to add seam allowances for the back piece. It still fits and the back looks fine, but there should be a little extra length in the front upper bodice. But you do what you can with the fabric you have.


Other than that little issue the top was a very easy make. I did French seams, the narrowest folded hem possible to keep as much length as possible, and finished the neckline and armholes in off-white satin bias binding. As the shoulder straps are fairly narrow, the binding overlaps itself. I decided to sew the neckline first, and then only sew the armhole binding up to the neckline stitching, rather than having overlapping stitch lines. That way it has a cleaner, even line, and looks more professional.

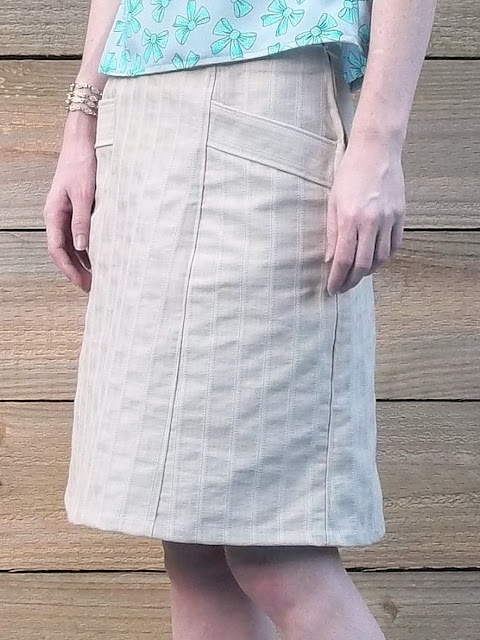
The skirt is made with a heavy cotton from Tessuti Fabrics. I bought it at the same time as the silk for my Kate Top. I wanted something light in colour that was simple but not completely plain. This cotton is textured but not printed, so it fight the bill well. As it has a fair amount of body it needed to be a skirt with a more solid shape, and this six gored A-line skirt seemed just right.

This pattern was trickier to use than the top. The pattern book has a handful of basic patterns and then gives options for how to vary it to make other styles. This was a relatively easy variation, except that I decided to make some extra changes. The diagonal pieces on the side fronts of the original pattern are fake pockets, but I decided I wanted real ones. Measuring out the extra pattern pieces I needed was okay, although I did manage to sew a pocket bag on inside out. Putting the zipper in was a bit more of a problem. Because the fabric is a little heavier, once you put together the lower skirt front, the pocket bag, and the pocket top, it starts to get pretty thick. My machine wasn't too happy about that, and so the stitch line is a bit wonky and the zipper is unaligned by about 5mm at the top. I thought about redoing the zipper, but decided it's not obvious so I couldn't be bothered.


So apart from getting rained on coming home, I'm happy with both top and skirt. The top is light and breathable, and the skirt's shape and neutral tone will make it a really flexible item. Plus, pockets! It's been a while since I've used a Japanese pattern and they're always a bit daunting, but I've always had good results with them. Both books have a number of other great patterns, so I've no doubt I'll make a few more of them in the future.