Sunday, 17 May 2015
Pajamapalooza!
This is a four for the price of one post. A month back Sydney did its usual mid-Autumn thing and switched to cold nights. All my old winter pajamas were well and truly falling apart, so I really had to hurry up and make some new long-sleeve PJs. And so here is most of what I've done in the last month. Three pairs of pajamas and one dressing gown, all the sleepwear I need to get me through the cold months and the spring. As with my Sari Pajamas I've used Closet Case Files' Carolyn Pajamas pattern.
So I'll write about the PJs in the order I made them. First up were the long sleeve sari pajamas. I loved the luxurious look and feel of my short sleeve version, and had an enormous amount of fabric left over so had already decided to make these before even finishing the short version. The weight of the fabric also means they're trans-seasonal, so I thought making them first would mean I had a bit more time before I needed to make warm ones, but the weather had different ideas about that. Anyway. The only real difference, and I did this for all three pairs, was I left out the collar interfacing. The collar maybe doesn't look as nice, but I prefer the softer feel. Other than that, this pair again has french seams, and again I used the fancy embroidered selvedge in place of added cuffs on the sleeves and pants - it gives the exact same effect, and also means no need to hem!
When I was looking for flannelette for winter pajamas I decided to try and look for more muted, classic prints. So obviously I bought rainbow striped fabric with polka dots. It's very grown up fabric. Anyway, this pair I had a lot of dramas with. Starting with being an idiot and not checking how much fabric I needed and buying too little. The stripes being horizontal for the top's front and back and vertical for the sleeves and pants was not part of the original plan, but it was the only way I could get the pattern pieces to fit. And even then I couldn't get the pants pieces on properly so they have wide cuffs. You can see that the print doesn't match up for the bottom 6 inches. And I had to use a contrast fabric in black cotton for the waistband, pockets, collar, and facings. And I managed to screw up sewing these, putting the first pocket in incorrectly THREE TIMES! My brain obviously needed a break from sewing pajamas, so I made the spotted shift dress before embarking on my final pajamas.
For this last pair I managed to buy a less garish fabric and get the right amount of it! So it was doing better than the previous ones right off. I decided this time to leave off the collar, and just have a rounded neckline. So I made a back facing to go in place of the collar, and slightly reshaped the neckline to be a curved v neck. I did make one error, accidentally putting the buttonholes on the wrong side, but that's a minor problem. I also squared off the top for the two flannelette pairs, because it was easier than doing a curvet hem on the thicker fabric.
And last but not least, the dressing gown. I made this after the long sleeve sari pajamas and before the flannelette pairs, because we had some big storms come through and it was horribly cold and this was the quickest thing to make. The whole thing was made in a few hours, and then I could be cosy inside while it rained for three days straight. I didn't use a pattern for this, instead I based it off a summer weight cotton kimono I bought in Japan a few years back. It's very simple, two rectangles for sleeves, trapeziums for the back and two fronts, and giant pockets. I then used some of the leftover for a shawl-ish edge/collar (I'm sure there's a proper name for that bit) to give it a finished look and also to be nice and warm around the neck.
So I think I'm done with sewing pajamas for the time being. I do love the Carolyn pattern because it is easy to make and looks great, but I'm looking forward to doing some different projects now!
Tuesday, 5 May 2015
Spotted Stripe Shift and Me Made May
It's been a few weeks since my last post. I have been doing quite a bit of sewing, mostly of pajamas (more of the Carolyn pattern from Closet Case Files) because the weather is cooling down and the nights have become pretty chilly. All my winter pajamas were almost dead by the end of last winter, so I had to make new ones. I've been planning to do a post with all the PJs, but my brain has started rebelling against making the same pattern multiple times so I decided I needed a quick change of pace. Enter this dress.
I bought this fabric at Tessuti in January during their sale. It was actually a last minute choice; I'd had in the back of my mind making a shift dress like this with a mid-weight fabric and cap sleeves but it was really just a vague idea with no specific plan. I saw this fabric while wandering the shop looking at everything and picked it up for a closer look, thinking it would be a good choice, but then put it back because it wasn't something near the top of my sewing list. I kept wandering and was just about to go pay for the rest of my fabric when my mind came back to this, so I went and had another look and decided to pick it up.
I always forget to write down exactly what the fabrics I'm buying are, so I can't specifically remember the details of this one. It might have been a Japanese fabric, even Nani Iro, or at least it was sitting next to them. It's a cotton, and the base of it seems to have been left natural with just the green and brown spotty stripes printed on it. It has a much rougher feel than a normal cotton, more like a heavy calico or even a soft canvas.
It also holds some of its shape when draping, which works really well for a simple shift. This dress was made with no pattern and has no darts at all and no closures, just front and back pieces and facings for the neck and arms. I used a basic sloper I'd mocked up a few years ago to make a dropped waist art deco-inspired lace dress as the basis for this dress, widening the pattern out from the under bust to the sloped shoulder seam so that it would have mini cap sleeves while still being an all-in-one dress. It's gently shaped in at the waist before curving out to the hips, and then straight down at the width of the fabric. It follows the shape of the body subtly, giving a nice line but keeping focus on the print.
I only bought a metre of the fabric because I knew I was going to make a very simple dress. Before cutting I played around with deciding whether to have the spotty stripes vertical or horizontal. I'd originally been thinking horizontal, but the fabric didn't look as exciting that way. When I held it up vertically, it was just so much more interesting, and worked better with the shape and drape.
I'm very happy with this dress, with how nice it looks by itself and with a belt, and with how it matches the wood and paua shell necklace my brother and sister-in-law gave me. Now I just need to get my brain back into gear and finish off my pajamas!
Lastly, like many sewing bloggers, I'm trying to do Me Made May, wearing something I've made myself every day this month (not including PJs). It's a lot of fun to see everyone else's makes online and on Instagram. But I think by the end of the month I'm probably going to have discovered some holes in my wardrobe, and have an even bigger list of sewing projects to do!
<a href="http://www.bloglovin.com/blog/13647209/?claim=2ys952nm98d">Follow my blog with Bloglovin</a>
Sunday, 19 April 2015
Sleeved and Sleeveless Sunshine
The weather is starting to cool down here, so I'm turning my mind to warmer clothing. A few of my basic long sleeve tops have been getting on a bit, and really need to be replaced. I probably should have made more last year but I couldn't find jerseys I liked, and tops aren't all that interesting to make so there was always something else to distract me. But when I was filling in time waiting for a bus I went into the op shop next to the station. It tends to carry fabric remnants alongside second hand clothes and I found this piece of soft lemon jersey for $1.80 (and a few other things I'll use at some point in the future). Score!
Most of my t-shirts are band t-shirts, and half of those that aren't have lots of colour and big prints on them, so making something as plain as this is a refreshing change for me!
I didn't bother using a pattern for this, but I did base it on the fit of a jersey shell top I already owned. I didn't want it to be tight, but I wanted it to be fitted, so I took my measurements and then added a bit under an inch at the bust and hip, and an inch and a half at the waist. I marked these points on the fabric and then used my french curve to join the dots - I don't use the french curve a lot, but it is so useful to have, especially for drafting something like this! I cut the back piece a bit straighter than the front, so the front is more fitted.
You can also see that while the top is sleeveless, it is slightly capped. From the underarm I curved it up and out to about an inch wider than the bust mark. I also made the shoulder seam slightly sloped so that it would curve down with my shoulders rather than sticking straight out.
To finish the top off, I put a 1cm hem at the bottom and narrow rolled hems for the neckline and sleeve caps.
So after I'd made the sleeveless version, I got on to making the long sleeved top I'd bought the fabric for. I used the exact same technique for drafting this as I did on the shell top, but I didn't narrow the front in at the waist quite as much, so the front and back pieces are essentially identical this time. The other change compared to the first top is the neckline: for this one the neckline is higher and rounded. Again, I couldn't be bothered using a pattern so I took my upper arm and wrist measurements and drafted the sleeves based on them.
When I first sewed this together, though, I found I'd made a stupid error - I'd made the shoulder seams too wide so the sleeves stuck way out. It looked like a bad 80s top I'd taken the shoulder pads out of. Not a good look. But fixing a too wide seam is easy, so I just took the sleeves off, cut a chunk off each side, and sewed them back on. They're actually still a few milimetres wider than I'd ideally like, but they're much better than they were! They also ended up being bracelet length which wasn't what I planned, but I quite like the sleeve length. The neckline is again a rolled hem, and there is a 1cm hem on the sleeves and at the waist.
When I first tried sewing jersey, I used a straight stitch but quickly learned that wasn't a good idea. There's no give in the seams to match the give in the fabric, and it ends up being terrible. I've learnt my lesson now and always use a zigzag. Now sewing with jersey is easy, and I was able to whip up both of these tops in one afternoon! And in this lovely yellow, I can wear sunshine all year round.
Sunday, 12 April 2015
Floranimal Skirt
Animal prints seem to be pretty popular at the moment. So do florals. But I have something better: floral animals! This fabric has elephants, giraffes, rhinoceroses and gorillas printed on it, all made out of pretty little flowers because of course they are. I'm a sucker for kitschy fabrics so obviously when I saw this one it had to be bought. It's from Spotlight, and it's some sort of painted/coated cotton, from memory. I think it's actually meant to be a furnishing or curtain fabric - the weight of it and the kind of waxy-feeling coating on it makes me pretty sure it wasn't meant for clothes. Oh well, it makes a great skirt so who cares what the fabric was 'meant' for?
I actually found the fabric a year or more ago, but hadn't gotten around to do anything with it. It wasn't event because I didn't know what to make, I always knew it was going to be an a-line skirt with pockets, but there was always something else I wanted to make first, so this kept getting pushed back. But as the weather is cooling down I wanted a more solid weight skirt to wear, so out came this fabric.
The skirt is self drafted, given it's just a basic a-line. It's slightly high waisted, with the waistband sitting just above the belly button. The stiffness of the fabric means it keeps its shape rather than settling softly as a more flowy fabric would. I think it also gives the skirt a fun feel.
I should have gotten around to making this skirt earlier - it's one of those very easy to do projects that are completed almost before they're started, which is always nice. And it's just a really fun fabric and an easy to wear skirt. I'm pretty sure this will get a lot of wear over the next six months. Actually, it'll probably become an all-year skirt rather than just the cool weather skirt it was originally planned to be.
Friday, 27 March 2015
The Enviro Chessboard Dress
It's taken a bit longer than I wanted to get around to posting this dress. Making it was easy, but because of a useless phone and internet company who shall remain nameless but are the second largest telecommunications company in Australia and start with an O have left us without home phone and internet for a week and counting, so I have to visit neighbours if I want to do anything more than check an email. Lack of internet should give me more time for sewing, though, so there may be a backlog of projects to post once our internet issues are sorted.
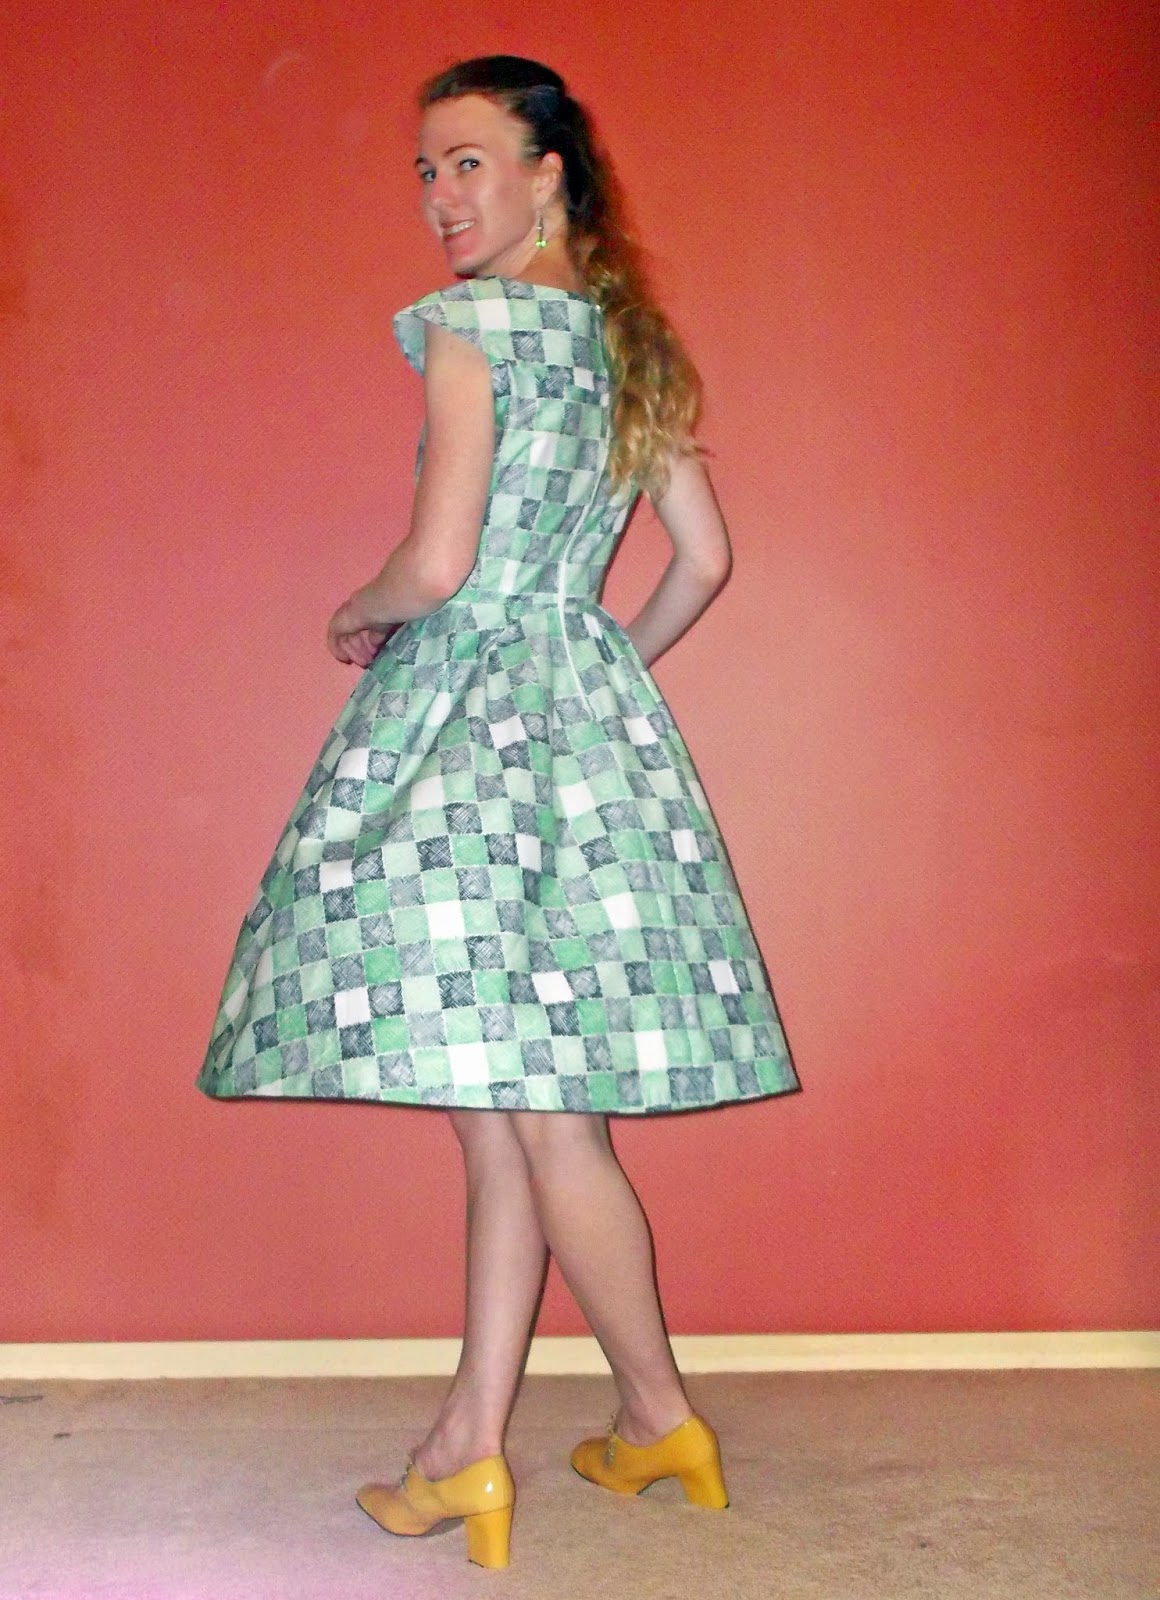
The pattern is the absolutely lovely Project Runway 2444, which everyone should own. It has gorgeous double diagonal bust darts extending up from the centre waist, giving a classic and elegant feel, and diagonal pleats in the skirt. Being a project runway pattern it has a number of variations, and my version includes the cape collar. The dress even has pockets! More dresses should have pockets, they're so useful.
This fabric is a vintage find, I'm not certain but I think it might date from the 1950s. So this dress is part of my 2015 vintage sewing pledge which A Stitching Odyssey is running. I pledged both to make vintage clothes and use vintage fabrics, six of each for some crazy reason, so this dress is one of my vintage fabric makes for the year. The dress itself does also have a vintage feel, but it's not a vintage pattern or vintage-inspired pattern, so it doesn't count for that part of the pledge.
These two photos show the close-up of the cape collar and the diagonal darts. I was happy it turned out as well as it did - although the print is a grid, when I folded it to cut the pattern pieces out it didn't sit evenly. I checked that the edges were aligned, unfolded and refolded it, measured it, and it was still a bit uneven. Honestly, there's some weird magic going on with the fabric. The bodice piece is even horizontally, but was slightly off-kilter vertically. I covered it up as best I could by stitching the collar knot down on what should be the centre, so the unevenness isn't obvious unless you look closely.
Also, don't look to closely at the zip, the stitching isn't fantastic. Nothing like a fabric with clear lines to show up a crappy sewing job! As for the name of the dress, well the fabric with its crosshatched squares of green, black, and white does look like some sort of strange chessboard. And the green made me think of either mould or the environment, and the environment is a much nicer reference point than mould.
The fabric is quite weighty and thick, giving a good amount of body to the dress. I think this pattern works best with a weightier fabric, either a heavy cotton like this or a solid satin for something fancy. The other thing I like about this dress is that it feels grown up, like I'm a real adult - or at least playing at being one!
I tend not to make patterns multiple times, but this is the second time I've made this one and probably won't be the last. It really is a great and versatile pattern, and worth buying if you don't already own it.
Thursday, 12 March 2015
The Antheia Maxi Dress
I've had my eye on this gorgeous jersey at Tessuti Fabrics for something like three years. It's such a soft and beautiful viscose jersey with a really vibrant print. But it's also a wide fabric, 1.5 metres, and I didn't want to buy it unless I had an idea that would properly make use of the print. So mostly when I visited Tessuti I'd just look at it, pat it, and then move on. But when it was discounted at their post-Christmas sale, I decided to just go ahead and finally buy a metre and a half of it, hoping I'd work out what the fabric wanted to be when I got it home. And this is what the fabric decided it wanted to be.
I obviously decided this fabric had to be a maxi dress to make full use of the print - and I'm luckily just tall enough that it doesn't drag completely on the ground, as long as I wear the right shoes and hold up the skirt when going up stairs/steep hills. I had been thinking of putting a band at the empire line, but then while playing around with the fabric draped on my dressmaker's dummy Ilse-Jane, I tried out wrapping the dress to the front or back from the side seams, and it started to look pretty good. So I cut the fabric in half and did some more playing around with pinning until I finalised on this design. In fact, this dress involved no cutting apart from dividing my piece of fabric in half. Other than that, it is just two rectangles sewn together.
So the way I put this together was very much trial and error, translating the idea in my head when wrapping fabric around Ilse-Jane into a proper dress. I first had to work out the basics of how the dress would go together, then see if it would actually be wearable, then start sewing. So I put pins at the shoulders, pins under the arms, and pins from the waist down along the side seams. I left it unpinned between the underarm pins and the waist, so that I could then pull the edges of the back piece to the front and the front piece to the back to make it fitted at the waist. I tried it on (very carefully!) with all the pins just to check that it would look alright which luckily it did - and I didn't stab myself with all the pins! woohoo! - and then sewed up the side seams to a little below the waist, the shoulder seams, and about 10cm under the arms. I possibly could have sewn it a little higher on the side seams, but wanted to make sure I had enough room left to do the waist without having to do any unpicking.
Given the way the waistline is done, either the front will be stitched higher or the back will. I wasn't sure at first which I would choose, so I did a lot of pinning one first (higher) and then the other and comparin how they looked. I decided on having the front higher (stitching it first), as it then sits nicely at the empire line with slightly triangular folds under the bust. The back sitting lower also allows the skirt to have more of a flow from the sides and below. To finish off and keep the wraps staying where they should the front and back are stitched into place at the centre with a few hand stitches. I decided against machine stitches because I didn't want them to be visible. Finally I finished all the hem edges, and left the top edges as open sleeves, which I thought suited the style of the rest of the dress. Overall, this ended up being a very easy dress to make once I worked out what to do with the fabric. I'm generally not a huge fan of maxi dresses because they can be cumbersome, but I'm glad I made an exception for this one.
Finally, I should explain the name. When I came up with this idea, I thought it had a bit of an Ancient Greece/mythology feel about it - or at least Ancient Greece via the 1930s and Hollywood. So I wanted to give it a name that reflected that influence. And the best way to do that? Look up Greek mythology on Wikipedia and find the goddess of flowers, whose name was Antheia. Hence, this dress is the Antheia.
And it got a great first outing, too - seeing a concert at the zoo. Each year Taronga Zoo in Sydney has a series of 'Twilight at Taronga' concerts in lat Summer/early Autumn. Last Friday, Conor Oberst (one of my favourite performers) was playing. It was a beautifully warm and sunny evening, so I decided the Antheia should join in the occasion. Plus, it let me get this stereotypically Sydney shot: on a ferry, on the harbour, with the bridge behind.
So I'm very glad I finally decided to buy this fabric I'd loved for years. And in using this wrapped/folded style, the full print is still being shown off all the way down the dress.
Sunday, 8 March 2015
The Carolyn Sari Pajamas
Almost all of my pajamas have either fallen apart or are on their very last legs, so when Heather Lou of Closet Case Files released her Carolyn Pajamas pattern recently it was perfect timing. And when she decided to have a pajama party in early March it was a good motivator to actually get them made quickly!
The pattern is very much a classic style of pajamas, and are very timeless and well designed. They also have pockets in the shorts! The pattern had a breast pocket, too, but I decided to leave that off this time, and I only put four buttons on the top instead of five because I only had four of the buttons I used. The fit is relatively slim for pajamas, so they look quite elegant, although if you're a person who prefers loose fitting PJs you'd probably be best to go up a size, especially on the shorts.
The fabric I used is actually a sari, which was given to me by a friend who knows how much I love to sew. She sews a bit too, and had been given the sari. but couldn't work out what to do with it. I didn't have any ideas either, because while it's a beautiful teal colour the fabric is a little thin so might not be the best for clothing. But when I saw the Carolyn pattern, I thought this would be perfect for it.
Because the sari fabric frays like crazy, I used french seams throughout. I found they helped the sleeves to set in better, which was great because I normally hate setting in sleeves (if a genie gave me three wishes setting in sleeves perfectly first time every time would be one of my wishes). I also hand finished the facings so that there wouldn't be visible stitching lines.
Overall, I really liked both the pattern and the final result. The instructions were nice and clear, the construction very smooth. Even with doing french seams, the pattern was very quick to make. This time I only made the shortsleeve and shorts version, but there's also long sleeve and long pants, which I plan to make as well with more of my sari fabric. But it's still very warm weather here even though Autumn has started, so I've probably got a bit of time before I need long-sleeve PJs.
Subscribe to:
Posts (Atom)