Sunday, 13 June 2021

Amber and the Swing Coat


 It's been a long time since my last post. So much so that I've gone from a quintessential summer item to very wintery makes with nothing in between.

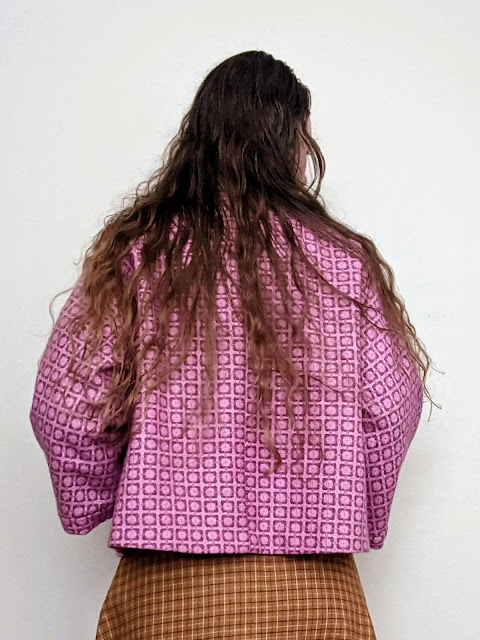
The jacket pattern is Simplicity 1319, which appears to now be out of print. It is a 1950s short swing coat with shawl collar. I made the longer length, although it still hits near the top of the hip. The fabric is a beautiful vintage wool I picked up at a Sydney Spoolettes fabric swap a few years back. It's very warm and has good structure and was relatively easy to work with. The lining is basic lightweight voile-weight cotton from my stash in pale baby pink. 

Overall, this pattern was reasonably good with only a few difficult elements. The way the shawl collar is constructed is designed to create pockets, with all the seams hidden inside. Both the lining and self fabric are folded over here, meaning there are four layers of fabric and the instructions for which pieces to fold which way were a bit confusing. I sewed one side what I thought was the right way but when I tried to turn it back the right way around it was twisted, so I had to unpick it, recheck and redo it to get it right. 

The biggest problem was with the length of the sleeves on the lining pieces. The instructions say the sleeve lining should be stitched to the seam allowance where the sleeve joins the cuff with the cuff then folded back in half and stitched down. But the sleeves of the lining piece are at least an inch too short to reach. Fortunately the cuffs are wide enough to fold in and stitch to the lining while still having part of the cuff visible, but it does mean the sleeves are a bit shorter. The pattern envelope shows the sleeves as being this slightly shorter length so I'm not sure if the problem was the illustration or the pattern pieces, but either way it didn't quite work how it was supposed to. 

The dress is the Named Patterns Amber Pinafore. The fabric is a viyella from The Sewing Basket in West Ryde, picked up on another Spoolettes outing. I've used viyella before and it's always been very soft, but this one is slightly stiffer and has a tendency to crease so requires a bit more ironing and effort to keep neat. I actually started making this dress a couple of years ago and never finished it, but pulled it out a few months back.

The waistline sits at just above the natural waist, with the deep v-necked bodice. The bodice pieces are all fully self-lined, but I left the skirt unlined as I didn't have enough of the fabric and didn't want to use a different fabric and possibly change the drape.

The back of the dress is racerback shape and does up with a buckle, but the fabric is prone to fraying so I only installed one eyelet. Only one is needed as it needs to be in the right place for the dress to sit properly and any more eyelets would just be cosmetic. Still, I would have liked to include a few more if the fabric was more stable and I was confident it wouldn't come apart.


The bodice being fully lined meant I was able to play around with how I wanted the check to sit, whether to have the centre front on the straight grain or on the bias. I decided the straight grain looked better, with the horizontal lines matching up more evenly. It also matches well to the skirt, which is approximately a half circle with the lines at the centre of the skirt matching the centre of the bodice and then curving with the bust seams.


I like the shape of the bodice pieces, but they do gape a bit at the sides. I initially thought I might have stitched them in the wrong way around (with the side edges in the centre front and vice versa), but when I tried changing them over the gaped more so I changed them back. I think if I trimmed the side edges to be shorter they would sit flatter, but it's a relatively minor issue and I decided it would take too much unstitching to be worth it to fix.


Overall I'm happy with both of these makes, despite a couple of small setbacks. I've worn the jacket several times already and found it a very good weight for transseasonal Sydney. The dress is something that can probably get wear through much of the year. 


Monday, 1 February 2021

The Forest Mint Swimmers

It's summer, so it's time for new swimmers!

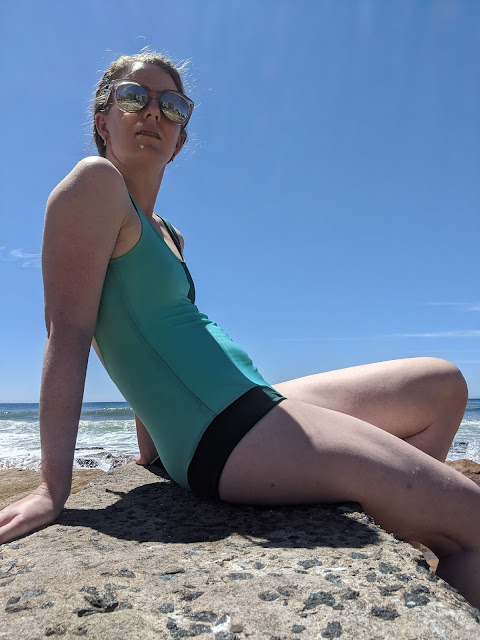
The pattern is a Cynthia Rowley for Simplicity, S8928. I had been looking for a nice one-piece that was simple and practical. I almost flicked past this pattern when looking in the catalogue because it is paired with a poorly styled and underwhelming-looking caftan, but then I noticed the interesting colour blocking. 


The lycras are both from My Hung in Hurstville. The forest green was a remnant piece which made it an easy first pick for half the suit. I then spent probably half an hour carefully looking through all My Hung's lycras to find just the right complementary colour including rich rose pinks and different purples and blues before settling on this slightly shimmery mint. It does have a higher sheen, but because it is in the same family of greens-with-just-a-hint-of-blue the shine is not distracting. I had considered using a third lycra for the leg bands - I have some bits and pieces in my stash - but in the end I felt adding a major contrast would take away from how well the two greens complement each other. 

This time I didn't make a straight size unlike for most patterns. I'm both long-waisted and have particularly small shoulders, so I needed it as small as possible at the top but it needed to reach all the way to and fit properly on my hips. I started from a 4 at the shoulders through to the high waist, then gradually lengthened and widened to reach an 8 at the crotch, while the leg band pieces I cut out in size 6. The result is suitably snug but with enough length to reach and cover properly.


I followed the instructions closely, except for the lining. The pattern as written is self lined, but I thought two layers of centre seams would look and feel far too bulky, so instead the main front and back pieces are lined with swimsuit lining. To make sure I cut them out the right size, I first sewed the two front and two back pieces together so I could use them to trace the lining fabric. This made sure everything lined up correctly and I didn't end up with straps starting or ending in the wrong place. The leg bands I did as the pattern suggested and self lined with lycra, which gave the swimsuit a neater finish both inside and out.

The instructions were straightforward and mostly easy to follow, apart from adding the elastic to the leg bands and sewing the crotch seam. The main fabric and lining pieces are sewn separately before being sewn together at the legs. The elastic is then stitched to the leg lining so it is encased in the garment. To join the crotch seam it is pulled up through the neck between the lining and main fabric and sewn in a circle. It was a bit confusing and I needed to reread the steps a few times, but the actual process was very easy in the end. Because the lining and outer are made as separate pieces I did some additional stitching at the top of the leg bands on the inside to keep them together and stop one sliding out of place.

I sewed this up almost entirely with my overlocker, which worked incredibly well. It made sure all the edges were neat, and the lining was far less likely to slip out of place than doing a zigzag stitch on a normal machine which avoided any unevennes with the fit. The elastic is stitched in with a zigzag stitch, using matching threads for each side and paying attention to make sure I started and finished the stitching at the centre seam. 

While this summer has been wetter meaning there have been fewer days to wear it, I did get to try it out last week on a 38 degree day. It held up well in the water, and the lycra didn't feel too hot to wear. Hopefully there will be some more sunny days and it can get some more use before the end of the season!


Sunday, 15 November 2020

The Wild Meadow Gown


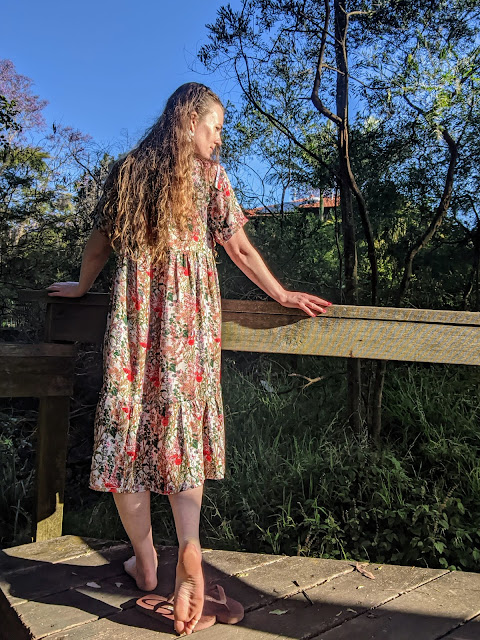
This dress is the Friday Pattern Company's Wilder Gown, which seems to be the current most popular pattern. I can see why it's so popular - it's fairly easy to make and easily adjustable and adaptable. It's loose fitting, but doesn't feel oversized, has a 70s influence but doesn't feel costumey. It has a bit of a secret pyjamas feel but is still very much wearable in public.

The fabric is a viscose rayon satin from My Hung Fabrics in Hurstville. I bought the fabric specifically for the pattern. I really liked the all over floral print, particularly the fact it has the feel of an overgrown meadow. The print is directional with the flowers all growing along the grainline, but because of the overgrown feel it isn't overly noticeable, which was lucky given I accidentally cut the bodice front pieces out upside down. The fabric is wonderfully soft with a subtle shine and an excellent drape, but it does fray a lot. Each seam is overlocked to protect the fabric from falling apart.

The pattern is easy to follow, with only a small number of pieces. The skirt is two tiers of gathered rectangles, two for the first tier and three for the second. Folded in half, my fabric was slightly narrower than the pattern piece, so for the first tier I just used the width of the fabric. The second tier is three pieces, two slightly narrower and one the correct width. 

I chose to make the gown with short sleeves and also shorten the length slightly so it wouldn't look quite so much like a nightie. The length of the full dress would have sat at a slightly awkward length, almost a maxi dress but not quite, so I made the second tier shorter by cutting it off at the lengthen/shorten line. 

Construction is generally very straightforward but I did have some issues with gathering the skirt tiers. The first line of gathering stitches I put in were too close to the edge of the fabric, which given the fabric's habit for fraying meant I wasn't able to gather the whole way along. I removed those stitches and did new gathering lower than the seam line which gathered in quite well. It did mean I had to remove that line of stitching from the finished garment, but it also avoided any more frustrations. 

The one new element to me was the gathered neckline. The pattern pieces have an extended neck almost like a turtleneck which is folded over and stitched with two lines of stitching about an inch apart, with the neck tie piece threaded through the channel between the stitching lines. This then gathers the dress when worn, pulled as loosely or tightly as desired.


I think this dress will get a lot of wear in these warmer months. Because of the print and the length I was slightly worried the dress might be a bit overwhelming, but I'm really happy with how it turned out. The only negative is that the fabric is slightly warmer than I expected it to be. The large amount of fabric gathered at the high neckline definitely contributes to that, so tying it more loosely might be one option. Overall, though, it's a lovely, dreamy, floaty dress that's both an enjoyable make and an enjoyable wear.

Thursday, 22 October 2020

Yoyo Zebra Dress


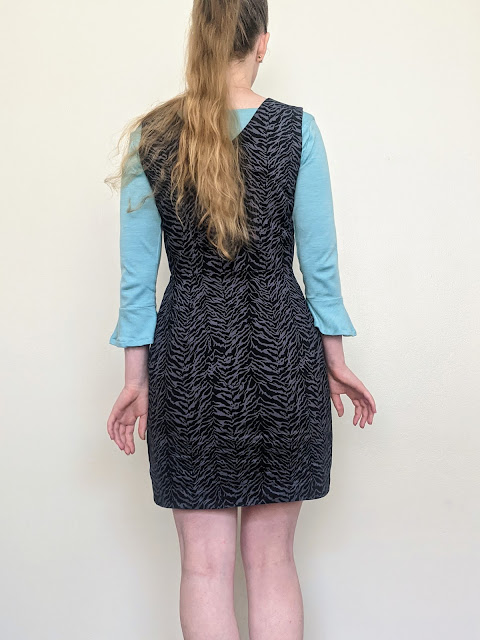
This dress is the Yoyo Zebra Dress, along with a boatneck merino top. It's a winter-to-trans-seasonal pinafore style dress, but not a childish style. The fabric for both the top and dress are from The Fabric Store. The dress is a relatively stiff printed cotton drill, and the top is a heavy merino in a rich aqua. 

The pattern is the out-of-print Yoyo Dress from Papercut Patterns. I like Papercut, their patterns are all clearly written and easy to follow, and this one is no different. It's unfortunate this pattern is out of print, given pinafore styles seem to be popular again and the zip front, v neck and angled hem of the Yoyo Dress make it stand out from many other patterns on the market. I like the fit of this dress, with the front pleats and back darts giving some shape, and really work well wtih the heavier weight of the fabric. I also think Papercut's process for attaching all in one facings is amazing, and gives a very clean finish on the outside of the garment.

I made the pattern with no adjustments, so it's a little shorter than it should be. Most Papercut patterns work pretty well for me, but some of their early dress patterns I find a bit short-waisted. With the zip front and triangular hem it ends a bit higher on the thighs than I expected, and the waist seam is about 2cm above my waist. If I had measured it properly before cutting the pattern pieces out I would have lengthened the bodice about 1cm at the shoulder seam and 1cm at the waist seam so it sat better and was a better length.

The top is the Epaulette Top from the Japanese pattern book She has a Mannish Style (translated into English as She Wears the Pants) with added flounce cuffs. As with all The Fabric Store's merinos it was lovely to work with. Being thicker it doesn't slip out of place at all and is very stable. The Epaulette Top is a pattern I've used as a base for making tops many times, because it is an easy to adjust basic shape. This version is designed to be one that can be both casual and work-appropriate and very wearable.

I like both of these pieces. So far I've definitely worn them together a few times, but both are versatile and can work with many other items in my wardrobe.

Friday, 18 September 2020

The Tidal Cardigan


This is my first proper piece of knitting! 
Late in June, after over three months of working from home and with my flat feeling very cold, I decided to try and learn to knit. As a leftie I'd tried to learn to knit a few times before but had only been taught by right handers which just didn't work very well. So I looked on YouTube for a tutorial and found this one from Noble Knits. It's very clear and easy to follow, and I found surprisingly that knitting wasn't too hard once I watched a left hander do it!  

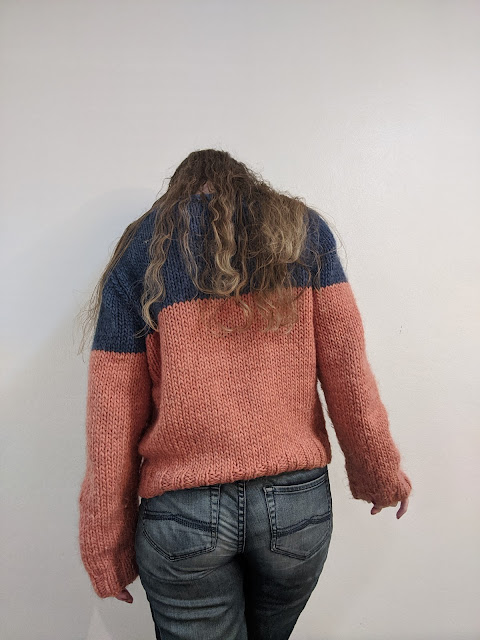
First I knitted some simple squares, then a scarf and beanie just to get the hang of it. But part of why I'd wanted to knit is my flat is extremely cold, so I wanted to make myself some warm woollens. So I started looking for some free patterns with chunkier wool, so it wouldn't be too hard or take too long to make. I also didn't want to spend a lot, so went to Spotlight to see what I could find. The yarn is Moda Vera Mawson, a 50% acrylic, 25% alpaca, 25% wool blend. It's soft and warm and very slightly fuzzy. The colours are denim and peach, although the peach is closer to a washed-out burnt orange.


I was originally planning to make a jumper and had downloaded some patterns that were right for the yarn I bought, but then I decided I don't have enough warm cardigans, so I searched for a cardigan pattern. I'd already bought two colours, so was looking for a two tone pattern. Unfortunately I couldn't find one for the right needle size, so instead I did the very sensible thing when completely new to knitting and combined two patterns: the Berroco Estuary and Berroco Clem, using the Estuary for the pattern and the Clem for how many stitches to cast on.


Knitting the cardigan itself was pretty basic as it's just basic ribbing and stocking stitch, with simple decreasing and increasing for the different pieces. It took me a few weeks to knit, but was mostly straightforward. I did make a few errors and have to redo some sections, one side I accidentally made too long before changing colour and had to undo several rows. Then on the right sleeve I ran just short of orange and had to start blue a row early. Fortunately because it is a slouchy cardigan it doesn't matter too much and isn't too noticeable.


Making buttonholes was a little more daunting and the instructions in the pattern didn't really explain it at all. So I looked at a few more YouTube videos of different ways to knit buttonholes. I did eyelet buttonholes which the pattern asked for. Because my buttons are large I was initially unsure they would be large enough, but surprisingly they do stretch wide enough for the buttons to fit through. The buttons are dark wood, and stitched on with topstitching thread.


I blocked each pattern piece to set the size. The sleeves ended up longer than expected after blocking, even thought I'd measured the length while making them. At first I was slightly annoyed by that but once I stitched it together I liked the extra length. I feel that it adds to the slouchy cozy warmth of the cardigan. I often like to pull the sleeves of my jumpers and cardigans down over my hands, so this cardigan just already has the sleeves pre-stretched.


I'm incredibly happy with how well this cardigan turned out. When I'd previously tried to learn to knit it didn't work well at all - my stitches were uneven, twisted and tension far too tight. But this is even and neat and has a great slouchy fit. I've been wearing it regularly for most of the last month.


Wednesday, 26 August 2020

The Out-Of-Office Work Dress


This dress was meant to be a new office-appropriate winter dress for resuming normal work. But we're still working from home for the foreseeable future, so instead it's office-appropriate dressing for my desk in my lounge room at home.


The lovely fabric is from The Fabric Store, and was a remnant I picked up last winter. The fabric is double sided orange and ruby, so it obviously needed a pattern that would show both. The orange side is merino, the ruby is nylon. It's a stable knit, so it's very easy to work with and maintains its shape very well.


I had initially been thinking of making a 1960s mod-style dress with contrasting bands at the neckline, waist, sleeve bands and hem, but I couldn't find a pattern that matched the image in my head. As the fabric is a remnant piece I had a limited amount of fabric, so I was a bit unsure about coming up with a dress without a pattern. So I decided to do some image searching for two tone dresses for inspiration, and found a few wrap dresses that looked really great.


After looking through different patterns, I found one that I thought would work well in two colours. The pattern is a Nancy Zieman wrap dress for McCalls, M7893. This is version A with an asymmetrical hem but with the longer sleeves of version B. The two sides of the asymmetrical hem are designed to reach a neat point, but as soon as you stop standing perfectly still they do move out of place.


While the dress is two toned, the pattern isn't. The back piece in the pattern is cut on the fold, rather than as two pieces. Cutting the back as two pieces was easy enough, but making sure I laid out the left and right fronts and each sleeve correctly so all the left side would be orange and the right side red took a bit more care. I also used matching threads for each side, changing over when I reached the centre back.


 It's unfortunate this dress isn't quite getting the wears I intended for it this year because I really like it. I'm still wearing it a bit, but it's not really an at home dress. Luckily the fabric is lovely and great quality, so even if the weather is starting to warm up now, there will be many other winters for it to be worn.


Monday, 3 August 2020

Ruska Jumper Dress


Another new make that's been in my wardrobe getting worn for more than a month. It has already been getting a reasonable amount of wear, and is comfortable for working from home while still being both relaxed and presentable for video meetings. 


This is the Ruska Knot Dress from Named Patterns' book, Breaking the Pattern. It's a great pattern book, with lots of options for each pattern and some potential for mixing and matching across patterns. My version is the straight knot dress but with the longer sleeves. 


The dress has a double front. The under dress is fitted and cut in one piece, while the knot overlay is cut in two pieces, stitched together down the front until it reaches the ties. It's connected in together along the seams, which means taking care to ensure no layers slip out of place, especially when connecting the sleeves and neckband. 


The fabric is a jumper knit from My Hung Fabrics. It's a lovely baby pink and charcoal mix - it definitely looks more pink in reality than in the photographs. It's quite soft and stretchy, but the ribbed fabric holds its shape well enough to work for the pattern. It's reversible, so there's no worry about the "wrong" side showing on the knot section. 


Unfortunately the fabric was absolutely terrible to work with. It falls apart and frays very easily, which means it had to be overlocked. But at the same time all the bits of fluff coming off got caught in the overlocker, almost clogging it. A couple of times on the longer seams I had to use tweezers to remove pieces of  thread caught behind the bottom blade. Once I finished sewing the dress I completely opened both the sewing machine and overlocker up in order to give them a thorough cleanout.


This dress is very comfy and cosy while still looking put together, very much a secret pyjamas pattern. Especially made out of this knit, it really does feel like a giant fancy looking jumper. And a giant fancy looking jumper is always great to wear.