Saturday, 13 February 2016

Midsummer Day's Dress


This is the Midsummer Night's Dream Dress by Papercut Patterns. Papercut are a great New Zealand independent pattern company who make some really elegant but easily wearable patterns.


I've so far only made a few Papercut Patterns but I've really enjoyed them. The packaging is lovely, and the instructions are clear and well-written. This dress was fairly quick to make in terms of the actual sewing. It's quick to make because although there are a few pieces - three skirt, three bodice, ties and binding - it's very straightforward to put together. All the stitching involved is straight stitching. Attaching the self bias needs a little more attention and effort to make sure it's folded and placed correctly, but it is easy enough. My fabric didn't entirely press down sharply so I had to use more pins to hold it in place, which makes sewing a little slower, but made sure that it was all even and correct.


I did find that the bodice was initially a little loose around the arms and potentially would slide down and expose bra sides. I'd already added the binding andstra ps and didn't really didn't want to undo all of that just to trim the bodice in, so I decided to put a few quick tucks/bust darts in at the sides. There are two on each side, and the print of the fabric makes them imperceptible. They're just enough to pull the dress in around the arms without affecting how the shape of the bodice or how the dress sits.


This dress was also my first rolled hem. As with all sewing machines, mine has a few different feet, some of which I've never really used. After hanging the dress for a couple of days to let the hem settle, I luckily only had to trim off a little unevenness. I then tried it on to decide how much I wanted to hem it by, and was pretty happy with where it sat. So I decided to have a go with my rolled hem foot. I also thought a rolled hem would be a good choice for the flow of this dress, as a minimal hem would have no effect on the dress' shape and movement. The fabric did try and slip out of the coiling part of the rolling foot, but it turned out almost perfectly even, which I was pleasantly surprised by.


The fabric is a rayon crepe from Spotlight. Given that the skirt is pretty much a semicircle, the print couldn't be anything directional. The dress also has a soft flow to it, so the fabric also couldn't be anything heavy. Originally I was looking at some all over floral prints, but when I saw this one I thought it would be perfect. The colourful jagged waves already have the look of movement, so it was well-suited to a dress with flow. It's also lightweight without being completely flyaway, soft but not see-through.


This one has taken a lot longer to get to here than it should have. I got the pattern in June, the fabric in September, and made the dress over the Christmas-New Year's break, and finally got around to wearing and photographing it yesterday. When I bought the pattern and fabric it was of course still cold, but the summer's been long and hot, and this dress is perfect for that sort of weather. Better late than never.


I love this pattern because not only was it easy to follow and the final dress beautifully elegant, it's also a wrap dress so it's relaxed and comfy. And isn't that one of the best things about sewing? You don't need to choose between comfort and look - with the right fabric and pattern, you get to have both.


Thursday, 4 February 2016

Flower Power Midi


Floral prints seem to be in at the moment. At least I've seen a lot on sewing blogs, in fabric stores, and in the windows of clothes shops. But I haven't seen so many giantly oversized florals like this 1950s-feel midi skirt. So I guess this skirt is both on-trend and individual.


The fabric is an old doona (quilt/duvet) cover I picked up at an op shop a few years back. Op shops can be great places for fabrics, and very cheap too. When I picked it up I didn't realise it was double sided - this skirt is only one quarter of the fabric. As soon as I saw the doona cover in the op shop I thought the giant flowers would look great as a skirt, but when I realised there were a total of twelve flowers, I thought I should come up with something that used more, if not all of it. But I didn't have any ideas, and so I put it away, buried in my overflowing fabric drawers.


From memory there was no label on the doona cover when I bought it, but the print seems to me to be a bit Skandinavian. Whether it is Ikea fabric or just trying to look like Ikea and Marimekko prints, it has that sort of style. Each flower has a different coloured centre: yellow for the centre front flower, red for the left, blue for the right.


 The skirt itself isn't really that exciting. It's self-designed, and without any measuring at all. I simply sewed up the back seam leaving room for inserting the zipper, and then went to work pinning it on my dressmaker's dummy Ilse-Jane. I eyeball measured to try and keep things even, although the side pleats are narrower than the front and back pleats. But the large-scale print means that these slight differences don't really matter - the flowers still stand out anyway. I hand-stitched the waistband down so that I only stitched through the insides of the pleats, allowing the pleats to stand out and so that there was no visible stitching line through the tops of the petals.


I have to admit that generally, the midi length isn't really my favourite. I think it can look a bit odd, either like a child playing dress ups in their mum's clothes, or  a kid wearing clothes they've outgrown. But with this print I really had no choice. There was no other way to show off those giant flowers. I do like how the length looks, I really do think it suits the print, but the length still isn't something I normally wear, so it is going to take some getting used to.

Although I'd had this fabric for ages and had known exactly what I'd wanted to make when I saw it, it took somewhere around 4-5 years to get around to making it. I do still have three quarters of it left (anyone want it?), but I have been thinking about the need to sew my stash, rather than just buying more fabric. And especially making something like this, which was not only something I'd already completely decided on but was also extremely quick to make.


Monday, 25 January 2016

Tropical Splash Swimsuit


Yay I made a new swimsuit! This is the Splash Swimsuit by Lily Sage & Co. It comes in both one piece and bikini. She released it last Northern Summer, so I'd been waiting for it to warm up before putting it on my sewing list. Then I needed to make a few work-appropriate clothes (more to come soon), but I finally got around to starting it last weekend.


I bought these fabrics at My Hung in Hurstville which has a huge range of lycras. When I went looking for fabric, this wasn't really what I had in mind. The pattern has the option to do the straps and waist and side bands in a contrast fabric which I'd decided to do, but I'd been thinking of using a fabric that was, well, at least a bit more restrained than this one. I was thinking block colour contrasts and colourful but muted main fabric, but once I saw this fish+flowers+waves+seaweed+gold foil nothing else looked interesting. And with the contrast accent again I did try and look for something that would tone it down, but nothing looked like a good match. So instead I went the whole hog and got some fluoro orange to match the fluoro orange fish. Very grown up.


Making the suit itself was pretty good. The instructions are well written, although I did need to reread how to do the straps a few times just to reassure myself that I was doing the right thing. But it was easy to follow. Sewing lycra, swimsuit lining, and swimwear elastic isn't easy - they do all have stretch, but different amounts which can make it awkward to keep things in place. There's a fair amount of basting in this pattern, which is helpful in address those issues, though.

I made a straight size 6, the smallest size. I'm long waisted, and so one piece swimsuits are often a problem for me as if they're long enough they're far too wide, but if they're fitted enough they're often too short. I'd seen a few others made up and lots of comments that the bottoms are quite high waisted. Because the pattern sat high I decided to not make any adjustments, but if I make the one piece again I will lengthen the bodice a little, maybe half an inch. As it is at the moment, the bodice pulls the bottoms up just a little bit over the waistline. It's not something that's a problem, but it is something that I'd fix in a future version.


I finished it off this past Saturday, finally getting the straps sewn. I won't post any pictures that give you a close view of them because, well my stitching is pretty woeful. I used a three point zigzag like the instructions say, and the stitching is fine. The straps themselves, however, are not so good. Trying to fold the lycra over the swimwear elastic, keep it even, keep it straight, and feed it through the machine takes either a lot more practice, or an extra five hands, or probably both. Either way, mine certainly don't look anywhere near professional. But they are functional, and they're tied up behind my back where I can't see them, so I think I can put up with them.


I made one change to the pattern, adding contrast bands on the legs. The pattern says to put in swimwear elastic and fold over the main fabric of the bottoms and stitch it in. But I tried the suit on and it was definitely already fitted enough and didn't need any elastic to keep it snugly in place. Also I was still a bit frustrated from sewing the straps and didn't want to use any more elastic unless it was necessary. Instead, I decided to cut a couple of extra pieces of fluoro orange lycra to act as contrast bands. Given every other edge has the contrast orange, I thought the legs needed the same. So I cut out the extra pieces, stitched the ends together to make one piece, stitched them right sides facing to the bottoms, then folded them over to the inside and finished off with a three point zigzag.


Although I finished the suit on Saturday I wasn't sure when I'd get to photograph it. Although Sydney's had a very tropical summer this year - constant temperatures up in the mid-high 30s followed by big thunderstorms - by the time I get home the storms are in full blast. And then this weekend was a bit grey and not really the right weather. Luckily not only is today a public holiday but it's also been fairly warm and sunny, so I took the opportunity to get the photos done.


I'm also very lucky that we have a pool so I can get the pictures in the suit's natural environment. With bonus fake rock waterfall and ferns for a 'tropical' feel. I even gave it a quick test swim (our pool's looking a bit dirty because of all the storms) and it did fantastically, no loosening or slipping out of place.


Overall, I am very happy with this suit, even if the straps are badly done. They're on, and they work, which is the important thing. And I love the slightly garish tropical fabric! I have a fair bit of it left - who knows, I might even make the bikini version and give myself a matching set.


Thursday, 14 January 2016

Hot Day Work Outfit


First post for 2016! It's taken two weeks, so it's a two-for one post this time. I did get some sewing done over the Christmas-New Year's break but hadn't gotten around to taking any photos until before work this morning. It's lucky I took these photos first thing this morning, because after reaching 40° around lunchtime Sydney had some big thunderstormsthrough the afternoon, and I got soaked to the bone crossing the road from the train station to the bus stop on my way home.


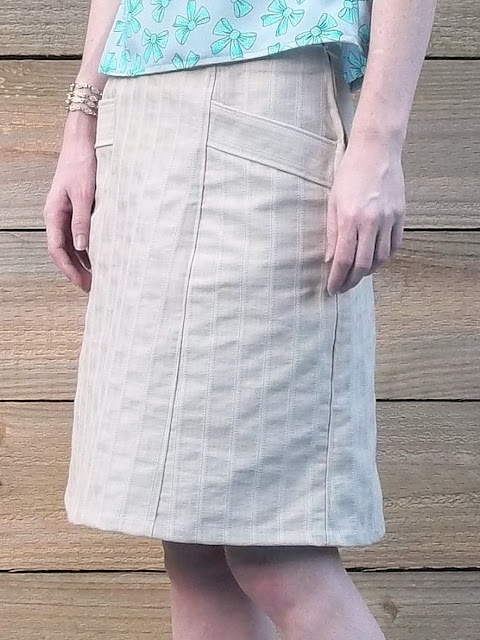
As with my silk Kate Top, this outfit is specifically things I made that I can wear to work. Both of these patterns are from Japanese pattern books. The top, which I'll call the tie shell, is pattern I from les couleurs francaises. The skirt is the first variation of the straight skirt pattern in the blouse, skirt and pants style book. Neither are English translations of the books, although there are a few diagrams and illustrations. Still, it's best to have some reasonable sewing knowledge before tackling a pattern you can't read.


The top is made with a poly crepe from fabrics by Gertie, bought at Spotlight. Unfortunately, given that it was a remnant-sized piece I was pretty limited in what I could do. I chose the tie shell because it didn't use too much fabric. I had to compromise slightly. though. Japanese patterns don't have seam allowances included, but my fabric was not quite wide enough to add seam allowances for the back piece. It still fits and the back looks fine, but there should be a little extra length in the front upper bodice. But you do what you can with the fabric you have.


Other than that little issue the top was a very easy make. I did French seams, the narrowest folded hem possible to keep as much length as possible, and finished the neckline and armholes in off-white satin bias binding. As the shoulder straps are fairly narrow, the binding overlaps itself. I decided to sew the neckline first, and then only sew the armhole binding up to the neckline stitching, rather than having overlapping stitch lines. That way it has a cleaner, even line, and looks more professional.

The skirt is made with a heavy cotton from Tessuti Fabrics. I bought it at the same time as the silk for my Kate Top. I wanted something light in colour that was simple but not completely plain. This cotton is textured but not printed, so it fight the bill well. As it has a fair amount of body it needed to be a skirt with a more solid shape, and this six gored A-line skirt seemed just right.

This pattern was trickier to use than the top. The pattern book has a handful of basic patterns and then gives options for how to vary it to make other styles. This was a relatively easy variation, except that I decided to make some extra changes. The diagonal pieces on the side fronts of the original pattern are fake pockets, but I decided I wanted real ones. Measuring out the extra pattern pieces I needed was okay, although I did manage to sew a pocket bag on inside out. Putting the zipper in was a bit more of a problem. Because the fabric is a little heavier, once you put together the lower skirt front, the pocket bag, and the pocket top, it starts to get pretty thick. My machine wasn't too happy about that, and so the stitch line is a bit wonky and the zipper is unaligned by about 5mm at the top. I thought about redoing the zipper, but decided it's not obvious so I couldn't be bothered.


So apart from getting rained on coming home, I'm happy with both top and skirt. The top is light and breathable, and the skirt's shape and neutral tone will make it a really flexible item. Plus, pockets! It's been a while since I've used a Japanese pattern and they're always a bit daunting, but I've always had good results with them. Both books have a number of other great patterns, so I've no doubt I'll make a few more of them in the future.


Wednesday, 30 December 2015

Reflections and Projections 2015-2016

To wrap up the year, I thought I'd do a post on what I've done this year and am hoping to do for next year. I do have a newly finished dress to blog, but I haven't photographed it yet so it will have to wait until next year.


Reflections on 2015

I'm pretty happy with my range of makes for this year. More dresses (eleven) than anything else, but I am a big fan of dresses. I also made nine tops, including jumpers, sleeveless/short sleeved, and long sleeved makes, and both formal and casual styles. I designed eight of my makes myself, and the rest were made from a variety of different patterns from the big 4 and independent pattern makers. I also had my first attempt with denim making my DuBarry coat dress, which was scary and often frustrating, but I'm really happy with how it turned out.


Getting to know other sewists on their blogs and Instagram has been fun and new to me. The best part was going to Frocktails in Canberra and meeting a bunch of other Australian sewists in person. Sewing can be a solitary hobby, so actually getting to meet and chat to others, to share advice and excitement about sewing, is really special.


The year of sewing has been fun, but there were a few things that I didn't quite achieve. I was a bit erratic in my posting. Pretty good in February and March, then less so through August, and a bit more frequent from September on. Hopefully in 2016 I can be more consistent. I also didn't manage to hit my Vintage Pledge aim. I did set myself a high goal of using 6 vintage patterns AND 6 vintage fabrics. In truth I did make 6 items from vintage patterns, 5 of which are published. The sixth was made as a gift for a friend and has yet to be photographed and so is yet to be posted. I did woefully on using my vintage fabrics, though. I only used two. Although to be fair I didn't check how much vintage fabric I owned before making my pledge, so I really gave myself an almost impossible goal.

And now my best/worst (favourite/least favourite?) makes of the year. Happily I only have one thing I'd really put on my 'worst' list, my slashed sleeve top. Basically, I made the slashed pieces too narrow and they're a pain to iron or keep flat, so I don't wear it.


For best makes, I have a top five. Fifth is my last make, my Tessuti Kate Top. I haven't yet worn it because it's currently the Christmas-New Year's break so I'm not at work, but I can see this getting a lot of wear. And the colours of the fabric are wonderful. Fourth is the Winter Garden Party dress. This is one of the few vintage fabrics I used this year. I'd had the fabric for a few years but couldn't find any pattern I thought suited it, but this one from Honig Design was great. The pintucks are my own addition. Third is my Antheia Maxi. I'd seen this fabric in Tessuti for a few years but never knew what to do with it, because I didn't want to cut any of the print. My self-designed wraparound maxi means all the print is still shown. It's also beautifully soft and great to wear on a really hot day.


My second favourite make of the year is one I am really proud of; my Hand-Sewn Guipure Lace Top. I bought this beautiful remnant of lace because it was heavily discounted. I got in my mind a picture of how it could be a lace top, but really had no idea of whether or not it would work. The entire thing is hand sewn which took a fair bit of time and patience, but I'm so happy with how it turned out - it's pretty much exactly what I envisioned!


My favourite make, though, is my DuBarry Coat Dress. I had a lot of stress making it, with problems with the denim, cutting out the wrong pieces, and even running out of denim before I made the facings (which then had to be completely different fabric), but it was all worth it for the final product. And because I used denim, it works as both a coat and a dress - two garments for the price of one!

Projections for 2016

I have a few big aims for 2016. I've just started a new job, so I'm going to need to make some clothes that are more suitable for wearing in an office. I want to use up as much of the fabric I already own as I can, and be more thoughtful when I buy new fabric. I need to get my overlocker fixed and learn how to use it. I also want to learn to master - or at least be reasonably good at - pants. I've made a few pairs over the years, but it's still a scary prospect. Overall, I want to try and make pretty much all my clothes for 2016, with the exception of knitted things and underwear. I'm not sure if I'll manage it, but I'll give it my best shot.


I sat down a few days ago and started writing a list of what I plan to make in 2016, and it's pretty long. There are twelve items that already have specific fabrics, although I haven't decided on the pattern to use for all of them. For my plan to master pants, I alread have a linen blend fabric and two different denims. Seeing as I already have the fabrics, I really have no excuse. I also have a swimsuit, cream skirt, and sleeveless blouse at the very top of my list to start on today and over the weekend. Hopefully having that list already written down will help me be consistent with making and posting.


So I think that's all. Happy new year!

Sunday, 20 December 2015

Silk Tessuti Kate Top aka Grown-Up Clothing Item #1


So I got offered a new job a couple of weeks back! I'd been looking for work for a while, in the meantime doing short-term projects, but nothing with any permanence or certainty. But I had an interview in mid-November and managed to be successful, so yay me! Anyway, all this has to do with sewing because this is a job in an office, where I'd previously been at a university/working from home. Although it's not a corporate or particularly formal office, I do still need to dress a bit differently to how I have been.


Tessuti released their Kate Top pattern in early November, at the same time as I made it through to the first round of the recruitment process for the job. It was a beautiful pattern, plus they had an Instagram competition for making it, so I was already tempted. When I got offered an interview I started really seriously thinking about buying the pattern. If I was successful, I'd need some more grown-up clothes, and a classic shell top is very versatile and grown-up.


The interview went well, and the offices are about a five minute walk from Tessuti's Surry Hills store, so I rewarded myself with a trip over there. Looking around for something that would be good for this pattern I spied this gorgeous silk. It's called Beautiful Spill and is wonderfully soft and vibrant and I just couldn't pass it up. I knew I had to get it and make the Kate Top with it.


Because the print is very bright I decided to make view A, with the lower neckline so that the colour wouldn't be completely overwhelming. I made size XXS, which fits very well. The top is designed to be a bit loose, and the drapey silk works really well with that bit of extra room from the bust to the waist. Being a slight build I probably could have left the bust darts off because they don't add any shaping for me, so in the future I might not include them. 


I was a little daunted about sewing with the silk. I have sewn with silk before, but only a few times, and with taffeta and dupion, not with something delicate and light like this. However it wasn't that bad in the end. I used a new size 8 machine needle, a lot more pins than normal, and went slowly, and I didn't have any issues. I also did French seams as the safest way to treat a delicate fabric, so that the raw edges would be hidden away. The only real problem I had with construction was sewing the bust darts on the wrong side of the fabric and having to redo them. There is a front and back to the fabric, but the colours are still very bright and you have to pay attention to notice the difference, which I obviously didn't do at first when doing the darts!


There were a few new techniques in making this. The side splits were something I'd never done before, and looking at the pattern pieces I had no idea how they can together. But the instructions given were really clear and easy to follow. I did stitch them down slightly differently to the instructions, doing each of the four side split sections individually, rather than doing them all in one with the hem. Although the silk did turn out to be easy to sew with, I thought it would be best to concentrate and get each edge done properly by themselves rather than run the risk of the whole thing going wrong. It might have been fine without my precautions, but better to be safe than sorry.


The other new-to-me techniques were using tearaway vilene and making self bias binding. The vilene on the neckline and armholes works to stabilise it, which is especially helpful on a light fabric like this silk. With it, I was able to hang the top as I went along, making it easier to pin things together and see if it was all coming together right. The bias binding was trickier. This silk doesn't really seem to crease - great for wearing the top, but not so good when trying to press a fold on the self bias. In the end I had to accept I wasn't going to get it pressed much at all, and just had to use a lot of pins and pay extra attention to make sure it was attached correctly. It isn't perfect, but for a first attempt and with a fabric that isn't really designed to be used as bias, I think it turned out pretty well.


So this is the first item for my (slightly) more grown-up work appropriate wardrobe. And I love it. I'm really happy I decided to use the silk and didn't avoid it because it's a scary fabric. The colours and the drape are both perfect for the pattern. And I think wearing this to an office I can pass as a real and responsible adult!


Monday, 14 December 2015

Casual Cotton Summer Pants


Although I love skirts and dresses for hot weather, sometimes pants are good for practicality reasons. Shorts are obviously a great option, but hot weather pants can be a bit trickier - they need to be breathable in both their shape and fabric choice. And I also don't want something that looks too slobby, for want of a better word. Also, I'm not really a fan of elasticated waists, which limits my options a bit.


This pattern is one I've had in my collection for a while, Simplicity 4290, a 1960s pattern for shorts and slim-fitting pants. The fabric I bought at a local op shop for the grand total of $1.50. When I saw it earlier this year I thought it would be a good choice for some casual pants. It's a lightweight black cotton with a pattern of gold foil printed stripes/zig zags. You can feel the foil printing on top of the fabric, but it's not at all stiff, so the fabric still has a soft flow.

The original pattern was moderately high waisted - it was from the early 1960s - but I wanted these to be relatively casual, so I lowered the waist by about two inches. I also widened the legs from the hips to mid-calf, as the original pattern was slim fitting, but tapered back in at the ankles. I didn't want the pants to be too fitted, because they're for summer and need to allow good airflow, but also didn't want them too wide or they'd end up looking a bit clown pant-y. I think I managed to find the middle ground!


The one thing I didn't think about when shortening the waist was the waistband. I'd already decided that, seeing as I had the stripes running vertical for the pant legs, I'd have the wide triple stripe going horizontal for the waistband. The pattern piece was a straight rectangle, so this seemed fine when I cut it out and sewed it in. But where a completely straight waistband works fine when resting at the natural waist, when you move it down lower there's all this extra curve as your body widens down to the hip. The back in particular had a bit of a gape. It obviously needed a fix.


I of course didn't want to lose that nice horizontal line of the waistband that the gold stripes gave it. So I decided to add two small darts either side of the centre back, taking care to not mess up the line of the stripes. You can see in the photo above where I've put the two darts, but I think I managed to avoid making it look like a mistake, and hopefully made it look like it's just a normal part of the pattern.


The pants have a side zip on the left, rather than a fly or elasticated waist. I used an invisible zip to make sure there wouldn't be any bulk or anything showing at the seam. I had initially been thinking about adding pockets, because pockets are such a useful thing, but didn't want to add any bulk. Also, I think it might have been a bit tricky having the side seam and a side pocket, and didn't have enough fabric in case I stuffed it up, so decided not to try and include any. I might be game to attempt it in the future if I make these again, but we'll see.


Overall, I'm pretty happy with these. They fit the bill of what I was wanting just right - they're soft, they're breathable, they're casual but not slobby, and they were very easy to make. The pattern being vintage means I'm also making my way through my vintage pledge aim for the year.