Sunday 25 November 2018

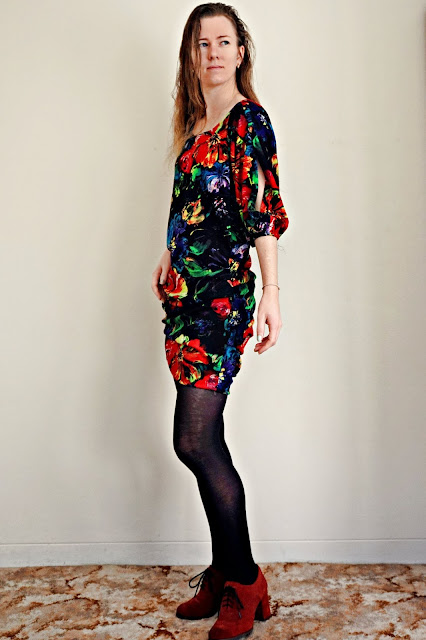
Lorenzo Jungle Dress


This is the Lorenzo Jungle Dress, a casual winter/trans-seasonal dress.  The fabric is a Liberty Lantana called Lorenzo from The Fabric Store. It's 80% cotton and 20% wool, so it's a similar weight to a flannelette but nicer feel and quality.


My initial thought for this fabric was to make a pinafore. But the fabric is very colourful and the print pretty kitschy so I was concerned it might be a bit too childish made into a pinafore. I flicked through my patterns to see what else I had that might work for the fabric and saw the dress on the cover of Stylish Dress Book (pattern E in the book) and thought it could work. I couldn't decide between the two so posted both options on Instagram asking for opinions, and the stylish dress book pattern narrowly won out.


I have made this before in a wool a number of years ago and retired it from my wardrobe earlier this year. So I knew it was something I could make easily, and knew the changes I'd want to make sewing it up a second time. Given how loose and full the dress is I decided to lengthen the hem and also narrow the pieces. The front is pleated and the lower back of the dress is gathered, so it was easy to reduce the bulk by placing the pieces over the fold line so that they were smaller. I also cut the pieces straight up the sides as the weight of this material didn't need anything extra.


This dress is an incredibly easy make. There are very few pieces, one for the front, two for the back, sleeves and patch pockets. The sleeves are cut a little narrow and do not have much in the way of fullness and the sleeve cap. Combined with the loose trapeze shape this can mean that the dress rises up when lifting up your arms, another reason why I lengthened the hem. For the hem I added around 10cm so that I would have enough extra fabric there to do some trial and error on deciding the right length.


In the end I think this dress struck a good balance in using the kitschy fabric but not turning out too childish. It's a fun print, and while it's probably designed with childrenswear in mind, I love a great print and don't think there's any problem with adults wearing something bright. This definitely isn't work wear, but I think it will find a good place in my wardrobe.


Thursday 8 November 2018

Watermelon and Ginger Jeans


I made jeans!And they're colourful and they fit and they look reasonably professional. And they're jeans that I made! It's definitely an exciting achievement. Exciting enough to jump for joy.


These are the Ginger Jeans from Closet Case Patterns. I cut out the size 2 although I should be a size 0 - I measured the test square and discovered that it had printed slightly under scale. I've never had that happen before with a digital pattern before so I'm not sure what went wrong, but fortunately it was as easily solved as cutting out the next size up. I'd also printed the low rise version but decided I wanted them high waisted. Instead of printing out the high waisted version - or even just the pages for the waist - I simply sketched the seams for size 2 up to the top of the size 20.


I've been planning to make jeans for a while. I had planned to make some last year and bought the pattern and a different piece of denim, but it was more expensive and I was too daunted to use it. So instead I bought this cheaper denim. The fabric is a very stretchy and lightweight denim from My Hung fabrics. It came in both this watermelon red and a rich aqua, but I decided I liked the watermelon shade best.


The pattern recommended basting the pieces together first and trying them on just to check for any major fit issues. I normally don't bother with any of those precautionary steps - I've never made a muslin in my life - but I decided this time I would be good and follow every step. I tried them on and the fit was great. Even my sketching the waist from low rise to high rise had worked well!


The pattern is generally well written with clear instructions and accompanying pictures. However, I did have issues with the fly. Because I tend to find the fly tricky to do, I made sure I read through the instructions and look at the pictures before sewing and also made sure each step that I followed exactly. However, when I undid the basting stitches it wasn't centred. So I unstitched the lefthand side of the zipper, repinned it further in and stitched it back in so it sat flat and straight.


I only have the one sewing machine so I couldn't do what the pattern recommends and have one machine threaded with normal thread and one with topstitching thread. Howver my machine does a spot for an additional spool pin, so I threaded jeans needles with both normal and topstitching thread, put the normal thread on the normal spool pin and the topstitching spool on the additional pin so I only had to change the needles rather than rethreading.


I used a red topstitching thread because I haven't really used it before and didn't want it to show up too much in case it was wonky and uneven. I decided I wanted wavy lines for the back pocket topstitching which I marked on with tailor's chalk and then very carefully tried to follow my lines. They aren't perfect, and my other topstitching definitely isn't even straight lines, but it's probably better than I thought it would be.


The pattern is for skinny jeans, but they don't taper in right at the bottom but are instead straight from the calf. This is the only thing I dislike about the pattern itself, and if I use it again I will definitely change it so that they are skinny all the way down. However, this is only a minor issue.


I also would make the waistband piece smaller and more tapered. The pattern says the piece is slightly longer so that it can be trimmed and adjusted to each person's waist size, and while I did trim it shorter I found that after I'd ironed my interfacing on it stretched it slightly out of shape. Ironing the waistband after it was inserted helped even the slight waviness a bit, but next time I'll make the waistband a bit too small so that it can stretch after insertion.


Anyway I am very proud of myself making jeans. It was daunting and definitely more involved than most sewing but surprisingly not hugely difficult. And I'm really happy with the fit and how they turned out. I'm even tempted to go and buy the aqua denim and make a matching pair. Akthough maybe not right away.


Wednesday 24 October 2018

The Liberty Blouse


Although it's been a while since I posted, I have done a fair amount of sewing in the past few months, and even photographed a few things, but haven't gotten around to editing the photos and writing about them. This blouse is one I started making in August, although it took over a month to finish.


The fabric is a Liberty of London Tana Lawn from The Fabric Store. The print on the fabric has an art deco feel, so my initial plan was to use a 1930s blouse pattern. Unfortunately the only 1930s blouse pattern I own needed much more fabric, so I took a look back through my patterns to find something more classic that would let the fabric do the talking.


The pattern is a re-released 1940s pattern from Simplicty, number 8243. Despite the stylised art on the pattern envelope, the sleeves are nowhere near as full. I was almost unsure about using this pattern because I didn't want big sleeves, but in the end the fit of the pattern was much slimmer than the drawing suggested.


While the blouse mostly sewed up very easily, one of the buttonholes on the sleeve cuff was very petulant. Part of the difficulty was that the cuffs are close fitting, so the buttonhole needs to be close to the edge. This meant that if I wasn't careful I'd sew over the seam allowances inside the cuff which pushed my stitching out of line. Fortunately, after two failed and unpicked attempts, the third try worked and I was able to finish the blouse off


It took me longer to finish this blouse than I'd planned because of the problems with the cuff. I had worried that I wouldn't finish it in time to wear before the weather warmed up, but since finishing I have been wearing it to work regularly. The Liberty fabric is soft and comfortable, so it's still comfortable to wear the long sleeved blouse in Spring.


Tuesday 31 July 2018

Floral Vampire Batwing Dress


I'm often a bit lazy with my sewing. I don't like changing my needle, so if I've put in a jersey needle I generally try and make a few things before changing the needle again. So when I made the side drape merino dress I went through my stash to look at other stretch fabrics I could sew up. One thing I pulled out was a heavy black and floral jersey. The pattern is another one from Drape Drape 2, the two-piece open batwing dress.


The fabric was from a Sydney Spoolettes fabric swap last year. I picked it up and put it down a few times, because I wasn't sure what I would do with it. It was a very large piece (1.5m by over 3m), a fairly thick jersey and quite a large print, so it needed a winter pattern that was big but wouldn't be overwhelming with the print.


Given I'd only just finished making something from Drape Drape 2, I'd already been looking through that book and it was fresh in my mind. It has two different batwing dress patterns, both of which I liked, but the other one looked like it needed a lighter weight jersey so I chose this one.


The pattern pieces for this dress are incredibly large and strangely shaped. Tracing them out was complicated, as there are multiple parts to join together, and it being a Japanese pattern there are many different patterns overlaid on each other on the page it can be hard to identify the correct lines. And the pieces couldn't even fit on a single piece of pattern paper, so there was lots of cutting odd bits off the side and attaching them on edges until I had what looked like a bat in flight.


Surprisingly, when I laid the pattern pieces out on the fabric, there was actually a fair bit of fabric left over. Yet the main piece, which makes up the front, sleeves, and upper back of the dress, was taller than me - not including the sleeves. The pattern pieces aren't only large, they have some strange angles which go in to making the gathered skirt, so it requires a lot of pins to cut out.


There are only a handful of steps to sew this pattern up and turn it into a mid-thigh length dress. The main thing to do is gather up the sides, which transforms a person-high piece of fabric into a skirt. The pleats on each side are sewn first, then the centre back seam, and the lower back piece is joined on. For the sleeves, the cuffs have pleats in them but were still a bit too loose and looked overwhelming with the large amount of fabric, so I added an extra pleat to make them slightly fitted at the cuffs.


I finished the dress a couple of weeks ago but haven't worn it yet. It's thick jersey, but the open sleeves mean it isn't really warm, and it sits somewhere between casual and dressy so I need to work out what it would suit. But I do like it and did enjoy making it.


Saturday 30 June 2018

Side Drape Merino Dress


Only 18 months ago I'd barely used merino and was daunted by the prospect; now I've sewn it a bunch of times and it's my favourite stretch fabric to use. It's soft and moves smoothly through the machine, and I've never had problems with it getting caught or skipping stitches. This dress and top are both in lovely merino from The Fabric Store.


The dress pattern is the one-piece side drape tank from Drape Drape 2. The pattern, as with many in the Drape Drape books, is a strange shape. This one is also very wide, and even though my piece of fabric was the size it called for it wasn't quite wide enough, so I had to fold it in slightly. This means the side drape is about an inch less than it should be, luckily not enough to make a noticeable difference to how the dress drapes.


Sewing the dress probably took less time than tracing and cutting out the pattern. The dress itself is all one piece, plus three strips to finish the neckline and armholes. It's sewn up very quickly, one shoulder seam, one full side seam, one half side seam, a hem and the finishings. The ease of sewing it matches its ease in wearing. The dress isn't fancy by any means, but it looks a step above casual. It sits in that secret pyjamas spot of being very easy and comfy but looking like you've put in more effort.


The skivvy was made back in February to take on holiday and was definitely useful in southern Patagonia. I didn'tuse a pattern for it,just traced out from some previous long sleeved tops I'd made. I thought about buying one because there are a few nice indie ones, especially from Papercut and Named Patterns, but I was making this fairly last minute and didn't feel I had the time to get either a paper pattern or print out and put together a PDF. It largely worked without a pattern, although the neck band is slightly tighter than ideal, but I can still get it over my head which is the main thing.


 The skivvyis actually black and charcoal stripe, but they're narrow stripes so it doesn't really show up in the photos. Both the dress and skivvy are very comfortable and versatile to wear, together or separately. The dress can probably get worn through most of the year given that it's sleeveless. The merino is warm when worn with a long sleeve top and tights, but it's also breathable so could be worn on its own.


Thursday 31 May 2018

Happy When It Rains Dress


This is the Happy When It Rains dress, inspired by Shirley Manson of Garbage. It also started raining here in Sydney after a dry spell as I was finishing making this, so the name seemed to fit. It even rained as I walked home this evening.


The fabric is a piece of Viyella a found at a local op shop for $2. Viyella a blend of merino wool and cotton that is soft, light and still fairly warm. It's no longer made so can only be found second hand. This means it's also often hard to find and not cheap, so finding some for so little I had to snap it up.


The piece was quite small - 1.3m by about 90cm - so I was limited in what I could make. I looked through my patterns and found this one. I've made this before and love the shift dress shape with the added detail of the bodice seam lines. It's a vintage pattern, which also seemed appropriate for the fabric. My copy is the original 1960s pattern, but it's been rereleased as Simplicity 3833.


The seam lines on the empire line bodice are definitely the highlight of the dress, but also require patience to do. Connecting the bodice to the skirt can't be done all in one go - it requires at least three steps. I sewed each side seam and bust dart, then sewed the curved front from seam line to seam line. It was a bit difficult to sew without it catching, and easier to start from the side and then sew to the centre, so that seam was also sewn in two stages.


The rest of the dress was very straightforward to put together, but I did get to use my new overlocker to finish off the seams. A few weeks ago Aldi had craft and sewing supplies as their special buys, including a Janome overlocker for $199. I've been daunted by overlockers, but it was actualy very easy to use. It did help that the machine was already threaded with small spools so I haven't had to work that out yet, but the actual sewing went pretty well.


The hem and facings are all finished by hand. Because the fabric is mottled rather than a flat colour, trying to match thread was going to be tricky. But by finishing by hand I didn't have to worry about that and was able to give the dress a clean finish.


I really like the shape of this dress. The empire line bodice is closely fitted, but the rest of the dress skims out from there making it very easy to wear.  There's also a long sleeved version which I would have made if there was enough fabric, so I guess that will have to be what I do next time.


Saturday 5 May 2018

The Tigermilk Dress


It's been a while since I last posted a new make. This was made mostly at the beginning of March, just before I went on holiday. I had thought I'd take it with my on my tip, but the ten buttons and buttonholes took a bit longer to finish than I'd expected.


The bodice fabric of this dress has had a few attempts before finally becoming this dress. I got the fabric from a fabric swap with the Sydney Spoolettes last year. It had already been cut into pieces for a straightforward pullover blouse, but never sewn up. It wasn't my style, but I loved the print. The pieces were for a large enough that I figured I could play around with them, and given it was a fabric swap they were free.


The pattern for the bodice is actually a blouse. The pattern is Simplicity 8009 from 1977. It had two options, sleeveless or puffy sleeves. Initially I decided to go for the sleeves.
The puffy sleeves were...not good. Although the fabric is soft, it didn't drape in the way I'd hoped, instead sticking out from my arms. So I removed the sleeves and used the fabric for sleeve facings instead. The length also didn't look quite right as a blouse, but the fabric is so nice and I liked how I'd sewn it together, so I decided to turn it into a dress.


The skirt fabric is from My Hung in Hurstville. I wasn't sure what colour would be the best choice, so I took a scrap with me and wandered around the store to see which one it matched with best. I was considering trying to match one of the colours in the bodice fabric, but in hte end decided to stick to something neutral. As it's just a simple A-line skirt I didn't bother with a pattern. I just measured the hem of the blouse and the length from my waist and cut out the fabric.


The dress title comes from Belle and Sebastian's first album, which I was listening to when I finished making it. And the retro feel of this dress suits their music. And tonight, it's getting an outing to see its namesakes perform.