Thursday 19 December 2019

Temperatures Climbing Dress


What do you do when it's going to be 40 degrees celsius (104 fahrenheit) and you still need to go to work? You make a light, loose dress the night before in preparation.


It's already been a hot summer here, and we're barely two weeks in. When the forecast for Thursday was for a 40 degree day I had a look through my wardrobe but there was nothing that was cool enough and ok to wear to work. So I decided I'd grab some cotton from my stash and make something.

Initially I was thinking of making a more typical sundress and even selected a pattern, but then realised its large number of pieces, zipper and fitted shape would be more complicated and be hard to get done in one night. So I decided a loose shape would be best, something with minimal shaping and only a few pieces.


I didn't use a pattern for this dress, instead drawing a quick sketch of the image in my head on my phone's note taking app. I decided to make the front with three pieces with diagonal seams to give a hint of shape. Although I didn't use a pattern the trapeze shape and lines are similar to a few other patterns, such as the Collins Top from In The Folds or the Sway Dress from Papercut Patterns.


The fabric is a Liberty of London tana lawn, Howells Ladders in orange/yellow from The Fabric Store. Tana lawn is beautifully soft and light, which makes it perfect for the heat. And the ladder print goes well with the "climbing" name for the post.


Because I didn't use a pattern the dress isn't quite perfect. The neckline is a little deeper than planned, the shoulders a little wider, the length a centimetre or two short. It's probably more of a beach coverup than workwear, but on extreme heat days comfort is the key.


It has been a long time since my last update, but I do have a few makes from this year that are ready for photographing and posting. Now that this very busy year is almost over, hopefully I'll have time to catch up a bit.


Monday 26 August 2019

Clear Sky Princess Coat


This coat has been a long time coming. I made my first winter coat back in 2006, when I had minimal experience and had never attempted anything at all comparable in terms of difficulty. It turned out pretty well and I have worn it ever since, but there were errors that I noticed more and more as I got better at sewing - the sleeve is caught slightly, the hem is not very neat, the thread I chose doesn't quite match the fabric, it's not quite warm enough. But making a coat was such a big task and battle with my machine that I put off making another one for a long time.


This coat is made with an Australiam Home Journal pattern that looks to be from the mid-to-late 1950s. Unfortunately Home Journal patterns aren't dated so I can know for sure. The coat has princess seams, a round collar and full-ish skirt. The sleeveheads are fitted, but the sleeves are slightly gathered at the cuffs. I've had the pattern for a few years, but had been daunted about making a new coat. I also wanted to make sure I found the right fabric to use. It needed to be thicker than my older coat, but also in a nice colour - just because it's winter doesn't mean coats have to be muted and dark colours. Wool is normally pretty expensive, too, so I wanted to be very sure and ready before I bought (and potentially ruined) pricey fabric.


I found this wool at 
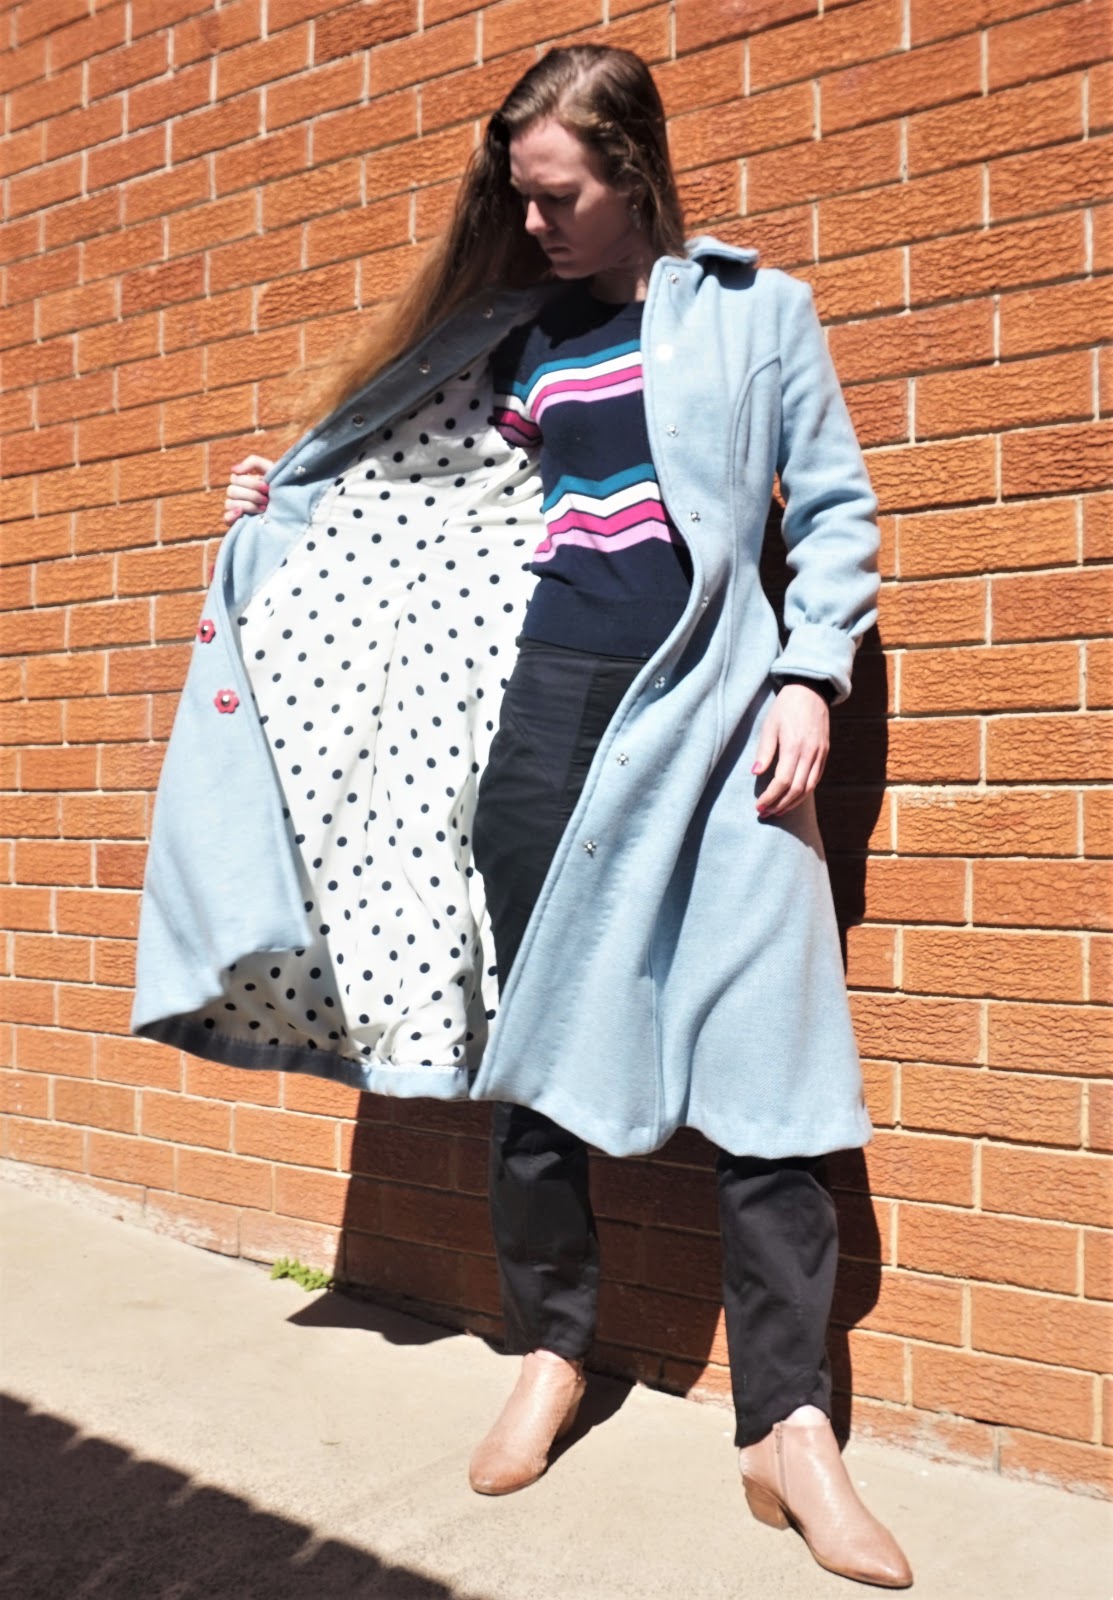
The Fabric Store in June. It's thick and warm, and at $42 was surprisingly cheap for wool coating. I loved the crisp winter sky colour, and the fact that it isn't a flat blue. If you look closely, you can see that it's a yarn dyed fabric with some variation from a light blue through to a grey. There's also a bit of pinky grey in the fabric according to all the fluff I cleaned out of my machines. The differences aren't large, but enough to give it some more depth.


Being a vintage pattern, it came in only the one size and did not include seam allowance. Markings on the pattern pieces are almost non-existent, so I had to make sure I paid close attention. I kept the fabric pinned to the pattern pieces until I needed to sew them to make sure I didn't get mixed up. I made only one change to the pattern, lengthening the sleeves as the original is bracelet length. I added about 3 centimetres, so they are long enough to keep my wrists warm but not too long to bunch up on my hands.


It took a long time to get this coat finished, partly because I took a three week break in the middle of making it. I'd been following the instructions closely, but vintage patterns don't give much detail, and no illustrations of the steps. When I got to the cuffs, the instructions just made no sense at all. The weather wasn't cold despite it being winter, so there wasn't a need to get a warm coat finished quickly, so I put it to the side. I reread the instructions every few days but it never made any more sense, so I didn't do any more work on it until the weather was predicted to turn cold again.


In the end I ignored the instructions for the cuffs and just worked it out for myself. They're probably the least neat part of the coat and might have been better if I'd followed the instructions, but I didn't want to run the risk of making a mistake. They still look fine, and I think anything I did to try and 'fix' them would probably end up looking more uneven, so I will just leave them be. And apart from the cuffs it was a smooth - if slow - sew.


Originally I was planning to use a different lining for this coat. I have some vintage 1950s lining with orange and blue roses that perfectly match the wool. Unfortunately, the piece was too small. I tried any and all pattern placements but simply couldn't get them to fit. Luckily I also had this cream and black polkadot lining in my stash, and the piece was big enough for the coat. The polkadots also match the buttons better than the floral lining would have, so I got over my disappointment of not being able to use it this time.


The buttons are also vintage, although I'm not certain when they're from. I found them at Rozelle markets about five years ago. I decided to do snaps rather than buttonholes because the thick wool was hard enough to sew seams, let alone doing buttonholes. I didn't want to run the risk of ruining expensive wool when I could just as easily have decorative buttons and snaps. Hand sewing on eight buttons and snaps did take a lot of time, but I'm happy with the neatness of the end result.


All seams and facings are overlocked to stop fraying. I stitched the princess seams down flat to keep them neat and reduce bulk. Stitching the seams down also accentuates the shape of the seam lines. The side seams aren't stitched down, however, because I added in pockets. In terms of time, there's probably as many hours of work hand sewing as there is machine. The eight buttons and snaps are sewn by hand, as are the facings and cuffs. I considered machine sewing the hem but decided to hand sew that too to keep ot neat.


I am extremely happy with how this coat turned out. It definitely shows the benefit of all the experience I have in the last 13 years in the quality of the stitching and attention to detail. But my machine still wasn't very happy with me making this, so I suspect it will be another 13 years before I make a third winter coat.


Sunday 4 August 2019

The Meridian


This is the Meridian Dress from Papercut Patterns. I've made quite a few patterns from Papercut and always find them well designed and clear to follow. The styles are relatively straightforward but often have nice design details that make them a little more interesting. The shape of this dress is pretty simple but the shaping the waist ties give to the bodice a lovely shape.


The fabric is a vintage Viyella I was given by a friend of my parents. Her aunt had a large fabric collection, and I was given this Viyella and a few pieces of raw Thai silk from the 1940s/50s. I have no ideas for the silk, but this Viyella obviously had to be a winter dress. Luckily it's the right time of year here to make a long sleeve wool dress. Being Viyella it's beautifully soft, light and warm.


This dress is the shorter length version of the Meridian Dress with long sleeves. I didn't make any adjustments in making it, and made a straight size XXS. The dress is pretty straightforward to sew. The front bodice pieces are a little confusing, and there was initially a slight gap when connecting the bodice and skirt pieces together. Because the bodice has a centre front seam as well as the ties it is a bit awkward joining it to the skirt. What I found worked was following the pattern and the stitching up the small gap the was left in the centre front. Given that the ties wrap across it also doesn't matter if the stitching is perfect because it will be hidden anyway when worn.


Viyella tends to fray so all the seams are overlocked, including inside the waist ties. The back is closed with a zipper and button. The button is a self cover button made with one of the leftover scraps. I bought an invisible zipper foot for my Janome machine so this invisible zipper is properly sewn in. I was even able to match the print up almost as close to perfect as possible. I had been pretty careful with the layout of the pattern on the fabric to try and make sure it would match on the back as that's the most visible seam, and the bodice back worked out really well. The bodie front is not evenly matched, but given the wrap ties it isn't really noticeable.


The dress sits at just above the natural waistline on me. I find Papercut's patterns are often slightly short in the waist. I'm 5'6" but longwaisted so with the skirt this pattern is still the correct length but I have found a few of their patterns in the past ended up a little shorter than I wanted. However being a narrow build, for this pattern the ties wrapping around at a low empire line probably works better than if they sat at my natural waist.


I made this dress back in June and photographed it in early July. It's been worn a few times in the last two months and has gotten many compliments. It's a very easy dress to wear - really the only thing slightly awkward with this dress is ironing the ties without leaving creases in the bodice. But overall it's a simple thing to throw on and a relatively easy sew for something that looks fairly elegant and much fancier than it is to make, which is generally my favourite type of pattern.


Tuesday 25 June 2019

Chelsea Pattern Tester Dress


Just in time for winter and rain - here's a dress for the middle of summer.
Back in February I got the opportunity to be a pattern tester for the new Chelsea Dress from Amy Nicole Studios. I've previously tested her Patti Pocket Skirt and incorporated that pattern into a dress as well. I really enjoyed that pattern, so when I got the email with the first picture of the Chelsea Dress asking for testers I thought it would be fun to try.


As this was a tester version, this was made exactly to the pattern as it was at the time. I made size 0. There were a couple of small changes to the final pattern, but nothing significant and nothing that has any bearing on my experience sewing it up. There are options on Amy Nicole's blog to do a full bust adjustment or raise the deep v neckline, but I did neither. There's also an option to make this a maxi dress, but I made the short version. So my review is just on the basic pattern, but there are options for changing it if you need to.


The bodice is very closely fitted and designed to have no ease. It is fully lined and understitched, with elastic along the plunge neck to keep it in place and stop any gaping. Sewing the elastic in is very straightforward, but understitching is a bit fiddly as the pieces are pretty small. The width of the straps and the fact they are angled to be closer together at the back also helps the dress remain secure. As I said the pattern doesn't really have ease, so the waistband is meant to be snug. The zipper and hook and eye fit very close to the body, so it's important to check the sizing is right.


I didn't have any problems with making the dress, but I did make one dumb error - I forgot to check the printer settings and it printed far too large. The skirt was easy enough to adjust - just cut thesides and length off a bit - but the bodice pieces are not easily adjusted. So, I printed out the half dozen or so sheets again before I cut into my fabric.


The bodice and hem fabric is a linen-like remnant I picked up at a Sydney Spoolettes fabric swap a few years back. I had wanted to make a short sleeve blouse or shell top out of it, but the piece was long and diagonally cut which made fitting pattern pieces tricky. I tried a few times over the years, but couldn't find something that fitted well on the piece. When I got the tester pattern for the Chelsea Dress and saw Amy Nicole's colour blocking suggestions I got this piece out again to see if I could jigsaw the bodice and hem into place and excitingly it fit!


The skirt and pockets are a basic cotton poplin. It's just slightly stiff, so it stands out with a bit of fullness. The dark blue matching the spots on the bodice and hem band was semi-accidental - I already owned both fabrics, so when the bodice pieces fit on the spots this blue was the obvious choice for skirt. The skirt is very simple, just a very basic shape gathered at the waistband with good sized pockets in the side seams. Because I'd printed the skirt pieces out too large I couldn't use the marked notches to guide where to place the pockets, so that was a combination of measuring and guessing. But they are a usable size, which is always a great bonus.


I haven't worn this dress properly yet so can't report on how it goes with a full days' wear. But it's a lovely style and the colour blocking options make it very versatile. It is a slim-fitting design on the bodice so isn't going to suit everyone, but it is an easy sew. But if you like the look of the pattern I definitely recommend it.


Thursday 23 May 2019

Linen Legs


And a third Me Made May post! I made these trousers in the summer to be a lightweight pair to wear to work on hot days. But they are still getting wears little more than a week before winter because the temperature hasn't cooled down yet. They're soft and light and very easy to wear, work appropriate but not overly formal. The top was also made a few months ago, mostly to wear to work but also as a step above casual.


I'm pretty sure the fabric for the trousers is a linen/cotton blend. I bought it as a remnant from an op shop for $2 and there was no tag or detail, but it feels and looks like linen but without so much creasing. I did a burn test and it turned to grey ash, so it is either cotton or linen or a combination. Luckily because it isn't pure linen they don't crush too much, but they do show some creases by the end of the day.


The pattern is Simplicity 8243, a 1940s blouse and trouser pattern described as 'sportswear'. While this is my first time making the trousers I have used the pattern before, making the blouse as my Liberty Blouse. They are a vintage pattern but they don't look costumey. The line drawings on the pattern envelope make the trousers look very loose and wide-legged, but they are actually fairly fitted from the waist to the hips. I noticed the same thing when I made the blouse, the 1940s illustrations are more exaggerated than the final product. 


These are very simple trousers, wide, straight legged, with small pleats at the front. The pockets are stitched closely in to the side which holds them a bit too tight, unfortunately as with so many women's patterns they are also on the small side. The trousers have a centre back invisible zipper and a hook and bar at the waistband. The zipper is an invisible zipper, but I didn't have an invisible zipper foot so it isn't the best insertion, but at least being charcoal in colour it doesn't stand out too badly. Because the fabric is a linen blend all the seams are overlocked to prevent fraying.


The top is the Tonic Tee from SBCC Patterns, made in a floral lycra jersey I got last year from a Spoolettes fabric swap. I'ts a very soft yellow-cream with a touch of pink, with small floral and leaf print. I made the extra small, which was the second smallest size. I chose that size as it's just a little looser which works well for a top that can be worn for work. Because it's slightly looser it looks better when tucked into something with a fitted waist.


 I've been wearing this top and trousers since I made them but only photographed them this morning. Me Made May has been good for getting me to get around to post my backlog of makes, as I document what I'm wearing each day. Whether I keep this pace up after the end of the month is a different question!


Wednesday 15 May 2019

The Embroidery Skirt


This is my second Me Made May post, but this skirt is not a new one. This was made last year in October. I even took photos of it, but didn't check any of them until after finishing when I discovered none of them were full sized or properly framed. For some reason it has taken me until now to get around to photographing it again even though I've worn it frequently.


The fabric is from The Fabric Store and is a gorgeous embroidered linen cotton. It was such an eyecatching fabric that I picked it up. I knew the fabric needed the be a skirt to take advantage of the print without the garment being overwhelming, and I didn't want to make anything complicated to take attention away from the embroidery. I thought a simple skirt, that was gathered or pleated in some way, would be the right way to use the fabric.


I bought a one metre piece, and the fabric was about 1.5 metres wide. Because my idea for the skirt was something fairly simple, the only decision I needed to make was which way to cut it. The embroidery is in staggered rows down the length of the bolt. My original thought was to cut lengthwise in between the rows because I was nervous about cutting through the flowers, but when I held the fabric against me to check how it looked it just didn't seem quite right.  When I turned it the other way, it looked great.


I had been very nervous that cutting through the embroidery would cause it to fray and fall apart. But using my overlocker to finish the edges of the fabric on all sides helped to stabilise the print. I decided to pleat rather than gather to minimise the bulk around the waist, and to allow the embroidery to feature as clearly as possible.


I inserted the zipper first and then used pins and my dressmaker dummy to pleat until the skirt fit. The skirt has a circumference of almost 2 metres but my waist is only 60cm, so there was a lot of pleating to do. The pleats had to be overlaid on each other to get it down to the right size. There was a fair bit of trial and error in the size of the pleats and how far to overlap them until I got it right. To hold it all in place I hand basted, machine stitched two rows of stitching, and then covered the waist with blanket-width bias binding.


Because there's a lot of fabric the skirt is quite heavy to wear. But it is fitted well so doesn't slip down. The pleating also gives the skirt a slightly full shape which swishes and moves when I walk. This skirt should have made it onto the blog ages ago, and has already had many wears. Hopefully it will have wears for many years to come!


Thursday 2 May 2019

Drifting Wolf


Me Made May time! My pledge, as the last few years, is to wear me mades every day this month. And I also plan to get back on track with blogging by posting anything I wear that I haven't yet posted. To start with is my newest make, finished just yesterday.


Both the top and pants are from Papercut Patterns. I've made quite a few of their patterns and really like them. For me, I find there are very few adjustments I need to make, and the instructions tend to be fairly simple and clear.


The pants are the Peter and the Wolf pattern, which is now sadly out of print. I've had the pattern for a few years after picking it up for $10 at The Fabric Store. However, pants are daunting to make, and these pants have what looks like complicated piecing so I had put them to the side as too hard for now. But pants are the one clothing item where I still own a lot of store bought clothes, so I'm trying to make a concerted effort to replace them with my own creations.


The legs have two front and back pieces, angled pockets, front insets, back yoke, a waistband and even facings for the curved hems. This number of different parts is honestly huge for a pair of pants. I really shouldn't have been so daunted, because this pattern was amazingly straightforward.


The fabric is a lovely mid-weight mid-stretch cotton sateen with a moderate sheen from The Fabric Store. The pattern envelope version is made in a neutral grey with satin for the pockets, yoke and front insets so they stand out. As these are pants for work I didn't want to do something too out there, so opted to use the reverse side of the fabric. Rather than showing up as different colours, it just works to highlight the construction of the pants. Each seam is also topstitched, which also helps to show off the creative shape of the pattern.


These pants weren't hard to sew. I found the pattern stepped out the process for making very well, and the legs having centre and side pattern pieces suits the skinny fit. I didn't do any adjustments, but I'd think it wouldn't be too hard to make any changes needed to fix the fit. Hemming the pants was a bit harder, as the point at the front is difficult to make sharp. Because my thread was black and the fabric is black I wanted to be careful not to cut through the stitching line, so when I turned the facings inside I wasn't able to get the point as pointy they should be, but the shape is pretty close to what it's meant to be.


The top is adapted from the bodice of the Adrift Dress. I've made the dress before and found it a bit short, particularly in the bodice, so I lengthened it for this top. As I've made the dress before and it's a simple shape. The fabric is a bamboo jersey from Tessuti in a rich royal blue. It's beautifully soft, and was very easy to sew up.


I'm extremely happy with both these makes. I've already been wearing the top for a few months, and the pants are certain to be a favourite and a pattern to make again.